
💻 Week 02 Lab
Collecting data from APIs (Weather data)
📍Location: Friday, 11 October 2024. Check your timetable for the precise time of your lab.
🥅 Learning Objectives
We have goals we want you to achieve by the end of this lab! By the end of this lab, you should be able to:
📋 Preparation
The two course activities that will feed into this lab the most are:
- 💻 W01 Lab and
- 👨🏻🏫 W02 Lecture
You will feel most comfortable during this lab if you have completed these activities.
📝 Note: By now, we assume you are familiar with the basics of the terminal (cd, ls, pwd, mkdir, cat). You can always revisit the 📝 W01 Formative Exercise or consult the ![]() Terminal Cheat Sheet if you need a reminder.
Terminal Cheat Sheet if you need a reminder.
🛣️ Roadmap
Here is how we will achieve the goal for this lab:
Part I: Meet a new Terminal command: curl (20 min)
You can start working on the lab as soon as you arrive in the classroom. Try to follow the steps below by yourself, or with a colleague near you. Your class teacher will be available to help you if you get stuck. Just raise your hand and they will come to you.
🎯 ACTION POINTS
Start the Terminal from within VS Code.
Open VS Code (use the one available on Nuvolos or install it on your computer) then navigate to the menu bar and click on
Terminal>New Terminal. This will open a new terminal window at the bottom of the VS Code window.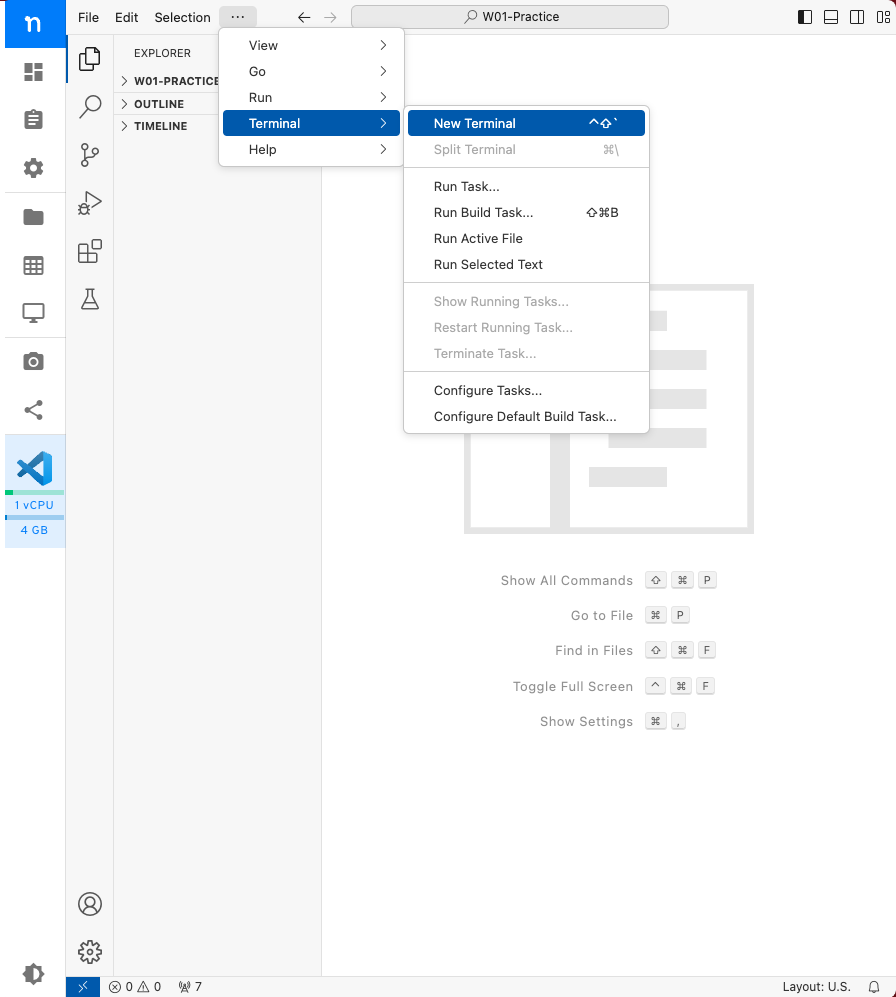
Figure 1. How to open a new Terminal window without leaving VS Code. Create a folder for this lab. Open the Terminal app on your own machine or on Nuvolos and create a new folder under an appropriate location, call this folder
W02-Lab.If you are using Nuvolos, I suggest you create a new folder at
/files/W02-Labto save your files.If you are working on your computer and you did the 📝 W01 Formative Exercise, then I suggest you reuse the
DS105Afolder we created there. You could place the new folder at~/DS105A/W02-Lab, for example.Open the folder on VS Code. Go back to the menu at the top of the VS Code window and click on
File>Open Folder.... Navigate to the folder you just created and clickOpen.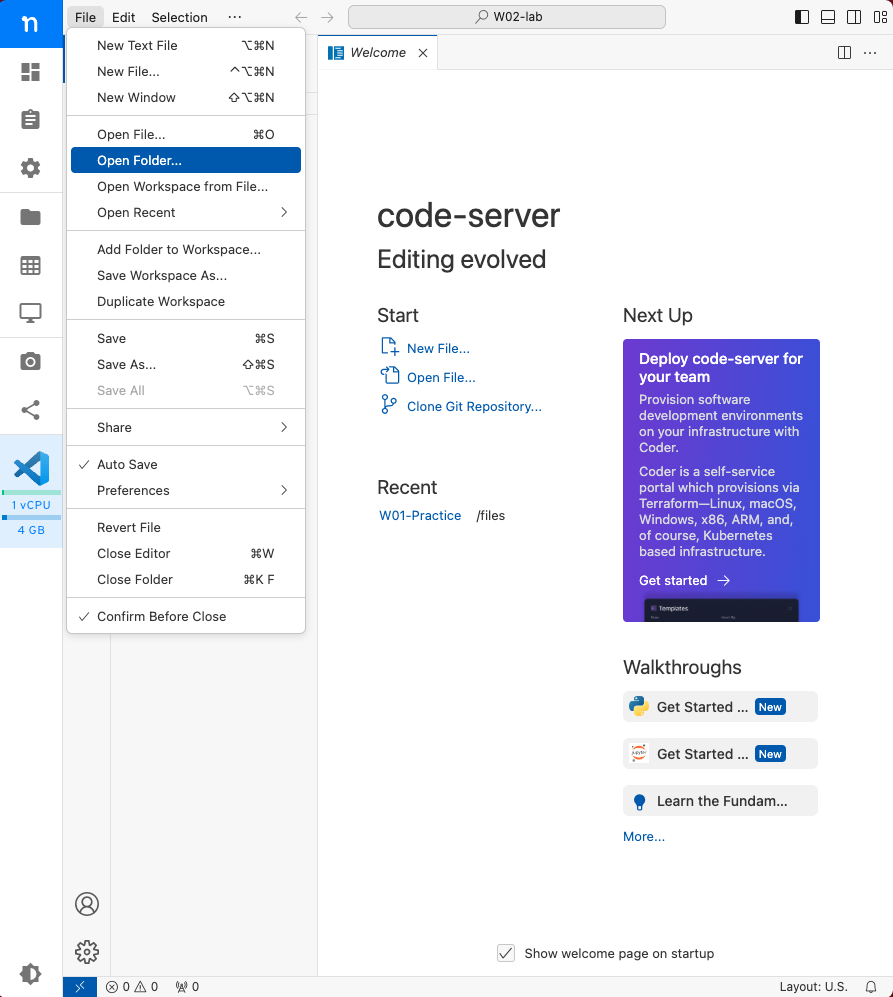
Figure 2. How to open a folder in VS Code. After this, navigate to the location of your “W02-Lab” to open it. You might need to reopen the Terminal window now that you have a fresh new folder open in VS Code.
☔️ Is it going to rain? Type the command below, according to your Operating System, see there then hit ENTER.
Zsh/Bash ( Mac or
  Linux) users
curl v2.wttr.in/London
 Windows users
curl might not be available on your machine. Give it a go first:
curl v2.wttr.in/LondonTwo things can happen:
If you see a prompt asking you to type in the address, this means
curlis available on your machine, but you will need to type the address manually. Just pastev2.wttr.in/Londonand hit ENTER.If you get an error saying something like
curlis not recognized as a command, don’t worry! You can use theInvoke-WebRequestcommand instead. You can use theInvoke-WebRequestcommand instead. Type the following command and hit ENTER:
(Invoke-WebRequest -Uri v2.wttr.in/London).ContentYou should see a very colourful weather forecast for London printed on the screen:
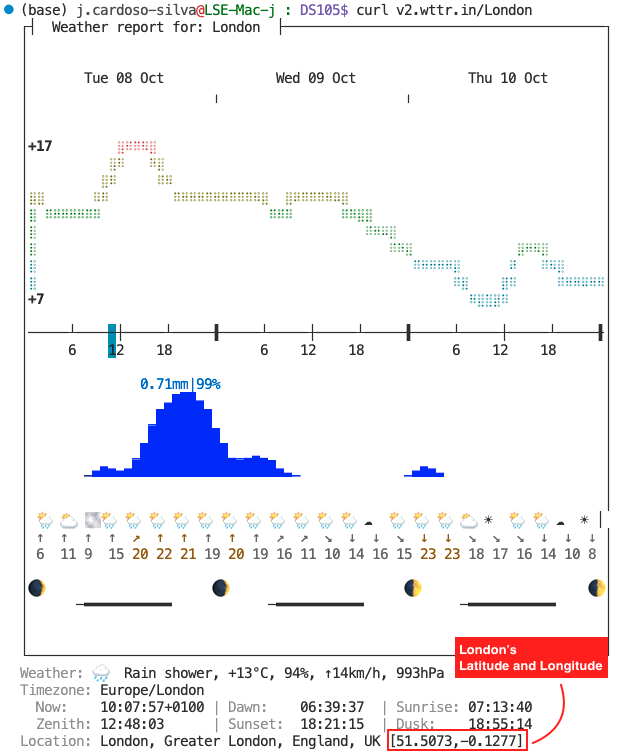
v2.wttr.in/London in the Terminal showing the weather forecast for London on 8 October 2024.💭 Think about it: At the end of the output, you will find the city’s latitude and longitude location. London’s should be [51.5073,-0.1277]. You can always visit this website to check if the latitude and longitude indeed correspond to the city you are searching for and not a homonym.
Choose a different location. Play with it! Replace the word
Londonin the command above with the name of a different country capital and compare the weather forecast.💭 Think about it: What happens when I type the name of a city that has a space in it, like
New York? Do you get the weather forecast for the right location?
🗣️ CLASSROOM DISCUSSION: Your class teacher will mediate a brief conversation about the following topics:
- How come does this weather data show up on the terminal? Is it magic? Is the data stored in the terminal somehow?
Wild guesses are encouraged! 🤓 Don’t rush online or to ChatGPT to search for a response.
👨🏻🏫 TEACHING MOMENT:
Your class teacher will talk about how the curl command works, plus introduce you to a few acronyms:
- API (Application Programming Interface)
- HTTP (HyperText Transfer Protocol)
- URL (Uniform Resource Locator)
Click here for spoilers
The curl command is a tool to transfer data from or to a server, a machine somewehere else on the Internet (not your computer). The curl command can speak many ‘languages’ (protocols), but the most common one is HTTP.
HTTP stands for HyperText Transfer Protocol. It is a protocol that defines how a server serves data to a client (your Terminal, in this case). The data it transfers is typically plain text (in the form of web pages, CSV files, JSON files, etc.), but it can also be images, videos, or any other type of file. The word hyper in the name refers to the fact that it can link to other data. The HTTP protocol is part of what enables you to click on a link in a web page and be taken to another page.
An API is a set of rules that allows one software application to communicate with another. The developer of an API decides what data they want to make available to others, and the precise format a user needs to send a request to get that data.
In this activity, curl sent an HTTP request to the server at v2.wttr.in. The developers of this server have intentionally made it so that when you send a request to it, it sends back a weather forecast for a specific location. The /London bit after the main URL is a path, almost like a folder in a file system and it is how the server knows what data you are asking for.
Part II: Save weather forecast data to a file (30 min)
We are going to use a different weather forecast API this time, called OpenMeteo. It is a free weather forecast API that provides weather data in JSON format instead of plain text and has a lot more information available.
🎯 ACTION POINTS
Follow the steps below to complete this part of the lab:
Visit the Open-Meteo page. Use any browser for this step. Scroll down a bit to see their sample
curlcommands: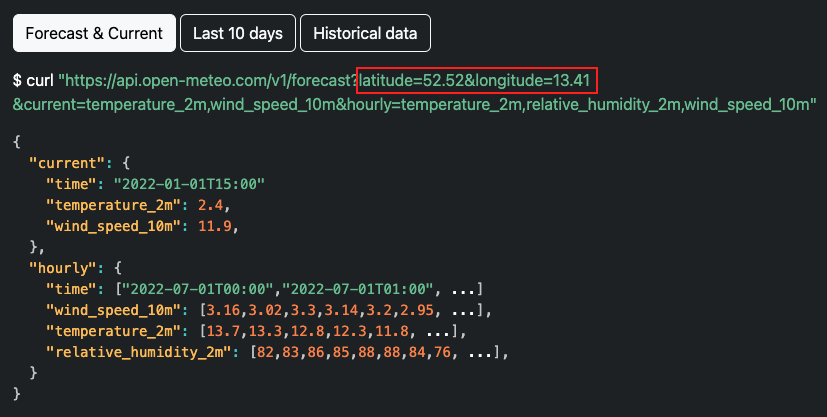
Figure 2. The OpenMeteo website provides a sample of how you could construct the URL for a curlcommand and the type of results you would get. The highlight of the latitude and longitude parameters are of my own making.
👥 IN GROUPS. You will feel more productive in these next steps if you work in pairs or small groups.
Check the weather forecast again. Explore the sample commands and the Open-Meteo API Docs page and figure out how to build the URL for this API such that you get the 24-hours weather forecast for today.
💭 Think about it: What do you think the symbols
?and&in the URLs represent?What was the weather like on the same day last year? Keep doing some investigative work through the Open-Meteo API and figure out how to build the URL for this API such that you get the 24-hours temperatures (not forecast!) for the same day last year.
Save the results to a
.jsonfile. Replace<URL1>and<URL2>with the URLs you constructed in the previous step and run the following commands in the Terminal:mkdir data # Create a folder to store the data inside W02-Lab curl <URL1> > ./data/weather_forecast_2024.json curl <URL2> > ./data/historical_data_2023.jsonThe
>command is used to redirect the output (plain text in the form of a JSON file) of thecurlcommand to a file.Check the files. This time, open the JSON file with VS Code, then right-click anywhere on the file page and select “Format Document”. Take a look below for a before and after example:

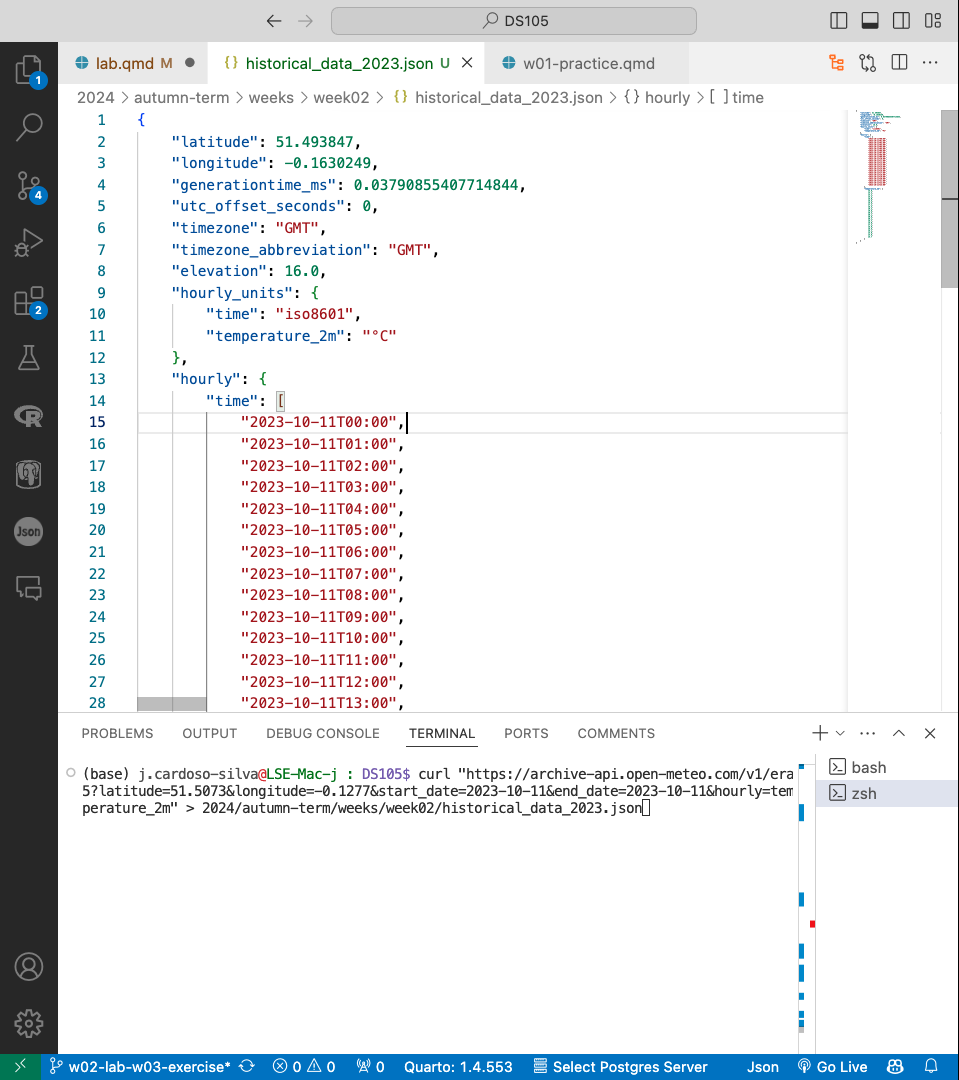
Notice how the entire content of the file is enclosed within a pair of curly braces {}. Inside the braces, there is a key-value pair at the top level. As you go deeper into the JSON structure, you will find more key-value pairs, lists, and dictionaries.
📋 NOTE: JSON stands for JavaScript Object Notation and is an industry-standard format that can be thought of as a mix between dictionaries and lists in Python. It is human-readable and easy to parse, making it a popular choice for data exchange between computer systems and programming languages. We will use JSON files A LOT in this course, so getting comfortable with them early on is essential.
⭐ Pro-tip: After opening a JSON file in VSCode, you will see arrows pointing downwards if you hover your mouse near the line numbers. Click on any of them to collapse or uncollapse parts of the JSON, making it easier to understand the data you are seeing.
👨🏻🏫 TEACHING MOMENT: Your class teacher will invite your attention, demonstrate how you would have navigated the website until
a solution, resolve frequently asked questions and guide you into the next task.
Part III: Create a Jupyter Notebook (40 min)
You have gathered and stored data from an API in a JSON file. Now, let’s load this data into a Jupyter Notebook and manipulate it until we can produce some insights.
🎯 ACTION POINTS
(Feel free to tackle these alone or in groups.)
Create a new Jupyter Notebook. Open Jupyter Notebook on your machine or on Nuvolos and create a new notebook called
W02 Lab.ipynb. Save it in theW02-Labfolder.Load the weather forecast data. Load the weather forecast data from the
.jsonfile you saved in the previous step using the code below:import json with open('./data/historical_data_2023.json') as f: historical_data = json.load(f) with open('./data/weather_forecast_2024.json') as f: weather_forecast = json.load(f)Run the code above and then check if the data was loaded correctly.
💭 Think about it: How do we know if the above worked? Is it just because it didn’t throw an error?
The objects
historical_dataandweather_forecastare Python dictionaries. Print the keys of these dictionaries to understand the structure of the data.
Click here for spoilers
You can use the keys() method of a dictionary to get a list of all the keys in that dictionary. Create a new cell in your Jupyter Notebook and run the following code to inspect the keys of the historical_data dictionary:
historical_data.keys()What was the temperature at 11:00 last year and what was the forecast for the same time this year? You will have to figure out how to navigate the JSON structure (dictionaries and lists) until you get to the place where the temperature is stored.
💭 Think about it: How do you access the value of a key in a dictionary?
💭 Think about it: Once you hit a list object, how do you extract an element from a specific position?
🏆 Challenge Overall, how did the hourly temperature change from last year to this year? Compare each hour of today’s forecast and last year’s records and then take an average.
For this you will need to use the following Python skills:
- Creating a new, empty list
- Accessing values of the same position in two different lists
- Calculating the difference between two values and storing it in a list
- Looping through a list to calculate the average
🤖 AI Tip: If you ask ChatGPT for help, make sure to provide plenty of details about what you need and how things are done in your course. It’s also important to use it to build parts of your solution rather than the final solution. This will ensure you are in control of your learning!
For example, you could query it like this:
“Here’s the code I have:
[PASTE THE LINES OF CODE]
Now I need to answer the question ‘’how did the hourly temperature change from last year to this year?’.
Don’t give me code yet, just guide me into the steps I need to write pure Python code (no external Python libraries allowed) to answer the question. I am a beginner in Python, but I already know about if-elses, lists, dictionaries and for loops. Not sure I understand functions yet.”
If you don’t constraint the AI, you will get complex code that will work but you won’t understand.
👨🏻🏫 TEACHING MOMENT: Before it’s time to leave the room, your class teacher will build a solution in front of the whole class. Pay close attention even if you manage to solve step 5 above – you might see different ways to solve the same problem.
Now what?
You have completed the lab! 🎉
Keep practicing
You are now ready to face the 📝 W03 Formative Exercise on Nuvolos. This exercise will be a natural continuation of today’s lab.
Got questions?
Post any question you might have to the #help channel on Slack, attend a support session (office hours or drop-in session) from Monday to Wednesday next week.