
📝 W01 Formative Exercise - Meet the Terminal
2024/25 Autumn Term
You can start working on this even before the first lecture. This activity is designed to help you get into the mood of the course and familiarise yourself with some of the tools and concepts we will be using throughout the term.
⏳ How long will this take?
On average, I’d expect this to take around 2 hours of practice:
- Task 1: about 10-15 minutes
- Task 2: ~45 minutes if you read and follow the instructions mindfully as intended. (TASK 2 IS THE MOST CRUCIAL ONE)
- Task 3: installation issues are notoriously tricky to estimate, as every computer might throw different errors. Give it a try for a maximum of 1 hour then reach out for help on Slack or via office hours.
- Task 4: about 10 minutes
⏲️ Due Date:
- 3 October 2024, 3.59 PM (just before the first lecture)
🎯 Main Objectives:
If you complete this assignment successfully, you will have learned to:
- Find the terminal app on your computer.
- Use the Terminal to locate and navigate directories and files.
- Create a directory structure and files using the Terminal.
- Install and set up Python 3 on your computer.
- Run Python scripts from the Terminal.
Task 1: Where are my files stored?
Have you ever used a word processor like Microsoft Word or Apple Pages to create documents? Here, I’m talking about the offline versions, not cloud-based apps like Google Docs or Microsoft Word Online.
When we create a document in MS Word or Pages, we need to save it somewhere on our computer. Many save the file to the Desktop or the Documents folder or in a folder you made just for that document. But if I asked you to pinpoint exactly where that file is stored on your computer without using the Finder (Mac) or File Explorer (Windows) search bar, do you think you could do it?
Let’s find out! Follow the steps below, paying close attention to the instructions.
🎯 ACTION POINTS
Open Microsoft Word or Apple Pages on your computer.
👉 If you don’t have either, you can use the built-in text editor on your computer (Notepad on Windows, TextEdit on Mac).
👉 Are you on a Chromebook? We will add helpers soon, but for the meantime, install the ‘Linux Development environment’.
Create a new blank document and type the following, replacing the placeholders with your own personal information. Feel free to apply formatting to the text, such as bold, italics, or underlining.
DS105A (2024/25 Autumn Term) - Formative Assignment 01

Name: [Your Name]
Degree Programme: [Your Degree Programme]
Year of Study: [Your Year of Study]

I am excited to start this course because [Reason]!
Save this document to the Documents folder on your computer. When asked to give a name to the file, name it
ds105a_formative_01. Keep the file format as.docx.💡 If you are on Mac and you don’t see the
.docxfile format, you can enable it by going toFinder>Preferences>Advancedand checking the box next to “Show all filename extensions”.Close the document and the word processor.
Open Finder (Mac) or File Explorer (Windows) and navigate to the Documents folder. You should see the
ds105a_formative_01file you just saved.
📑 TAKE NOTE:
Locating the file like this is easy, right? Finder (Mac) and Windows Explorer (Windows) have bookmarks that take you directly to the Documents folder. What many people don’t realise is that these pre-defined locations, Desktop, Documents, Downloads, etc., are shortcuts to specific folders (also called directories) on your computer. These folders are stored in a larger folder called the “home directory,” named after your computer’s username.
Your home directory is in a folder called C:\Users on Windows or Users on Mac. This “Users” folder is contained within another folder called C:\ on Windows or / on Mac. This top-level folder containing everything on your computer is called the “root directory.”
The root directory is your computer’s highest-level folder containing all other folders. Within the root directory, there are specific folders for each user who share that computer. For example, on a Mac, the home directory for a user named ‘Jack’ would be /Users/Jack, with the first / representing the root directory in the file path. On Windows, we can think of the C:\ folder (the C drive) as the root and so the home directory for a user named ‘Jack’ is at C:\Users\Jack.
⭐ It is important to know the path to where you are! Whether you are using the Finder or File Explorer, it is important to start recognising locations (paths) on your computer. Click on the corresponding tab below to see how you can view the path to the file you just created on your computer.
 Windows users
If you are on Windows, click on the OS (C:) drive to start navigating from the root directory. From there, keep navigating, branching out, until you reach your home directory. Then, keep navigating until you reach the Documents folder. You should see the ds105a_formative_01.docx file you created.
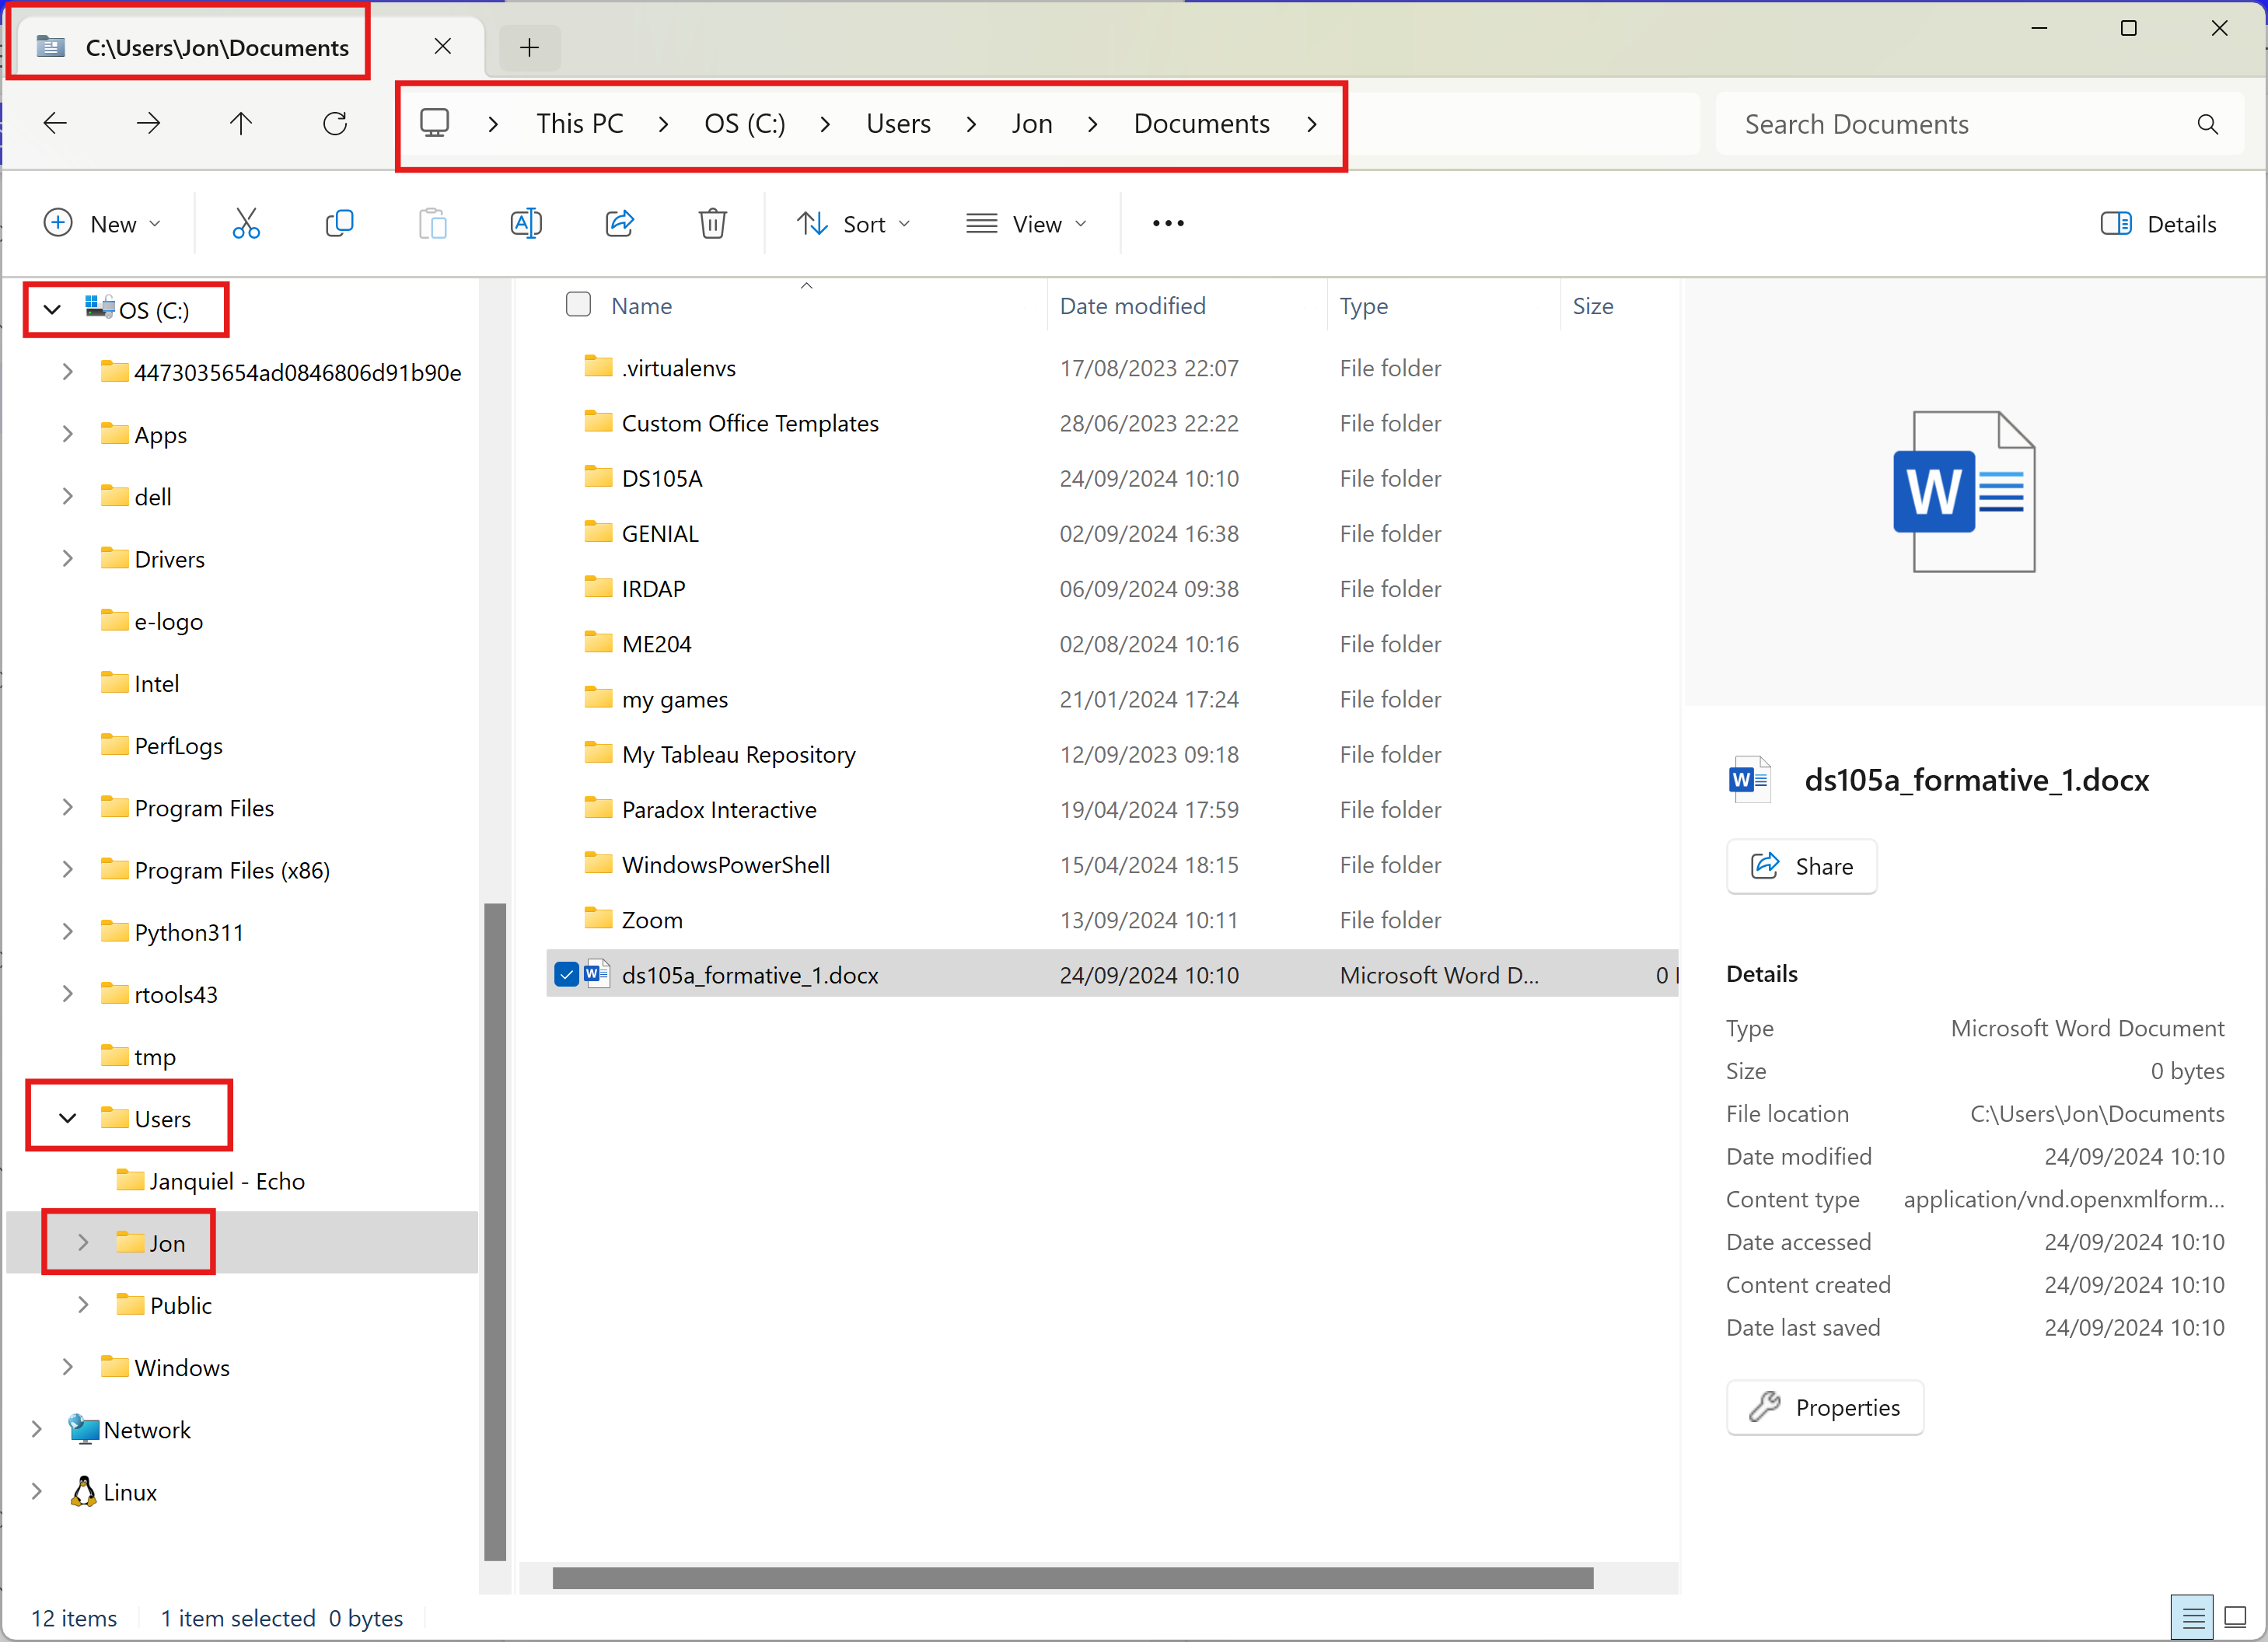
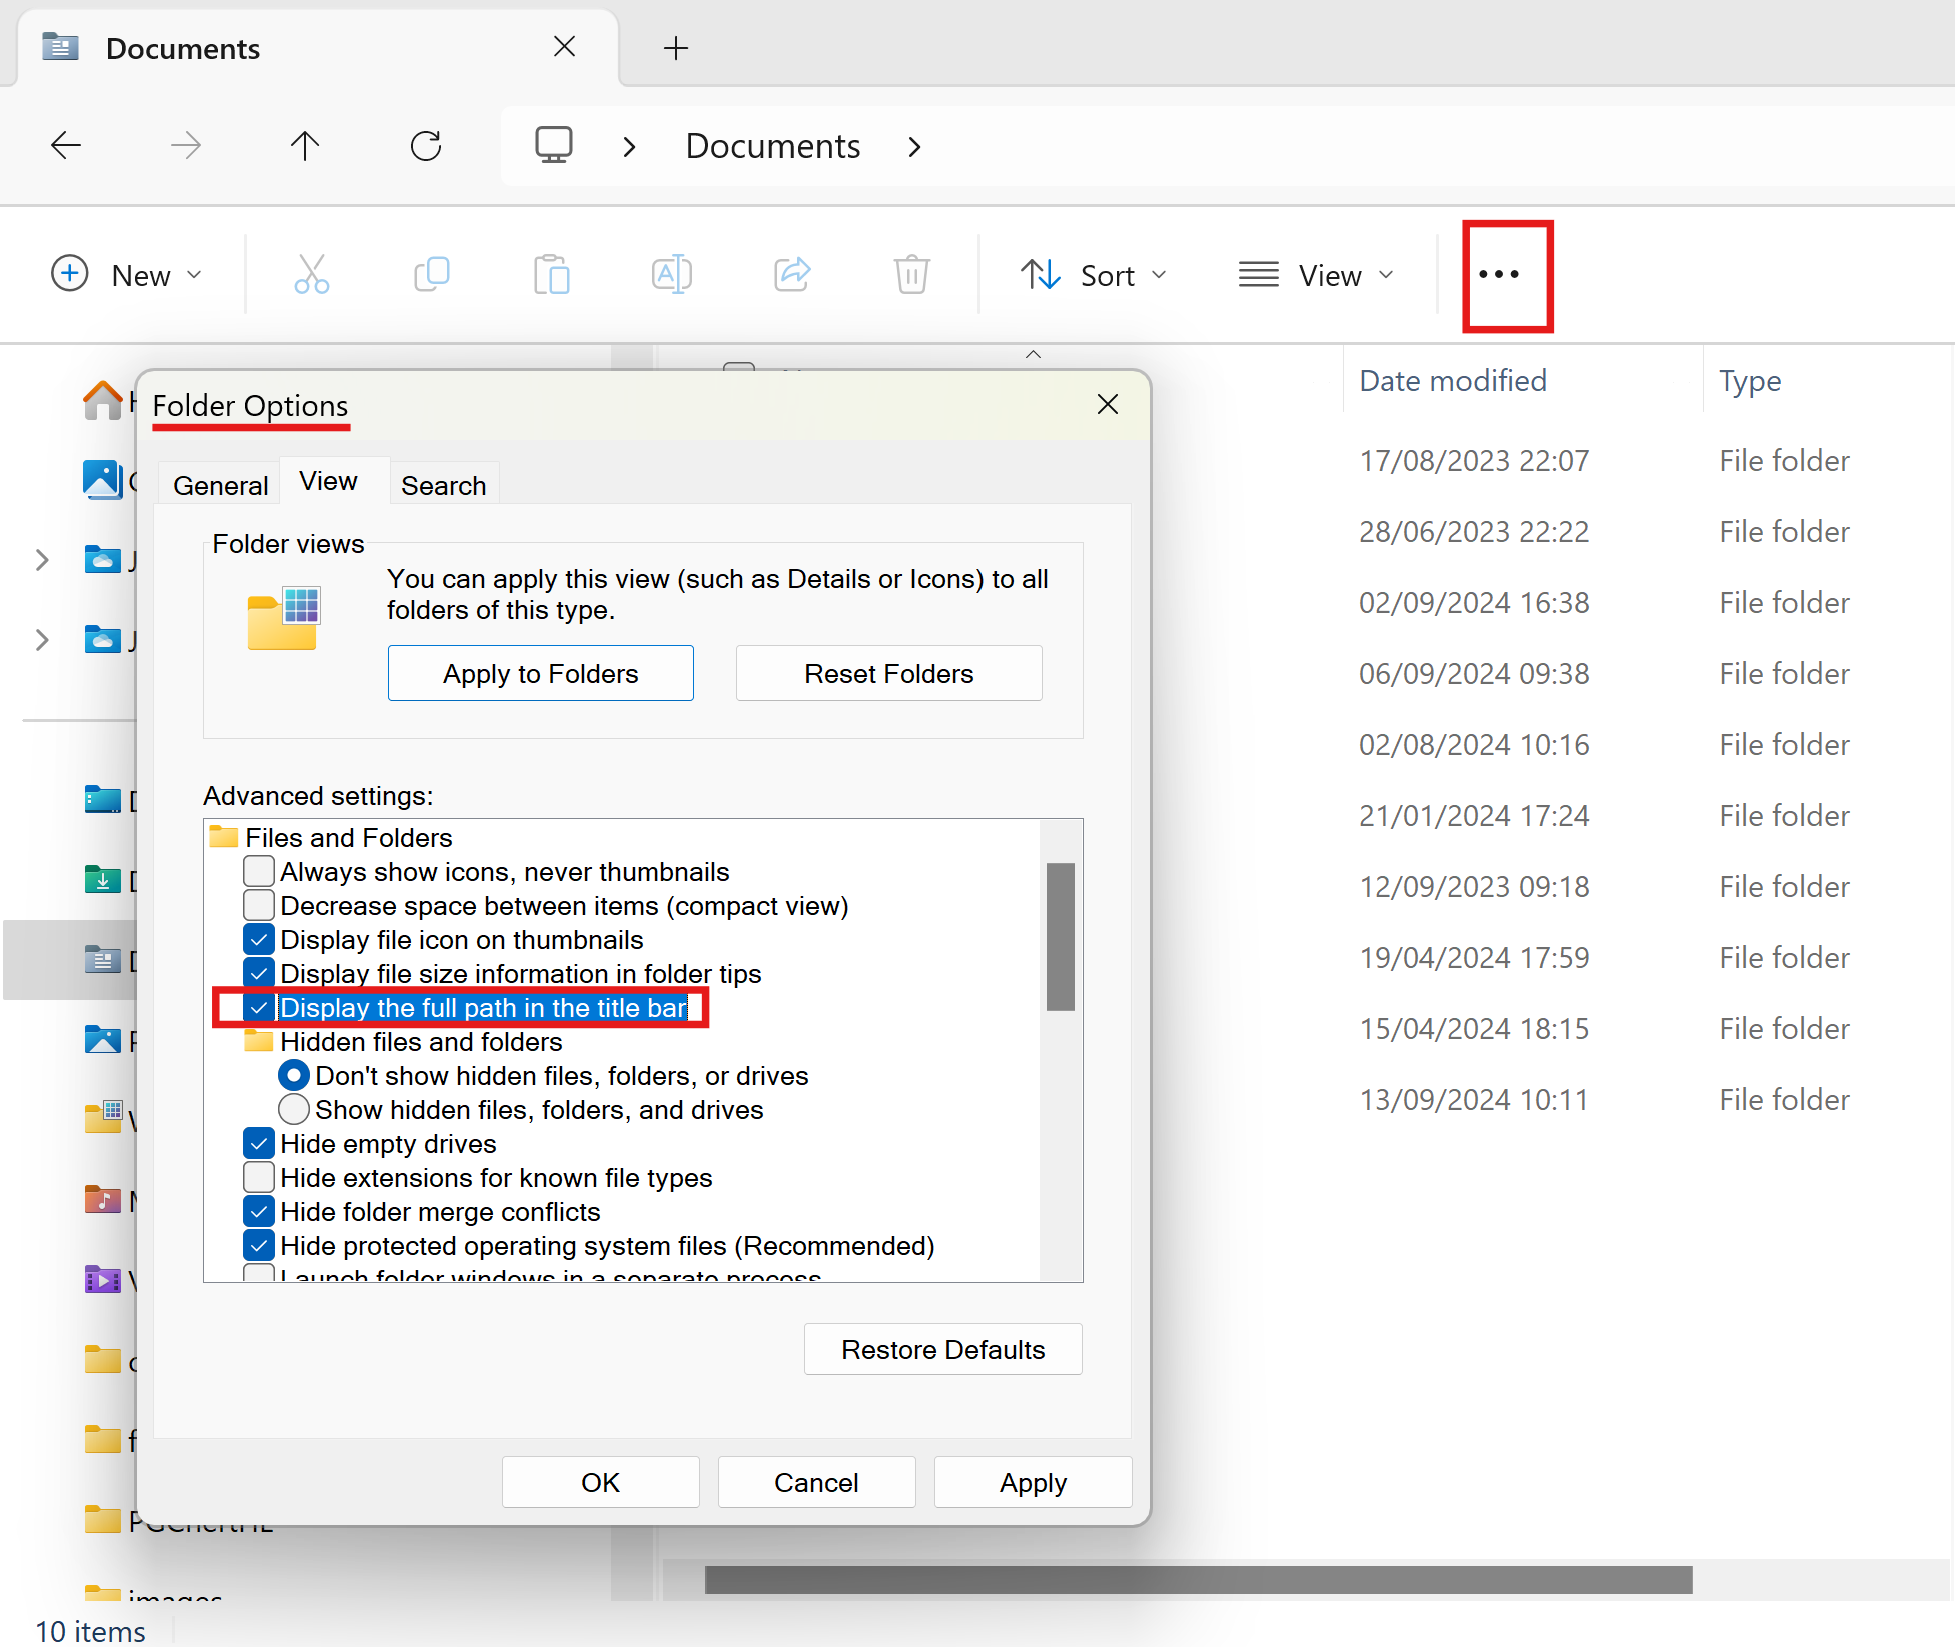
You might also want to enable the path bar as the title bar in the File Explorer window. To do this, follow the steps highlighted in the image below and check “Display the full path in the title bar.”
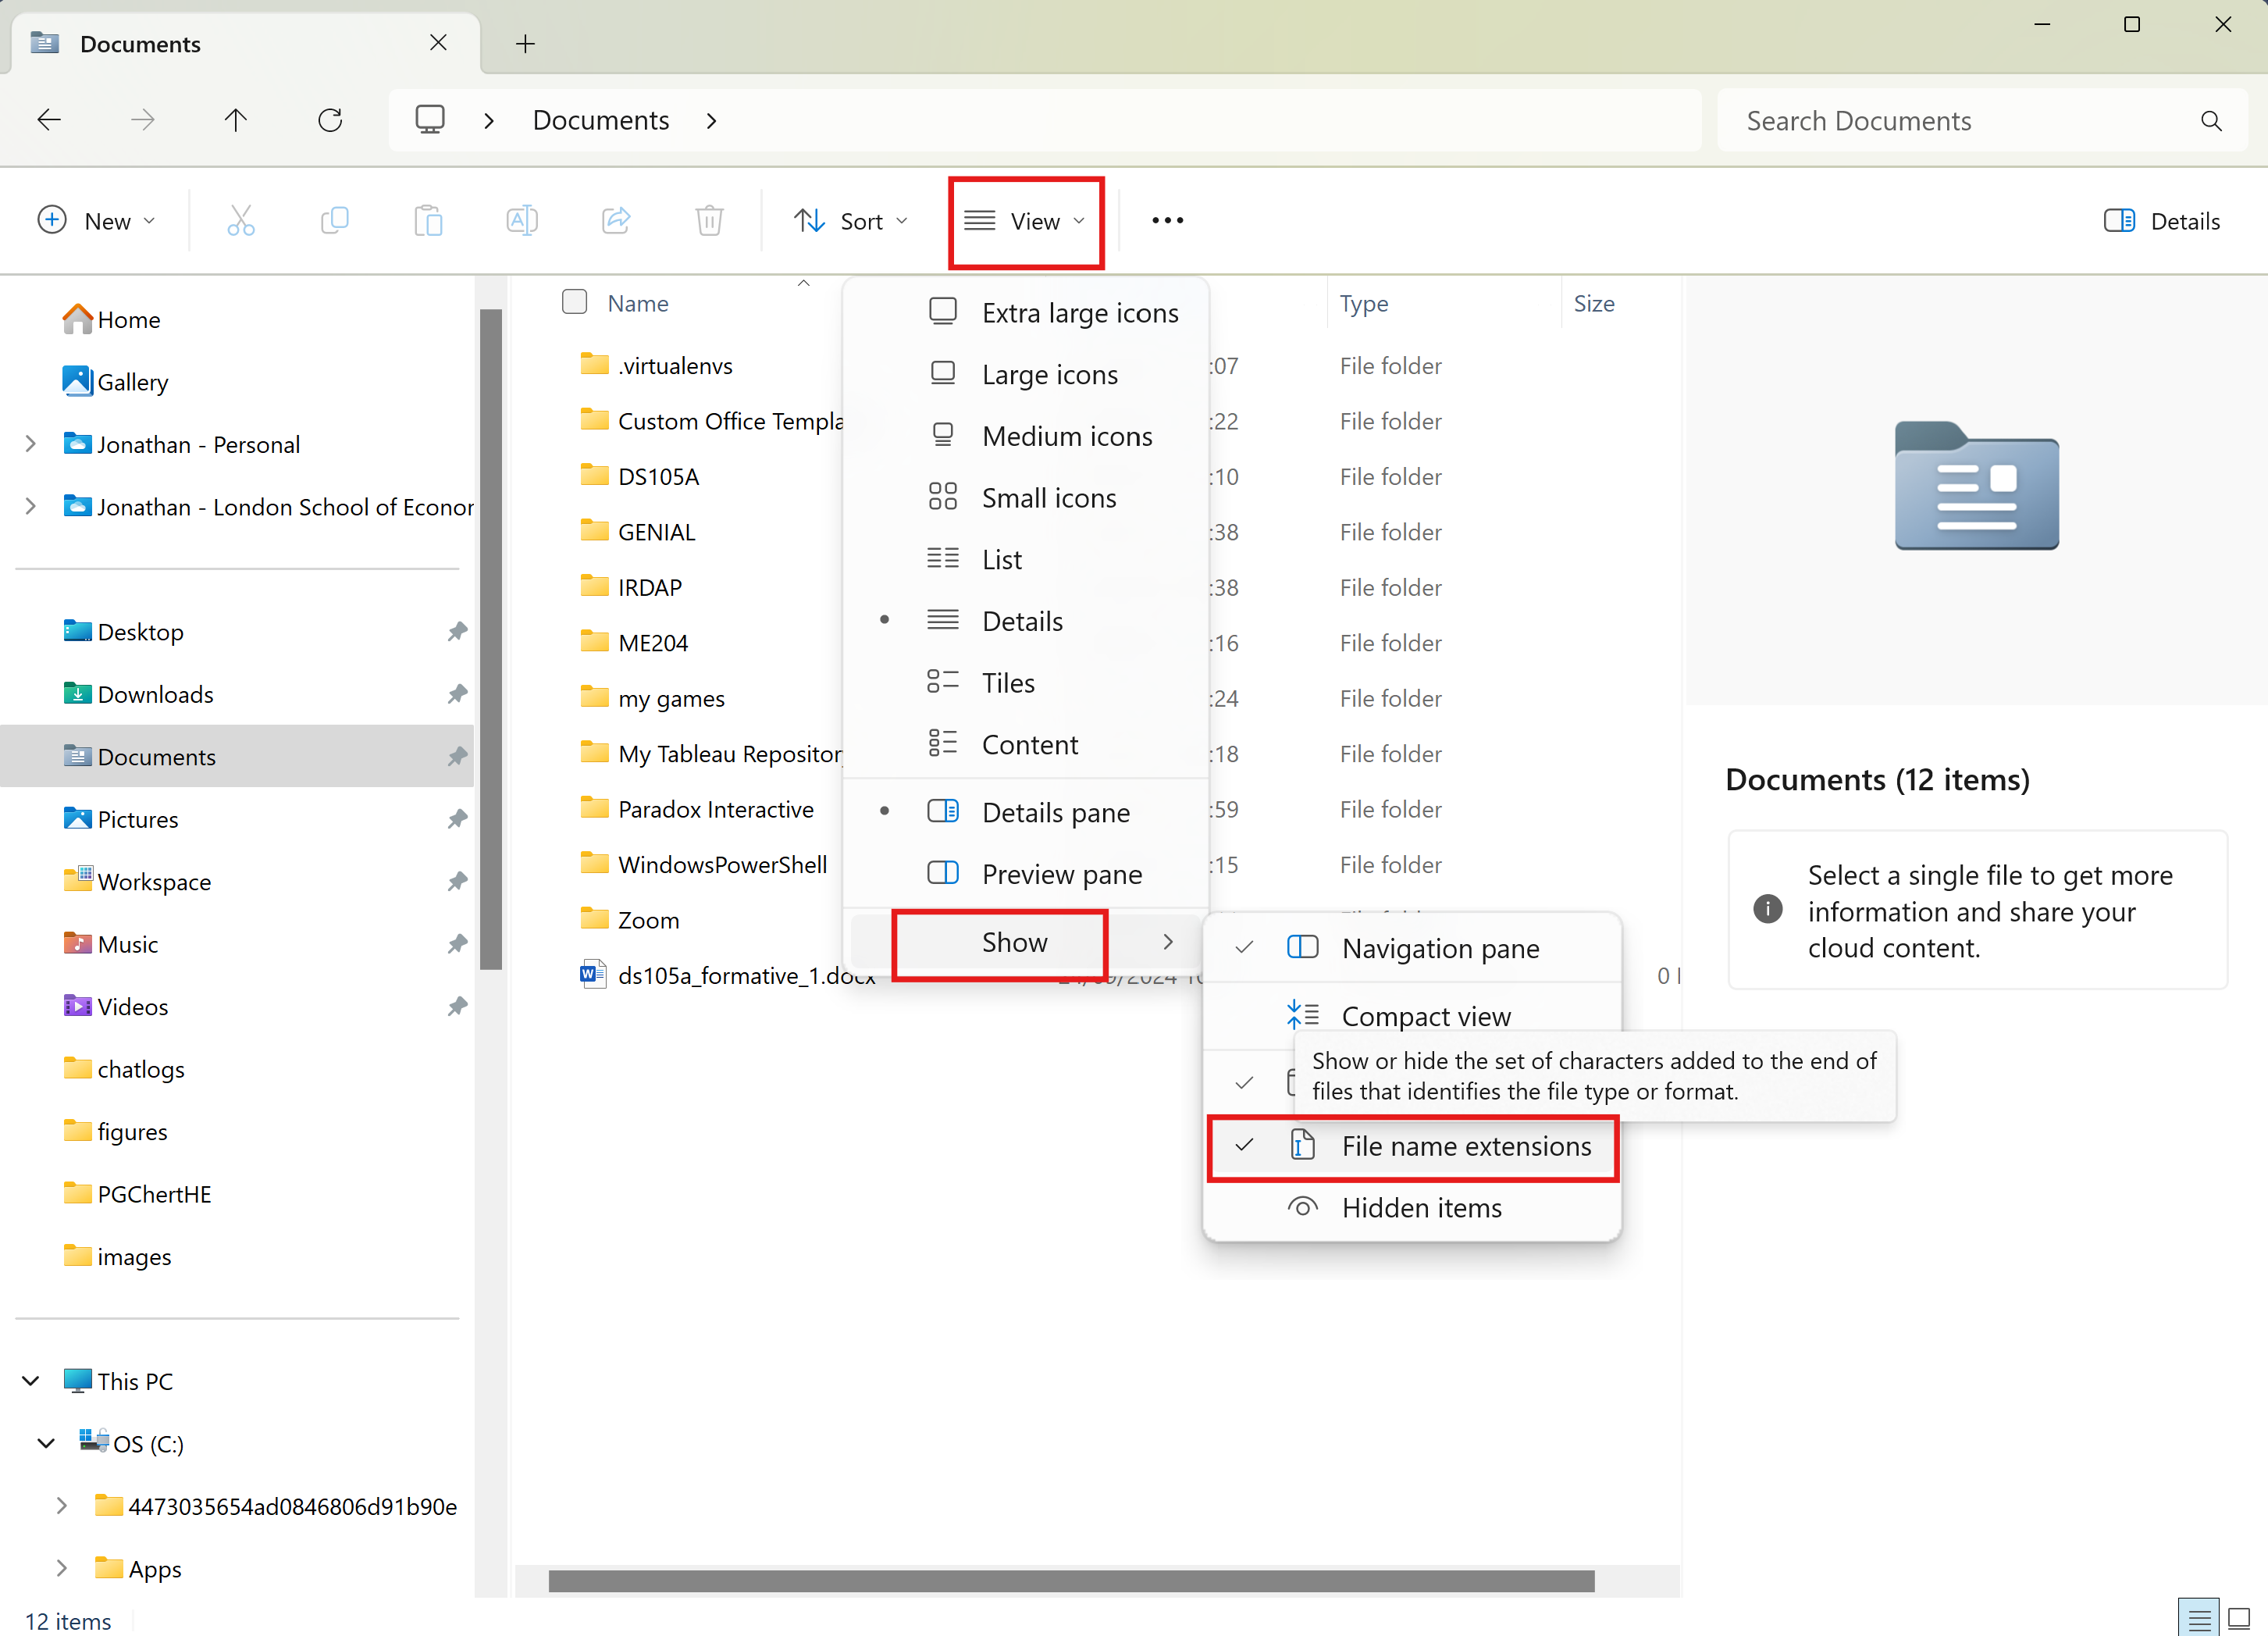
Then, to see the filename extension (the .docx) like the one in the image, you need to enable file extensions by going to “View” > “Show” > “File name extensions”. This will also help you understand the file types you are working with.
 macOS users
If you are on Mac, click on “View” > “Show Path Bar” to enable the path bar at the bottom of the Finder window. This will show you the path to the file you are currently viewing:
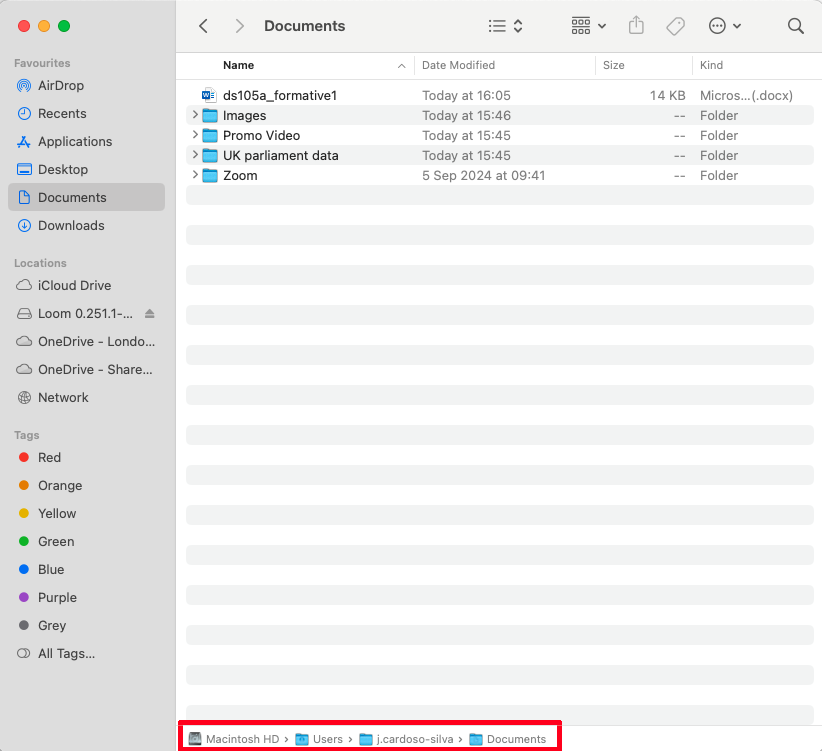
To visit the root directory, click on the “Macintosh HD” or “Macintosh SSD”. From there, keep navigating, branching out, until you reach the file you created:
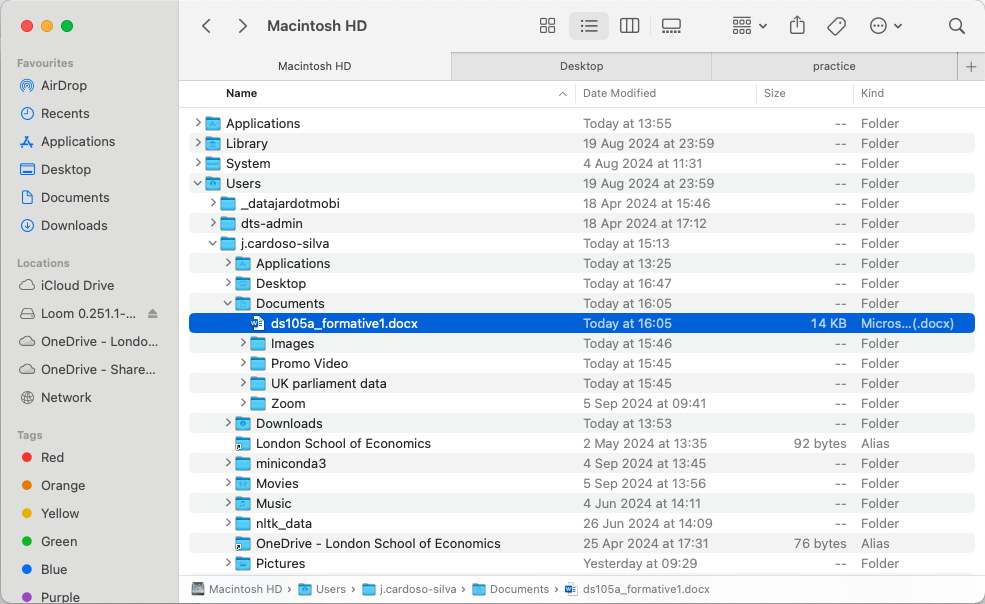
To see the .docx filename extension like the one in the image, you need to enable file extensions by going to Finder > Preferences > Advanced and checking the box next to “Show all filename extensions”. This will also help you understand the file types you are working with.
📋 Why does this matter?
Soon, when we start writing code, you will need to know the exact location of the script you’re currently running, its relationship to data files, and where you’ll save the files you create. Understanding your computer’s file system structure will make it easier to navigate these paths.
✅ Click here to check your understanding of Task 1
✅ Check your Understanding
If you understood the concepts above, you should be able to explain the following to a friend:
💭 Think about it: a good indicator that we have grasped a new concept is when we can clearly explain it to others.
🗣️ Talk about it! If you’re having difficulty articulating answers to the questions above, you can benefit from chatting with others (peers or instructors) to revisit your learning. What if you posted a message in the #help channel on Slack, such as, “I still don’t get this home/root directory business. Anyone else on the same boat?”?
Task 2: Meet the Terminal
The best way to fully internalise how the structure of your computer’s file system works is to use the Terminal. Unlike a Graphical User Interface (GUI) like Finder or File Explorer, the Terminal is a text-based interface that allows you to interact with your computer using commands. There is no mouse, drag-and-drop, or clicking on icons on the Terminal. Just you, the keyboard, and a blinking cursor!
Your computer already comes with at least one such terminal application installed. On Windows, we have the PowerShell, or the older Command Prompt. On Mac, it is simply called Terminal.
Follow the steps below to open the terminal on your computer and to locate the file you created in Task 1 using only the terminal.
🎯 ACTION POINTS
Open the Terminal
- Win: Press the
Windowskey, typePowerShell, and pressEnter. - Mac: Press
Cmd + Space, typeTerminal, and pressEnter.
You should see the Terminal open with a bit of text and a blinking cursor.
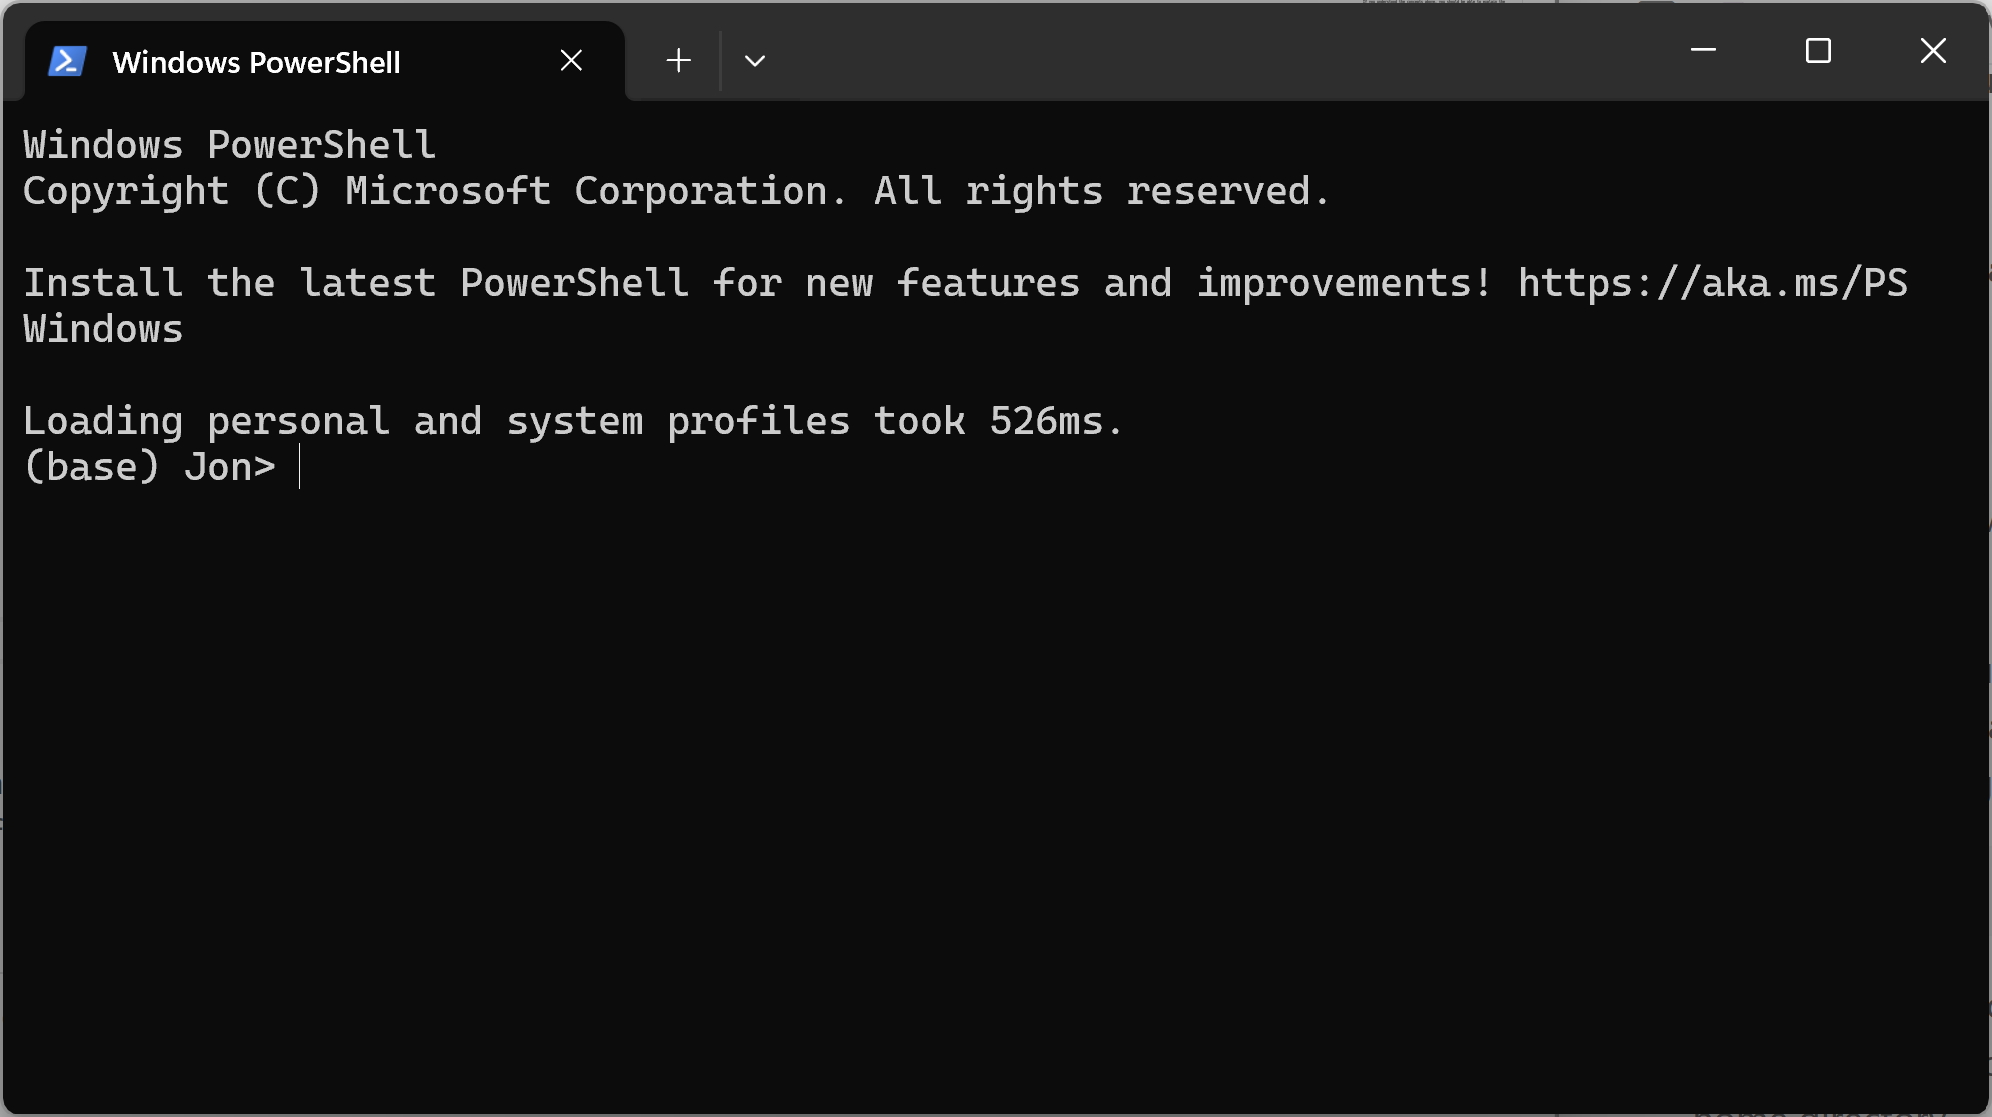
Figure 6. The PowerShell terminal on Windows. Check where you are. When you open the terminal, you are placed in a specific directory. This is called the current working directory. To find out where you are, type the following command and press Enter:
pwdThe
pwdcommand stands for “print working directory.” It will show you the full path to the directory you are currently in. You should see that you are in your home directory.💡 Every time this tutorial asks you to identify ‘where you are’, remember to run the
pwdcommand!Check what is in the directory. To see what files and directories are in the current directory, type the following command and press Enter:
lsYou should see the “Documents” in the list that appears. The
lscommand stands for “list.” It will show you a list of all the files and directories in the current directory.
💡 PRO-TIP for MacOS/Linux users
You can also pass some parameters to the ls command. For example, you can use the -l parameter to get a more detailed list of files and directories. Try running the following command:
ls -lYou can also use the -t parameter to sort the files by the time they were last modified. Try running the following command:
ls -tFinally, you can combine parameters. For example, to get a detailed list of files sorted by the time they were last modified, and to show size of files in human-readable format, you can run:
ls -lthLearn how to change to a subdirectory
You use the
cdcommand to move to a directory inside the one you are currently in. For example, to move to the Documents folder on a Mac, you would type:cd DocumentsAnd press Enter.
The first time you run this on a Mac, you might get asked for permission to access the Documents folder. Click “OK” to proceed.
💭 Did the current working directory change? Hint:
pwd💭 How can you check what is inside the Documents folder?
Open the file
To open the file you created in Task 1, you can use the
opencommand on a Mac or thestartcommand on Windows.On a Mac, type the following command and press Enter:
open ds105a_formative_01.docxOn Windows, type the following command and press Enter:
start ds105a_formative_01.docxThe file should open in your default word processor.
You can always go back home
If you keep
cd-ing into directories, you might get lost deep in the directory tree.Whenever you want to go back to the home directory, you can use the
cdcommand with the tilde symbol,~. Type the following command and press Enter:cd ~You should see that you are back in your home directory.
💡 Another way to refer to the home directory is
$HOME. Therefore,cd $HOMEwould also take you back to your home directory.List/open without changing directories. You can list (
ls) and open (openorstart) files without changing to the directory they are in. To do this, you will need to combine specify the path to the file.For example, run the sequence of commands below (hitting
Enterafter each line):cd ~ ls ~/DocumentsThe
/symbol signifies that you are referring to a folder inside the preceding directory.💡 Notice how you listed the contents of the Documents folder directly from the comfort of the home directory.
💭 How would you open the
.docxfile without leaving the home directory?Specifying the full path
Now that you know how to navigate until you locate a file using the terminal, you can refer to it using its full path. The full path to the file you created in Task 1 depends on the operating system you are using.
On a Mac, the full path to the file is: “/Users/[Your Username]/Documents/ds105a_formative_01.docx”
On Windows, the full path to the file is: “C:[Your Username]105a_formative_01.docx”
💡 Mac and Windows describe paths using different symbols. On Mac, the forward slash
/separates the folders. On latest versions of Windows, the forward slash also works but the backward slash,\, is the default path separator🥇 Can you open the
.docxfile but, this time, passing the full path?Move the file. Let’s say you want to move the
.docxfile to the Desktop. You can use themvcommand to move (or rename) the file.Whereas the
cdcommand expects one argument (the directory you want to change to), themvcommand expects two arguments: the file you want to move and the destination you want to move it to.# This is the syntax of the mv command: mv <source> <destination>Close the MS Word or Apple Pages document if it is still open there, otherwise, the terminal will not be able to move the file.
Type the following sequence of command, pressing
Enterafter each line:cd ~/Documents mv ds105a_formative_01.docx ~/Desktop/
The file should disappear from the Documents folder and appear on the Desktop.
💡 Using Finder or Windows File Explorer, open the Desktop folder to confirm with your own eyes that the file is indeed there.
Specify a relative path to go up the directory tree.
Say you are in the Documents folder and you want to open the file which now sits on the Desktop. The symbol
..will move you up one level in the directory tree to the parent directory.For example, running these commands will take you back to the home directory:
cd ~/Documents
cd ..
You can use multiple
..to move up multiple levels. For example, to go from home to the root directory. For example:cd ~ cd ../../ pwd # Check where you areSimilarly, if you were one level deeper:
cd ~/Documents
cd ../../../
pwd # Check where you are
Open the file using a relative path. On the terminal, return to the Documents folder using the
cd ~/Documentscommand. Then, open the.docxfile using a relative path to the Desktop.
🔍 Look at the solution
cd ~/Documents
open ../../Desktop/ds105a_formative_01.docxopen to start if you are on Windows)
Create a new directory
You can create a new directory using the
mkdircommand.Go back to the home directory using the
cd ~command.Type the following command and press Enter:
mkdir DS105AGo inside the new directory using the
cd DS105Acommand.
Move the file to the new directory. From the terminal, use the
mvcommand and relative paths to move the.docxfile from the Desktop to the newDS105Adirectory.
🔍 Look at the solution
If you are inside the DS105A directory:
mv ../../Desktop/ds105a_formative_01.docx ./Or using a more absolute path:
mv ~/Desktop/ds105a_formative_01.docx ~/DS105A/💭 If you start from the root directory on Finder or Windows File Explorer, how would reach the DS105A folder?
📋 NOTE:
There are infinitely more commands and tricks you can learn to navigate the terminal. For now, these basic commands should be enough to get you started. It is imperative, however, that you practice using the terminal as much as possible. The more you use it, the more comfortable you will become with it.
For more information, check out our ![]() Terminal Cheat Sheet.
Terminal Cheat Sheet.
✅ Click here to check your understanding of Task 2
✅ Check your Understanding
After completing this task, you should be able to explain the following to a colleague:
💭 Think about it: a good indicator that we have grasped a new concept is when we can clearly explain it to others.
🗣️ Talk about it! If you’re having difficulty articulating answers to the questions above, you can benefit from chatting with others (peers or instructors) to revisit your learning. What if you posted a message in the #help channel on Slack, such as, “How are others practicing these weird commands beyond the practice material? I guess I understand the concepts and the commands, but not sure I will remember when to use them and for what.”
Task 3: Setting up your Python Environment
We want to make sure you have Python 3+ installed on your computer.
![]() Python is the primary programming language we will be using in this course. It is a very versatile language that is easy to learn and use. Its application is not restricted to data science. Python is also widely used for building and running AI tools, web development, automation, games, and many other applications.
Python is the primary programming language we will be using in this course. It is a very versatile language that is easy to learn and use. Its application is not restricted to data science. Python is also widely used for building and running AI tools, web development, automation, games, and many other applications.
Checking if Python is installed
Open the terminal and type the following command:
python --versionWhat happens? Choose the option that best describes what you see:
- Option A. (No Python found) The Terminal shows a message that says ‘python’ is not found or not recognised.
- Option B. (Old Python) You see a Python version number that starts with 2, or if the version starts with 3, it is lower than 3.8.
- Option C. (Wrong Python) You see a Python version number but it is not the one you installed.
- Option D. (Recent Python) You see a Python version number that is 3.8 or higher.
What you will do next depends on the option you chose above. Follow the instructions below according to your choice:
Option A: Python is not found or not recognised
You will have chosen this option if:
You never installed Python on your machine. In this case, just follow the instructions on the Installing the latest Python 3 section below.
You are sure that you have already installed Python 3.8+ (or the latest) and yet the Terminal does not recognise the python command. In this case, follow the instructions on the Configuring the environment variable section below.
Option B: Python is too old
The libraries we will use in this course require Python 3.8 or higher. (See for example, pandas requirements.)
You have two options:
Keep the old Python version and install a new one alongside it. If you have Python 2, it is likely that some applications on your computer depend on it. In this case, don’t uninstall Python 2. Instead, install Python 3.8+ alongside it by following the instructions on the Installing the latest Python 3 section below.
Uninstall the old Python version and install the latest Python 3.8+. If you have Python 3 but it is an older one, or if have Python 2 and you are sure that you don’t need it, you can uninstall it and install Python 3.8+ by following the instructions on the Installing the latest Python 3 section below.
Option C: Python is installed but it is not the right version
If you see a Python version number that does not match the one you installed, you will have to change the environment variable to point to the correct Python version. Follow the instructions on the Configuring the environment variable section below but before that, try to understand how many Python installations you have on your computer.
If you are on Windows, open PowerShell and type:
where.exe pythonIf you are on Mac, open Terminal and type:
which pythonThis should return a path per line and hopefully, you will see the path to the Python version you installed.
- On Windows, the path looks like
C:\Users\[Your Username]\AppData\Local\Programs\Python\Python312\python.exeorC:\Users\[Your Username]\Anaconda3\python.exe. - On Mac, this is typically
/usr/local/bin/python3or/usr/anacoda3/bin/python3.
💡 Use the terminal skills you learned in Task 2 to navigate to each of these paths and run the specific Python within each folder, ./python --version
Option D: Python is installed and up-to-date
Your life is so easy! You can skip to Task 4 below.
Installing the latest Python 3
Windows users
🎯 ACTION POINTS
Download the Python 3 installer. Go to Python Downloads page and click on the big yellow button that says Download Python 3.12.6 (or the latest).
Install Python 3. Double-click the downloaded
.exefile and when the first window shows up, make sure to mark the checkbox that says “Add python.exe to PATH”. Then, click “Install Now”.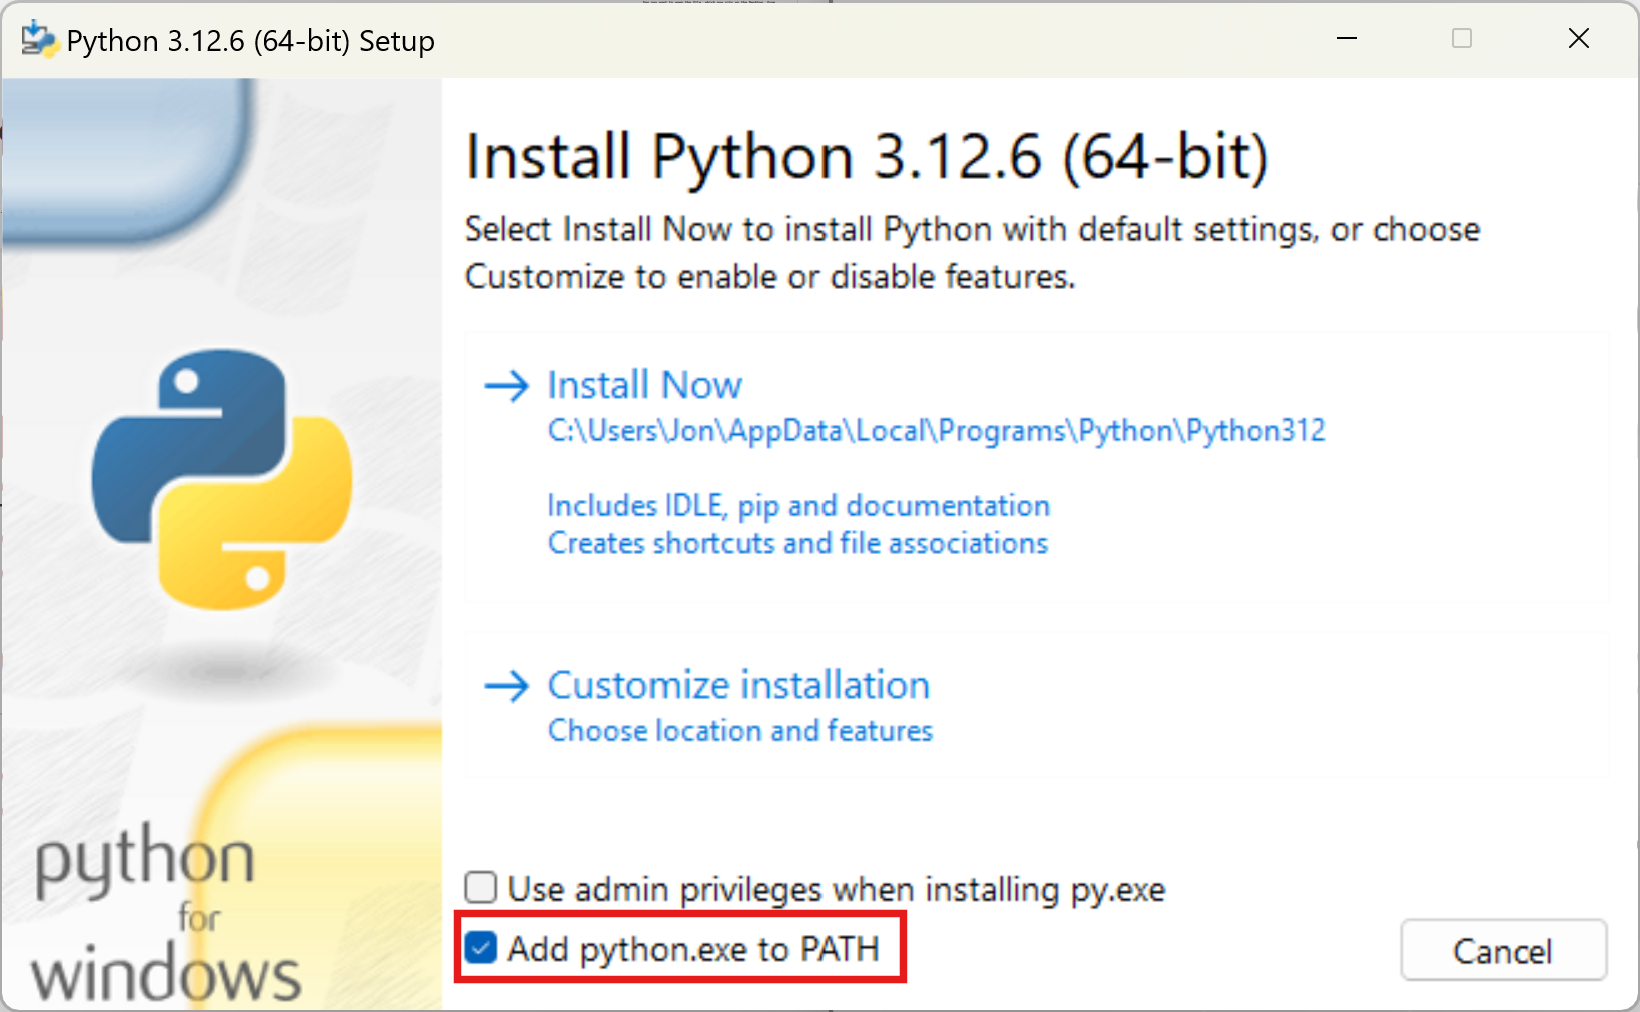
Figure 7. When the initial window shows up, please mark the checkbox that says “Add python.exe to PATH”. Check again if Python3 is installed. It is important that you close the terminal and open it again after installing Python. Then, type the following command:
python --versionYou should now see the same version number you installed. If you don’t, you may need to configure the environment variable.
💡 If you are still having trouble, you can ask a question on the
#helpSlack channel, we will be very happy to see a message there, or book an office hour with the lecturer or a teaching assistant.
macOS users
🎯 ACTION POINTS
Install homebrew. Before we install Python, let’s install Homebrew, a package manager for macOS. The following command downloads the installer and runs it on your computer:
/bin/bash -c "$(curl -fsSL https://raw.githubusercontent.com/Homebrew/install/HEAD/install.sh)"(it is the same command you will find on their official website)
You will be asked to enter your password. NOTE: You won’t see the number of characters you type, but it is being recorded.
Eventually, you will be asked to Agree to the Xcode license. Hit Enter when you see a message like “Press RETURN/ENTER to continue or any other key to abort”.
It will take a while to install. When it is done, you should see a message that says “Installation successful!”
Install Python 3. Now that you have Homebrew installed, you can use it to install Python 3. Close and reopen the Terminal and type the following command:
brew install python- You will see a message that says “python has been installed” when it is done.
Check again if Python3 is installed. It is important that you close the terminal and open it again after installing Python. Then, type the following command:
python --versionYou should now see the same version number you installed. If you don’t, you may need to configure the environment variable.
💡 If you are still having trouble, you can ask a question on the
#helpSlack channel, we will be very happy to see a message there, or book an office hour with the lecturer or a teaching assistant.
Configuring the environment variable
📋 NOTE:
On both Mac and Windows, applications (like Python) are installed in specific directories. On Windows, most applications, including Python, are installed in the Program Files or Program Files (x86) folder. On macOS, most applications are stored in the Applications folder.
When you type a command like python in the terminal, your operating system needs to know where to find the Python executable. This is managed by the PATH variable. It is a list of directories that your operating system checks when you run a command. If the directory where Python is installed is included in the PATH variable, the system will know where to find it. If it’s not included, the terminal will return a “command not found” error.
There are two scenarios where you may need to configure the PATH variable before the terminal recognises the Python version you installed:
If the Terminal still does not recognise the Python version you installed. If you have installed Python, you are sure of it, but the terminal is not recognising the Python version you installed, you may need to add the Python directory to the
PATHvariable.If you have multiple Python versions installed. It is common to have multiple Python versions installed on a computer. The problem arises when the terminal is not pointing to the Python version you want to use.
👉 By the way, you don’t need to remove old Python versions, such as Python 2. You might have games or other apps that still require this older Python to function well.
🎯 ACTION POINTS:
Follow these external tutorials to set up your environment variable
- Windows: RealPython Tutorial: How to Add Python to PATH (on Windows).
- Mac: RealPython Tutorial: How to Add Python to PATH (on macOS).
Once you have added the Python directory to the PATH variable, close the terminal and open it again. Then try the python --version command again.
If nothing works, ask a question on the #help Slack channel, we will be very happy to see a message there, or book an office hour with the lecturer or a teaching assistant.
A workaround is to use the full path to the Python executable when running Python scripts from the terminal, instead of just typing python.
Task 4: Running Python scripts
You’ve made it past the hardest part! Let’s install a Python package and run a simple Python script.
🎯 ACTION POINTS:
Install new packages with Python package manager
pip. When you install Python, you get a lot of useful packages that come with it. But it is rare to rely on just those. Virtually all coding projects involve importing a package developed by a third-party. We will frequently need to install external Python packages in this course.Type the following commands in the Terminal to install the popular Python packages
numpyandpandas:python -m pip install numpy pandas💡 The
-mflag tells Python to run thepipmodule as a script.💭 How would you modify the command above to replace ‘python’ with the full path to the python app?
Run a sample Python scripts.
Create an empty plain text file by following the instructions below:
If on Windows, type on the terminal:
ni ~/DS105A/sample.pyIf on Mac, type on the terminal:
touch ~/DS105A/sample.pyOpen the file in a text editor (TextEdit on Mac, Notepad on Windows), copy-paste the Python script below and save it (File > Save).
Click HERE to see the sample Python script
import numpy as np

def plot_ascii_bar(data, labels, height=20):
    max_val = max(data)
    scale = max_val / height

    # Calculate title width
    title_width = max(len(label) for label in labels)

    # Print title
    title_msg = ' ' * title_width + ' An archaic bar chart'
    print(title_msg)
    print(' ' * title_width + ' ' + '-' * (height + 1))

    for i in range(len(data)):
        bar_height = int(data[i] / scale)
        print(labels[i].ljust(title_width) + ' ' + '#' * bar_height)

    # Print x-axis
    print(' ' * title_width + ' ' + '-' * (height + 1))

# Example data
data = np.random.randint(1, 100, size=12)
labels = list(chr(65 + i) for i in range(12))

# Plot ASCII bar chart
plot_ascii_bar(data, labels)
Now run the script from the terminal:
python ~/DS105A/sample.pyYou should see a simple ASCII bar chart printed on the terminal.
💡 Make sure you are using the right python. Otherwise, you might get an error message saying that numpy is not installed.
✅ Click here to check your understanding of Tasks 3 & 4
✅ Check your Understanding
If you understood the concepts, you should be able to answer:
💭 Think about it: a good indicator that we have grasped a new concept is when we can clearly explain it to others.
🗣️ Talk about it! If you’re having difficulty articulating answers to the questions above, you can benefit from chatting with others (peers or instructors) to revisit your learning. What if you posted a message in the #help channel on Slack, such as, “When I try to add Python to PATH I get this error: … Anyone else had this?”?