
🛣️ Week 03 - Git tutorial + handling your first Git conflict
Lab Roadmap (90 min)
Today, you will exercise something every data scientist should know: how to use Git to organise your code and git commands on the Terminal so that you don’t have to rely on a GUI (graphical user interface) to do so.
📚 Preparation
Click here to read about how to prepare for this lab.
🥅 Learning Objectives
- Render a markdown file as a personal web page on GitHub
- Use
gitcommands on the Terminal to manage your code:git addgit commitgit pushgit pull
- Create python scripts and run them on the Terminal
- Create Jupyter notebooks, mixing Python code and markdown
- Visualise your Python scripts and notebooks on GitHub
📋 Lab Tasks
Here are the instructions for this lab.
We will help you get started with your ✏️ W03 Summative assignment while learning how to use git and practice your Python skills. Because this is part of an assignment due next week, it is unlikely that you will be able to complete all the tasks during this lab. Just see how far you go, and ask for help if you get stuck.
Part I - Setting up your formative repository (20 min)
🎯 ACTION POINTS
Work independently, but feel free to ask the class teacher or your colleagues for help if you get stuck.
Go to our Slack workspace’s
#announcementschannel to find a GitHub Classroom link. Do not share this link with anyone outside this course!Click on the link and accept the ✏️ W03 Summative assignment.
You will be redirected to a new private repository created just for you. The repository will be named
ds105a-2023-formative1--yourusername, whereyourusernameis your GitHub username.Once it is ready, go to your repository on GitHub and copy the SSH URL. You will find it under the green button that says ‘Code’:
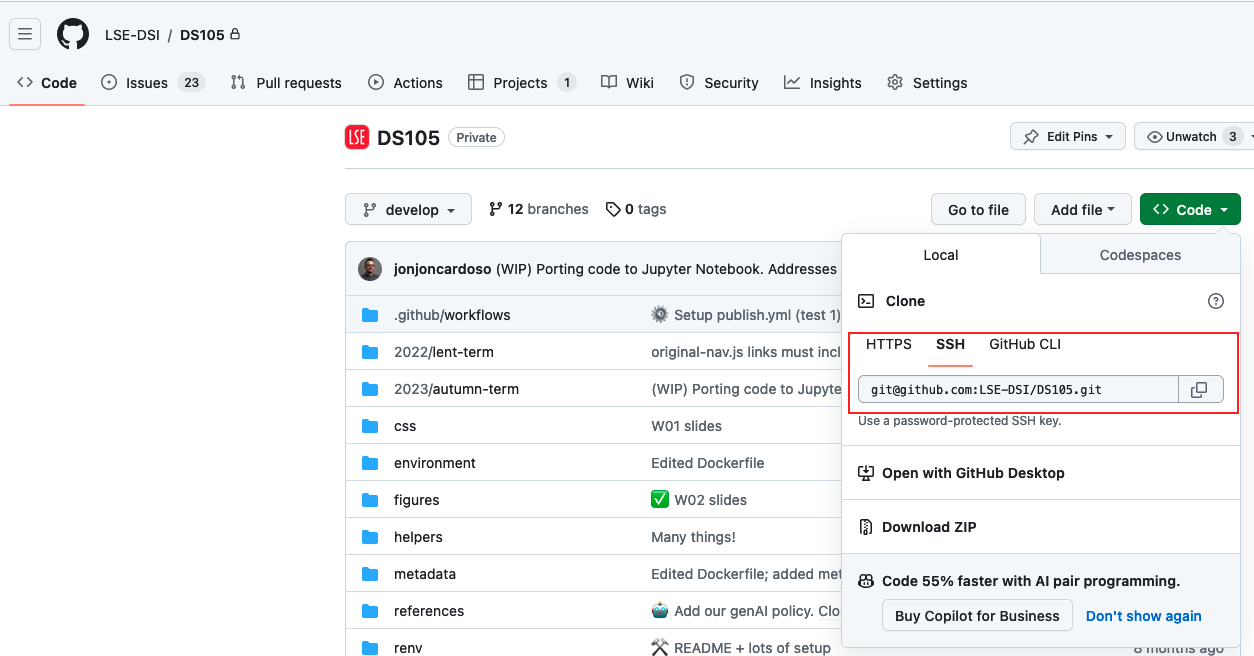
💡 Tip: if you haven’t set up your SSH keys yet, you can click on the ‘Use HTTPS’ button instead. You will be asked to enter your GitHub username and password every time you push changes to GitHub.
On a Terminal, navigate to the folder where you want to store your repository. For example, if you want to store it in your home folder, type
cd ~. Then, your repository by typing:git clone <url>Replace
<url>with the actual URL you copied from GitHub. For example:git clone git@github.com/LSE-DSI/DS105.git
<url> and not just url?
This is a convention used in documentation to indicate a placeholder, i.e. something that you need to replace with the actual value. It is common to add < and > around placeholders to make them stand out.
In this case, you need to replace <url> with the actual URL you copied from GitHub.
Check that the repository was cloned successfully and that it has the same
README.mdfile that you see on the GitHub web page.Now, go to your repository on GitHub click on ‘Add file’ and then ‘Create new file’. Name the file
generate_fake_data.py.Paste the following Python code inside this empty file:
import random

from faker import Faker
from pprint import pprint

fake = Faker()

def generate_company():
    return {
        "name": fake.company(),
        "mission": fake.bs(),
        "catch_phrase": fake.catch_phrase()
    }

# Generate a limited set of companies
companies = [generate_company() for _ in range(5)]
company_names = [company["name"] for company in companies]


if __name__ == '__main__':

    pprint("Companies generated:")
    pprint(companies)
Click on Commit Changes. You will be asked to write a commit message. Write something like “Add generate_fake_data.py” and click on Commit Changes. Great! That was your first commit on this repo!
Now, on your computer, get these latest changes from GitHub by typing:
git pullCheck that you can run the Python script. You can run it from the Terminal:
cd <path_to_your_repo>
python generate_fake_data.py
You might need to install the
fakerpackage first. You can do so by typing on the Terminal:pip install fakerYou should see a random list of companies printed on the Terminal. Something like:
Companies generated:
[
{
    "name": "Coleman, Cervantes and Miller",
    "mission": "transform customized relationships",
    "catch_phrase": "Up-sized zero administration hierarchy"
},
{
    "name": "Blair, Moore and Mendoza",
    "mission": "deploy scalable communities",
    "catch_phrase": "Re-engineered contextually-based structure"
},
{
    "name": "Hawkins, Taylor and Clark",
    "mission": "visualize intuitive content",
    "catch_phrase": "Front-line composite functionalities"
},
{
    "name": "West, Knight and Hall",
    "mission": "target synergistic metrics",
    "catch_phrase": "Reduced content-based open architecture"
},
{
    "name": "Perry-Smith",
    "mission": "expedite collaborative web-readiness",
    "catch_phrase": "Organized next generation hub"
}
]
Open the file
generate_fake_data.pyon VS Code so you can start editing it.
Part II - Your first Git conflict (25 min)
Let’s cause a conflict! 🤯
🎯 ACTION POINTS
Go back to the GitHub repository on your browser and edit the file
generate_fake_data.pyEdit the file so that you create 10 fake company names instead of 5. You can do so by changing the line:
companies = [generate_company() for _ in range(5)]to look like this:
companies = [generate_company() for _ in range(10)]Commit your changes with a message like “Generate 10 companies instead of 5”.
Now, DON’T
git pullJUST YET! Instead, go back to VS Code and edit the filegenerate_fake_data.pyso that you create 20 fake company names instead of 5.Add and commit your changes with a message like “Generate 20 companies instead of 5”:
git add generate_fake_data.py
git commit -m "Generate 20 companies instead of 5"
Beautiful. Now see things go wrong by trying to push your changes to GitHub:
git pushYou should get an error message! You now have a conflict! You can also visualise the problem on GitLens (or GitHub Desktop) if you like.
See if you can decipher the git commands you need to type to solve this conflict. You can also ask the class teacher for help if you get stuck.
Your class teacher will be able to help you understand and solve this conflict. They can give you a solution if you get stuck. General guidelines about conflict resolution will be provided next week.
Part III - Python exercises (45 min)
Here we will give you a more complicated Python script - you don’t really need to understand it. Just know that it will generate a fake dataset that contains some companies, their employees and their families. Everyone in those families happens to work for the same limited set of companies!
Your real task has more to do with the analysis of the data produced by this script.
Let’s get started:
🎯 ACTION POINTS