

📚 Collaborating with Git: Feature Branches and Pull Requests
A practical guide to GitFlow-style collaboration
Why Feature Branches?
When multiple people work on the same repository, committing directly to main creates problems. Someone pushes broken code, another person’s changes get overwritten, and nobody can review anything before it lands.
A solution for this is to use a functionality built into Git called branches. Each person works on a separate branch, then submits their work via a Pull Request (PR) for review before it merges into main. This is the standard collaboration pattern across the software industry, often called “GitFlow” or “GitHub Flow.”
The key rules:
mainstays stable and working at all timesAll new work happens on named branches
For example:
feature/api. Yes, branch names can have any name you want including characters like/and-.Some teams also like to include the username of the person who created the branch in the branch name. For example:
feature/api-jonjoncardosoorjonjoncardoso/api.Work enters
mainonly through reviewed Pull Requests
The Collaboration Model
When two people share a repository, each person works on their own branch. Here’s what that looks like in practice:
Bob clones the repository, creates a feature/api branch, does all his work there (including modifying files originally created by Alice if necessary), and submits a Pull Request when finished. Alice (or a reviewer) can inspect the changes before anything touches main.
For ✍️ Problem Set 1, the collaboration works across two repositories. You build your scraper in your own repo on main, then build an API in your partner’s repo on a feature/api branch. Your partner does the same in reverse.
main Alice’s scraper ✅
feature/api Bob builds API here → PR
main Bob’s scraper ✅
feature/api Alice builds API here → PR
Confused about all of this? Send a message on Slack to ask for help!
Step-by-Step: Working in a Shared Repository
Step 1: Grant Repository Access
The repository owner needs to add their collaborator:
- Go to your repository on GitHub
- Click Settings (top navigation bar)
- Click Collaborators and Teams in the left sidebar (under “Access”)
- Click Add people
- Search for your collaborator’s GitHub username
- Click Add
<their-username>to this repository
Your collaborator receives an email invitation.
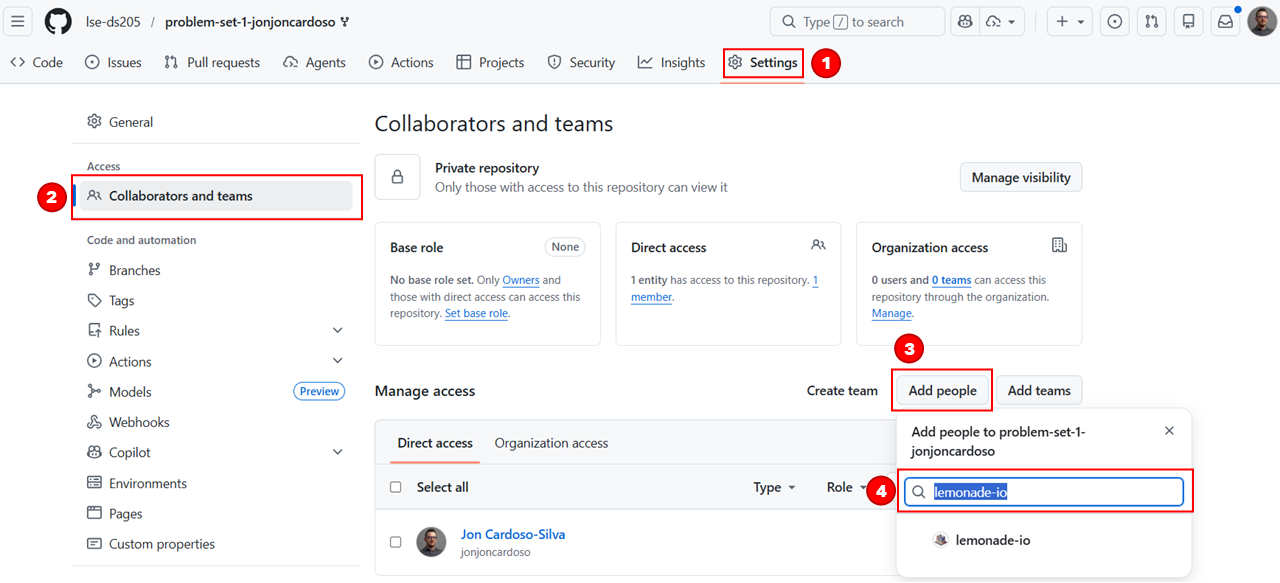
For ✍️ Problem Set 1: Both partners must do this. Alice adds Bob to problem-set-1-alice, and Bob adds Alice to problem-set-1-bob.
Step 2: Accept the Invitation
The person receiving access needs to accept:
- Check your email for the invitation from GitHub
- Click View invitation (or go directly to the repository URL)
- Click Accept invitation
You now have write access to the repository.
Step 3: Clone the Repository
Now you should clone their repository to your local machine.
# Clone your collaborator's repository
git clone git@github.com:lse-ds205/problem-set-1-<their-username>.git

# Enter the directory
cd problem-set-1-<their-username>
💡 TIP: If you find it confusing that you will have two repositories on your Nuvolos/laptop with very similar names, you can give them different names when cloning. For example:
git clone git@github.com:lse-ds205/problem-set-1-<their-username>.git ps1-part-bStep 4: Create Your Feature Branch
Do not work directly on main.
The first thing you should do is create a feature branch.
# First, make sure you are on the other person's repository
cd problem-set-1-<their-username>

# Create and switch to your feature branch
git checkout -b feature/api

# Verify you're on the correct branch
git branch
# Should show: * feature/api
All your work happens on this branch from now on!
The first time you will push to that branch, Git may ask you to set the upstream. That is, to indicate to GitHub that it must create a replica of that branch on GitHub too. You can do this by running:
# Create and switch to your feature branch
git checkout -b feature/api

# Push and set upstream (first time only)
git push -u origin feature/api
Step 5: Work, Commit, Push
If you ever need to check which branch you are on, you can run:
git branchWhich should show you are on the feature/api branch.
From here on, you can go back to following the daily workflow we covered in the GitHub guide:
# Make your changes...
# Then stage and commit
git add .
git commit -m "Add FastAPI endpoints for product data"

# Push your branch to GitHub
git push origin feature/api
Submitting via Pull Request
When your work is ready for review, submit it as a Pull Request:
Go to the repository on GitHub
Click the Pull requests tab
Click New pull request
Set base:
main← compare:feature/apiIf you see “Can’t automatically merge”, this means your feature branch differs from main (which is normal and expected). Jon will review your PR regardless. Don’t worry about it.
Click Create pull request
Add a clear title describing your contribution
Write a brief description of what you built
Click Create pull request
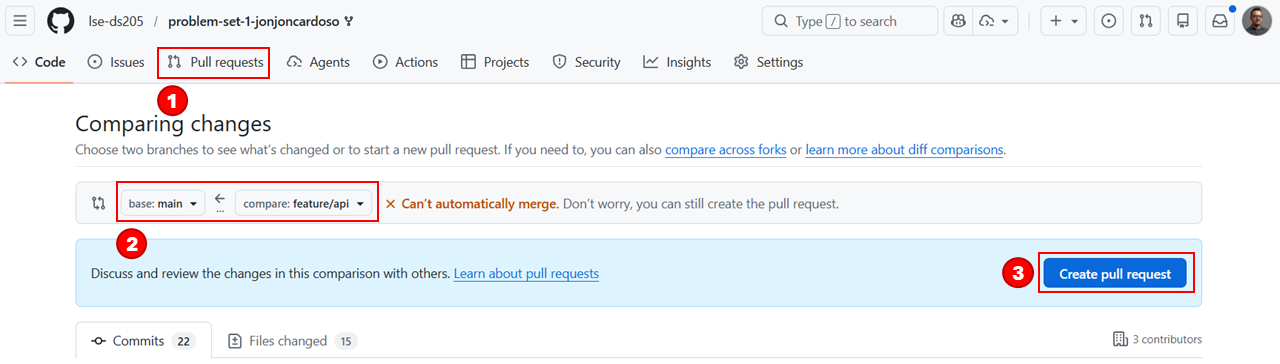
The reviewer can now inspect your changes, leave comments, and approve the work.
For ✍️ Problem Set 1: Create your Pull Request by Thursday 26 February 2026, 8pm UK time. Add Jon (jonjoncardoso) as a reviewer. Do not merge the Pull Request. Jon reviews it as submitted.
Common Issues
“I don’t see the Settings tab”
Your collaborator hasn’t added you yet. Contact them via Slack or email to request access.
“I accidentally committed to main”
If you have already committed to main, but haven’t git pushed yet, you can create the feature branch now. Your commits come with you:
git checkout -b feature/api
git push -u origin feature/api
Then reset main to match the remote:
git checkout main
git reset --hard origin/main
Then, go back to your feature branch and keep working there:
git checkout feature/api“My collaborator’s code is incomplete or broken”
Try to work with what you receive. If the documentation is unclear, ask via GitHub comments on the repository. If the code genuinely produces no usable data, contact Jon on Slack.
For ✍️ Problem Set 1: Jon can provide you a template scraper with sample data if your partner’s work is genuinely unusable. You won’t be penalised for your partner’s incomplete work.
“I can’t push to the branch”
Check these in order:
- Did you accept the repository invitation?
- Are you in the correct repository? Run
git remote -vto verify. - Try setting the upstream explicitly:
git push -u origin feature/api
“My collaborator made changes to their web scraper and I want to use them in my API”
Your collaborator should have updated their scraper on main by now. To merge those changes into your branch, stay on your own branch (feature/api) and run:
# Make sure your git is aware of all remote changes
git fetch origin

# Merge main into your current branch
git merge origin/main
If your collaborator made changes to files you also modified, there will be conflicts. You must resolve them manually using VS Code’s merge tool. Ask help on the #help channel on Slack if you need it.
PS1 Key Dates
Problem Set 1 Timeline
10 Feb: Pairings announced, collaboration begins
From 10 Feb: Jon gives feedback on Part A scrapers via GitHub Issues
26 Feb, 8pm UK time: Part B deadline (Pull Request with Jon as reviewer)
See the ✍️ Problem Set 1 page for full assignment details, and the ✍️ PS1 Pairings on SharePoint for your partner assignment.