
📦 Final Project (75%)
ME204 (2026) – Data Engineering Principles for the Social Sciences
This final project is worth 75% of your ME204 grade. You will choose a question and data source, build a complete data pipeline, and explore what you collected. Your final public page must answer one focused question through two or three central findings supported by your NB03 analysis. Use the core methods you learnt during Weeks 1 and 2, together with the tools introduced in Week 03 that help your project.
📝 Key Info
| ⏳ | Deadline | Friday, 31 July 2026 at 5 pm UK time |
| 💎 | Weight | 75% of your final ME204 grade |
| 🎯 | Final outcome | One clear answer to a focused question, built around two or three central findings supported by NB03 |
| 📂 | Submission | Nuvolos assignment hand-in from /files/assignments/final-project/ (guide; latest submission counts) |
| 👥 | Working together | Work alone, or share NB01 and NB02 with one partner. NB03 and the public page are individual. |
| 🤖 | AI policy | Fully authorised use. You remain responsible for every decision, file, value, and claim. |
| 🛠️ | Week 03 support | Each lecture of that week will include 1h-1h30m dedicated to project work with support from Jon. |
Your project follows the data science workflow:
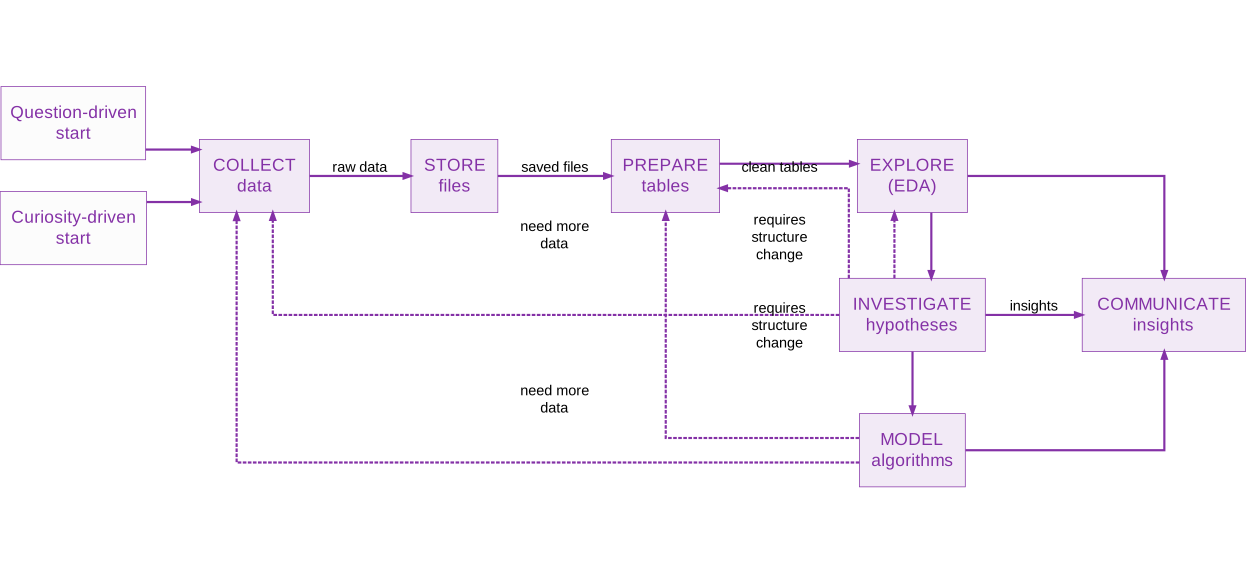
For this project, follow the route from COLLECT through COMMUNICATE. Investigating hypotheses and modelling algorithms are optional, not required.
✅ Start Here: Set Up Your Repository
TASK: Set up your repository before you write any project code.
The GitHub repository records how your project develops, so its history must begin when your project begins.
This part will also be a good opportunity to practice navigating the Terminal as well as your understanding of Git commands.
The Nuvolos assignment gives you starter files under /files/assignments/final-project/ but you still need to associate that folder with a GitHub repository.
Follow the instructions below according to whether you are working alone or in a pair.
I’m working on my own
Create a new private repository on GitHub, call it
me204-final-project.🔔 This time, leave the repository completely empty: do not add a README,
.gitignore, or licence on GitHub. We will add them in the next step.Match the settings in the screenshot below (Private, no template, README off, no
.gitignore, no licence):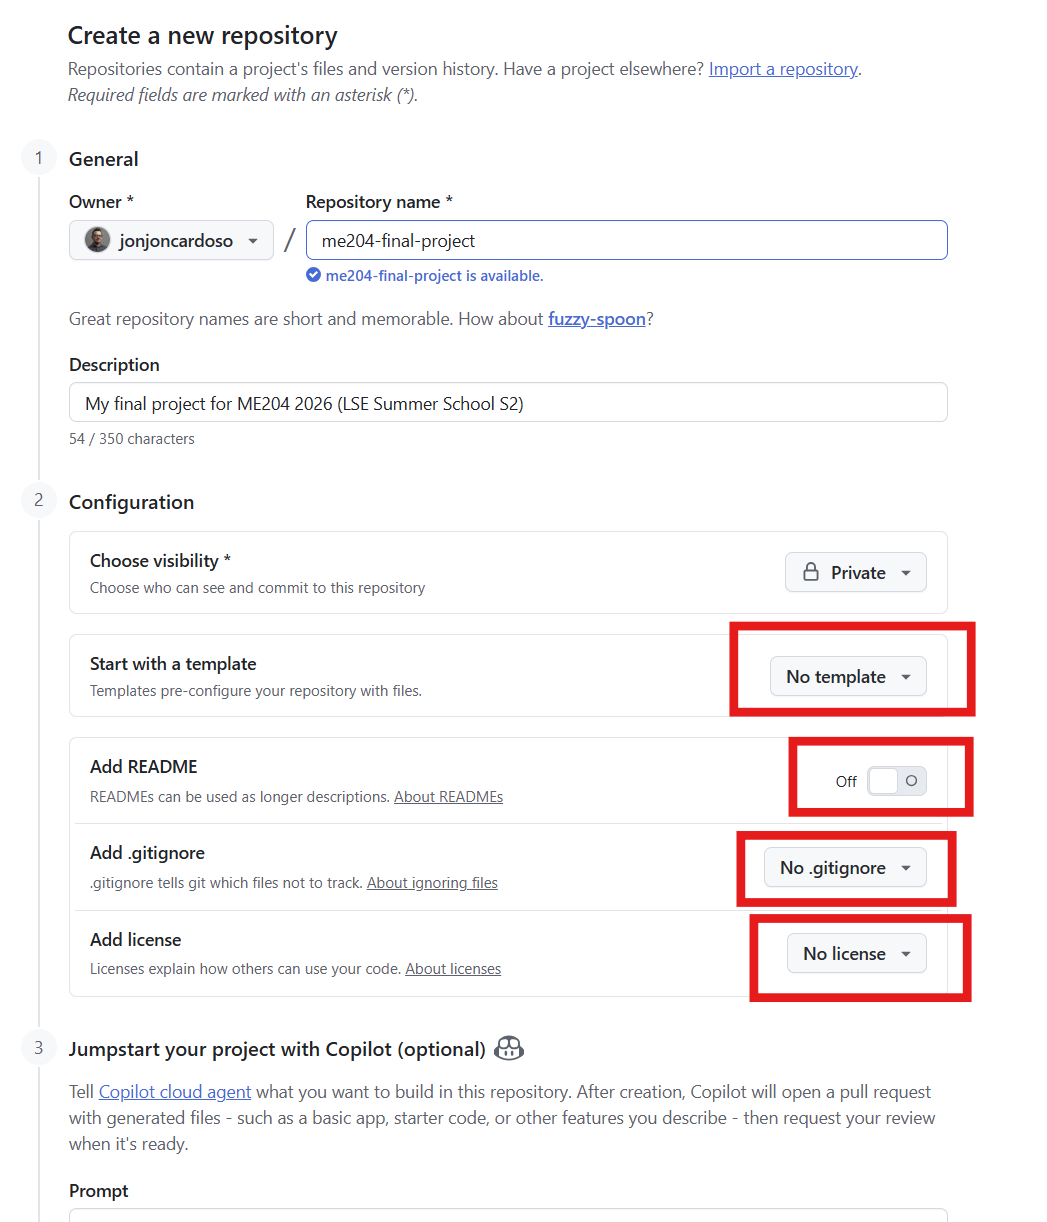
GitHub Create a new repository page with Private selected and Add README, Add .gitignore, and Add license all left empty or off. Open a terminal on Nuvolos, cd into the assignment folder to look at the starter files:
cd /files/assignments/final-project
lt
You should see that this current folder is NOT empty but contain some initial files to make your life easier.
Convert that folder into a Git repository:
The following commands instruct
gitto recognise that this folder is a Git repository and set the branch tomain.git init git branch -M mainLink the
/files/assignments/final-projectfolder with your GitHub repository:⚠️ Note though: you MUST replace
YOUR_GITHUB_USERNAMEandYOUR_REPOSITORY_NAMEwith your own GitHub username and repository name before running the remote command below.git remote add origin git@github.com:YOUR_GITHUB_USERNAME/YOUR_REPOSITORY_NAME.gitThat is, if your GitHub username is
jonjoncardosoand your repository name isme204-final-project, the command above would become:git remote add origin git@github.com:jonjoncardoso/me204-final-project.gitFinally, add the starter files to the repository and commit them:
git add .
git commit -m "Start final project"
Push the starter files to the GitHub repository and link your local
mainbranch to the version on GitHub:git push -u origin main(From now on, it is the routine you know:
git pushwill work fine.)Confirm that the starter files appear in your private GitHub repository.
Start small. Commit and push after each meaningful piece of work.
We’re working in a pair
Start by choosing one person as the repository owner. This person will create the shared repository and invite their partner.
👤 Repository owner
- Complete all seven steps under I’m working on my own above. Stop once you can see the starter files in your private GitHub repository.
- Open that repository on GitHub and go to Settings → Collaborators.
- Select Add people and invite your partner using their GitHub username.
- Wait until your partner accepts the invitation before they continue with the instructions below.
👤 Partner
Accept the repository owner’s invitation on GitHub.
Open a terminal on Nuvolos and move to the folder above
final-project:cd /files/assignments pwd ltThe
pwdcommand must print/files/assignments, andltshould show the suppliedfinal-projectfolder.While you remain in
/files/assignments, delete everything insidefinal-project:rm -rf final-project/* rm -rf final-project/.[!.]* ltThe first
rmcommand removes ordinary files and folders. The second removes hidden files whose names begin with., such as.gitignoreor.env.example. The finalltcommand should still showfinal-project, but nothing should appear inside it.⚠️ Do not run these
rmcommands unlesspwdprinted/files/assignments. They are written to remove only the contents offinal-project.Your work must remain directly under
/files/assignments/final-projectso that Nuvolos can find it when you submit.Move into the now-empty assignment folder:
cd final-projectClone the owner’s repository into the folder you are currently in:
⚠️ You MUST replace
OWNER_USERNAMEandREPOSITORY_NAMEwith the repository owner’s GitHub username and repository name before running this command.⚠️ Before you copy the command, notice how it ends:
.git .There is one space between.gitand the final dot. Keep that space and dot. They tell Git to place the repository directly in/files/assignments/final-project. Without the final dot, Git creates another folder insidefinal-project, and Nuvolos will not find your submission in the required place.git clone git@github.com:OWNER_USERNAME/REPOSITORY_NAME.git .For example, if the owner’s username is
jonjoncardosoand the repository is calledme204-final-project, the command would be:git clone git@github.com:jonjoncardoso/me204-final-project.git .Inspect the shared project and confirm its location:
lt
git status
pwd
You should see the same starter files that the repository owner pushed. The final command must print
/files/assignments/final-project.🔔 Do not run
git init. Thegit clonecommand has created the local Git repository and linked it to GitHub for you.
👥 Both of you
- You share NB01 and NB02.
- Each of you writes your own NB03 file or files and your own public page.
- Run
git pullbefore you start working so that you have your partner’s latest changes. - Commit and push after each meaningful piece of work so that your partner can see it.
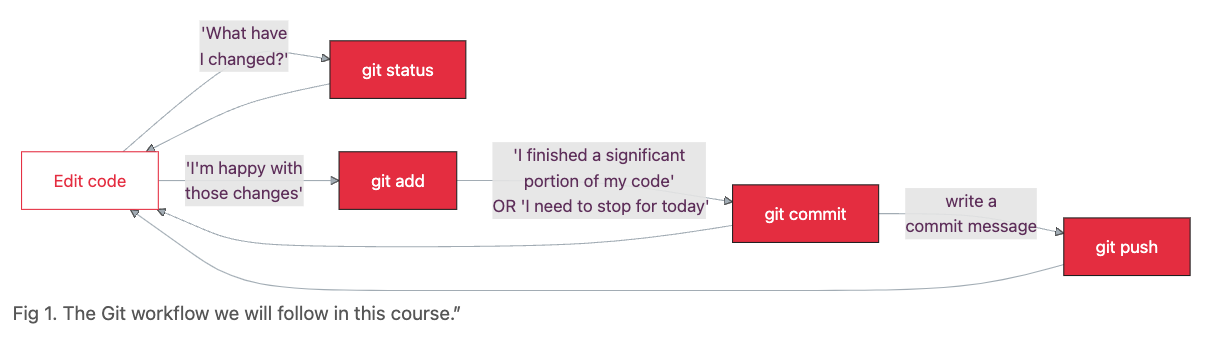
Continue to use the Git ceremony for the rest of your project:
🗂️ Required Structure and Naming
Keep the main folders and files organised like this:
final-project/
├── README.md
├── .gitignore
├── .env.example
├── data/
│   ├── raw/
│   ├── processed/
│   └── database.db                 # include when your project needs SQLite
├── notebooks/
│   ├── NB01-Data-Collection.ipynb
│   ├── NB02-Data-Transformation.ipynb
│   └── NB03-<your-github-username>-Data-Analysis.ipynb
└── docs/
    ├── index.md
    └── <your-github-username>.md
Anything inside <angle brackets> is an instruction to replace that text. Do not include the angle brackets in the real filename. For example, if your GitHub username is jonjoncardoso, your individual files could be NB03-jonjoncardoso-Data-Analysis.ipynb and docs/jonjoncardoso.md.
How to Name Your Code Files
Start with the same filenames you used in the midterm:
NB01-Data-Collection.ipynbcollects and saves raw data.NB02-Data-Transformation.ipynbprepares tidy tables for analysis.NB03-Data-Analysis.ipynbcontains your exploratory analysis.
For the final project, keep the familiar NB01 and NB02 names unless you need several files for one stage. Add your GitHub username to every individual NB03 filename, as explained below. You may use Jupyter notebooks (.ipynb), Python scripts (.py), or a mixture of both.
Do I need a letter such as a or b?
The most common reason to add letters is that you are collecting data from several APIs and want one NB01 file for each API.
If one file collects everything you need, keep the familiar name:
NB01-Data-Collection.ipynb
If you collect from two APIs in two separate files, add a and b directly after NB01. Keep Data-Collection in both names, then add the source so that a reader can tell them apart:
NB01a-Data-Collection-OpenWeather.ipynbNB01b-Data-Collection-WorldBank.ipynb
If you add a third API, continue with NB01c. Use the same letters in the order you list the files in your README.
Having NB01a and NB01b does not mean that you must also create NB02a and NB02b. If one NB02 file can prepare all your collected data, keep NB02-Data-Transformation.ipynb.
Add letters to NB02 only if you decide to separate the preparation work across several files. For example:
NB02a-Data-Transformation-OpenWeather.ipynbNB02b-Data-Transformation-WorldBank.ipynb
The same principle applies to NB03: add letters only if your individual analysis uses several files.
If You Are Working in a Pair
You share the NB01 collection files and NB02 preparation files. You each write your own NB03 analysis file or files.
Every NB03 filename must include the GitHub username of the person who wrote it. For example, two partners might create:
NB03-jonjoncardoso-Data-Analysis.ipynbNB03-anotherusername-Data-Analysis.py
If you split your own analysis across several files, keep your username in every filename and add letters for their order, such as NB03a-jonjoncardoso-Data-Analysis.ipynb followed by NB03b-jonjoncardoso-Data-Visualisation.py.
You may add subfolders under data/raw/ when you collect from several sources. List those subfolders in the README and explain what they contain.
Your README
Begin the README with this identity table:
| GitHub username | LSE ID |
|---|---|
[username] |
[LSE ID] |
[second username, if working in a pair] |
[second LSE ID] |
Remove the unused row if you work alone. The README must also:
- introduce the question and data sources
- explain how to recreate the Python environment and obtain any credentials
- list every notebook and script in the order another person should run them
- state what each file reads, does, and writes
- explain any departure from the expected structure
🔨 Build Your Project
This section names what each stage must produce. How you get there is your design, as long as the repository shows a runnable collect → prepare → explore → communicate sequence.
NB01: Collect and Save Raw Data
NB01 must contain code that collects the main data used in your project from one or more APIs, or by scraping webpages where the website permits it. Choose data that gives you enough material to investigate a focused question. Save the original responses under data/raw/, document each source so another person can identify it, and keep credentials in .env.
A static CSV, JSON, or other file that you download manually cannot be your project’s main data source. You may use static or manually gathered data only to supplement the data collected by your code.
Which data sources can I use?
Your main data source must be:
- a public or authenticated API, OR
- web scraping where the website permits it
You may add a public downloadable dataset, such as a static CSV or JSON file, as a supplementary source. You may collect some data manually only when it supplements data collected from an API or web scraping.
A JSON or CSV response returned by an API request in your NB01 code counts as collected data. A complete CSV, JSON, or similar file published for direct download counts as static data, even if your code downloads it, and cannot be the main source.
I need ideas for a data source
- Google Maps Geocoding API converts addresses into coordinates and coordinates into addresses. It requires a Google Cloud project and credentials, so check its current access conditions before choosing it.
- OpenWeather provides weather, forecast, and air-quality data. You may return to it after the midterm if you collect different data or investigate a different question.
- NASA Open APIs provide astronomy, Earth observation, imagery, and other scientific data.
- The Movie Database API provides data about films, television programmes, actors, and images.
- GitHub’s REST API provides data about repositories, issues, pull requests, users, and organisations.
- World Bank APIs provide development indicators and metadata for countries.
- Wikimedia APIs provide data from Wikipedia and related projects.
- Open Food Facts provides product, ingredient, nutrition, and packaging data.
- Browse the Public APIs list on GitHub for more possibilities, but check the official documentation before committing to one.
- Return to an API used in class, but collect different data or ask a question the class exercises did not answer.
- Use a static dataset from data.gov.uk or the Office for National Statistics only to supplement your main API or web-scraping data.
Use real data from an identifiable source. Do not fabricate data or submit data created by an AI tool. Respect website terms, robots.txt, privacy, and consent. Do not collect personal or sensitive data without explicit consent.
NB02: Prepare Reusable Tables
NB02 starts with the original files under data/raw/. Its job is to turn those files into one or more tidy tables that NB03 can load and analyse without repeating the preparation work.
Save the prepared tables as CSV files under data/processed/, in a SQLite database at data/database.db, or in both formats when each serves a clear purpose. CSV files are a complete and valid choice. You do not need a SQLite database simply to make the project look more advanced.
You are not required to invent a use for pd.merge, pd.explode, melt, SQL, dashboards, or any other method introduced during Week 03. Once your chosen project creates a need for one of these methods, use an appropriate method and explain what problem it solved. For example, combine sources when your question needs both, reshape values when their current structure blocks the analysis, and build the dashboard if that is your proposed public output.
NB03: Explore Your Data
NB03 reads the tidy outputs from NB02 and explores the data for patterns, comparisons, and findings that could help answer your project question. It must not repeat the collection or main preparation work.
Each student writes their own NB03 notebook, Python script, or numbered set of files, with their GitHub username in every NB03 filename.
NB03 may explore more patterns than you eventually use on the website, but it must contain the evidence for each of the two or three central findings you select. Keep the analysis exploratory rather than inferential, predictive, or machine-learning based. Choose as many or as few plots and tables as you need to understand the data and develop that evidence.
Public Website
Each student creates one public page under docs/, named with their GitHub username:
docs/<github-username>.md, ordocs/<github-username>.qmdif you choose Quarto
If you use Quarto, render the .qmd file to HTML before submission. The shared docs/index.md links to each student’s page.
Publish the docs/ folder through GitHub Pages:
- Open the repository on GitHub and go to Settings → Pages.
- Under Build and deployment, choose Deploy from a branch.
- Choose the
mainbranch and/docsfolder, then save. - Open the published site and confirm that
docs/index.mdlinks to every individual page.
The website is where you answer the focused project question for a general reader. Select the two or three strongest findings developed in NB03 and connect them into one clear account.
👥 Write for Three Audiences
The project asks you to explain the same work at three levels of technical detail:
| Artefact | Reader | What they need |
|---|---|---|
README.md |
Technical colleagues | Setup, credentials, file order, inputs, outputs, and reproduction steps |
| Notebook Markdown or script comments | Data analysts | Decisions, alternatives, transformations, analytical reasoning, and evidence |
| Individual website | General readers | Why the question matters, what the data shows, and what the findings mean |
Give each reader the information they need without repeating the same text across the three artefacts.
🤖 Generative AI Policy
You may use generative AI freely throughout this project. We assess how well you understand and direct the work.
You remain responsible for:
- checking that the code runs and does what you claim
- protecting credentials and personal data
- verifying values, sources, and website claims
- explaining unfamiliar methods or libraries you choose
- making the final analytical and communication decisions
Your submitted files must show that you inspected the results and used evidence from your own data.
📊 How We Mark Your Project
Three Criteria
We mark the evidence in the files you submit. Your final mark is the sum of the marks awarded for these three criteria:
| Criterion | Marks | Ask yourself |
|---|---|---|
| Pipeline and Professional Practice | 30 | Can another person follow the README, run the files in order, obtain the prepared data used by NB03, and see how the work developed in Git? |
| Analytical Reasoning | 35 | Does NB03 explore the prepared data systematically, and can a reader see how your choices and findings follow from that exploration? |
| Communication | 35 | Do the README and code documents serve their technical readers, and does the website answer the focused question through two or three central findings? |
Read each question while looking at the files in your repository, including only work that another person can inspect there.
Marking Bands
A project whose needs are fully met by the methods taught from W01D01 to W02D04 can reach any marking band. You do not need to invent a reason to use a method shown in Week 03. If your chosen data, question, or public output creates that need, use an appropriate method and explain what it allowed you to do.
| Band | Range | What you would see across the project |
|---|---|---|
| Pass | 50–59% | The required parts are present and the main sequence works, but some steps, explanations, or decisions are incomplete. |
| Good | 60–69% | The project works, answers its question, and uses familiar methods correctly. The README, code documents, and website agree with one another. |
| Really Good | 70–79% | Choices respond to what you found in your own data. You explain why you made them, and each part of the project supports the next. |
| WOW | 80–100% | The work solves hard problems with clever, advanced choices, and still stays short. Another capable student could learn from how little code, explanation, and clutter it needed. |
Marks rise when each choice improves the work and you can explain what it allowed you to do.
Pipeline and Professional Practice bands (30 marks)
Explain the decisions another person needs to understand. Keep those explanations short, and avoid narrating obvious code line by line or repeating the same information across files.
| Band | Marks | What we can see in your files |
|---|---|---|
| Below the passing standard | 0–14 | NB01 does not collect the main data, raw files are missing, NB02 does not produce usable prepared data, credentials are exposed, Git history is missing or unusable, or the repository cannot be run. |
| Pass | 15–17 | NB01 collects and saves raw data, NB02 produces data that NB03 can load, and the main sequence can be followed. The repository shows some Git history. Some steps or explanations may be incomplete. |
| Good | 18–20 | Collection is organised with named functions where repeated work needs them, and preparation after files are on disk uses pandas methods for tables, filters, and summaries. Credentials are protected, each tidy table states what one row represents, and the README is concise but sufficient. Commits show regular progress, and their messages explain how the project developed and record corrections when mistakes were found. |
| Really Good | 21–23 | Collection and preparation choices are shaped by the project question and by what appears in the submitted data. Tables contain what the analysis needs, transformations address problems in the chosen sources, and methods introduced during Week 03 are used wherever the project requires them. Git history shows purposeful development across the project. |
| WOW | 24–30 | The pipeline handles real source constraints with clever design, stays reliable and easy to rerun, and still looks almost simple. Few files, short functions, and a lean README are enough for another capable student to reuse the approach. |
Analytical Reasoning bands (35 marks)
| Band | Marks | What we can see in your files |
|---|---|---|
| Below the passing standard | 0–17 | NB03 contains too little exploration to develop usable findings, or states results that a reader cannot connect to the code and outputs shown. |
| Pass | 18–20 | NB03 loads the prepared data, explores it in a relevant way, and records at least one finding that the website could use. |
| Good | 21–24 | The exploration uses suitable summaries, filters, groups, tables, or visualisations to develop findings. Those findings follow from the results shown. |
| Really Good | 25–27 | Explanations refer to specific values and patterns in the data. You justify important choices, consider useful alternatives, and state limitations that affect the findings. |
| WOW | 28–35 | Surprising patterns lead to sharp next questions, and the methods chosen answer them with real command. NB03 can be as long as your exploration needs, provided a reader can follow it from start to end without losing the thread. |
Communication bands (35 marks)
| Band | Marks | What we can see in your files |
|---|---|---|
| Below the passing standard | 0–17 | The website is missing or unreadable, the README does not tell someone how to run the project, or the code documents contain too little explanation to follow the work. |
| Pass | 18–20 | The README gives basic setup and file-order information, the code documents explain some steps, and the website reports at least one finding. |
| Good | 21–24 | A technical reader can use the README, a data analyst can follow the code and explanations, and the website connects two or three supported findings into an answer to the focused question. |
| Really Good | 25–27 | The README supports reproduction, the code documents explain decisions using specific evidence, and each central finding on the website can be traced to NB03. |
| WOW | 28–35 | Each artefact is advanced because it is precise and short. The README, NB03, and website each say exactly what their reader needs, so someone can reproduce the work, inspect the reasoning, and understand the findings and limitations from those files alone. |
⬆️ Submission Checklist
Before the deadline:
If you work in a pair, both students submit the complete shared repository through their own Nuvolos account and use their own LSE ID. You may submit again before the deadline if you need to correct something. We mark your latest completed Nuvolos submission.