
💻 Week 10 Lab
Branches, Pull Requests, and merge conflicts
By the end of this lab, you should be able to: i) create an Issue on GitHub and a branch linked to it, ii) check out a remote branch locally and push changes to it, iii) open a Pull Request that automatically closes its Issue on merge, iv) deliberately create, identify, and resolve a merge conflict, v) plan your formative pitch using Issues and docs/index.md.
This lab is about working as a team on GitHub. You will practise the collaboration patterns (branches, pull requests, merge conflicts) that you will use throughout the 📦 Group Project. Come to the lab with your group and sit together.
📋 Preparation
- Attend the 🖥️ W10 Lecture
- Make sure you have joined your group’s repository on GitHub Classroom: GitHub Classroom link
- Clone the repository to your local machine (or on Nuvolos) if you have not done so already
- Have your terminal and VS Code (or your preferred editor) ready
🛣️ Lab Roadmap
| Part | Activity Type | Focus | Time | Outcome |
|---|---|---|---|---|
| Part 1 | 🎯 ACTION POINTS | Issues, branches, and Pull Requests | 30 min | Each member has created a fun-facts file via a branch and merged a PR |
| Part 2 | 🎯 ACTION POINTS | Deliberate merge conflict | 20 min | Your team has created, observed, and resolved a conflict |
| Part 3 | 🎯 ACTION POINTS | Plan your formative pitch | 30 min | Your docs/index.md and project board are ready for Monday/Tuesday |
| Wrap-Up | 🗣️ TEACHING MOMENT | Pitch checklist | 5 min | Everyone knows what to bring on Monday/Tuesday |
Part 1: Issues, branches, and Pull Requests (30 min)
Note to class teachers: Walk through the full cycle on the projector first using a demo repository: create an Issue, create a branch from it, check it out locally, make a change, push, open a PR with “closes #N”, and merge. Then let students do it one at a time within their groups. Circulate and help anyone stuck on the checkout or push step.
When you are working in a team, someone needs to check your work before it lands in the main codebase. That is what Pull Requests are for. The workflow goes like this: you describe a task in an Issue, create a branch for it, do the work, push, then open a Pull Request so a teammate can review before merging.
You can create Issues from the Issues tab on your repository, or directly from the Project Board you set up in the lecture. Both work the same way.
Step 1: Create an Issue
One team member creates a GitHub Issue that represents a task that needs to be done in the project. Use the template below:
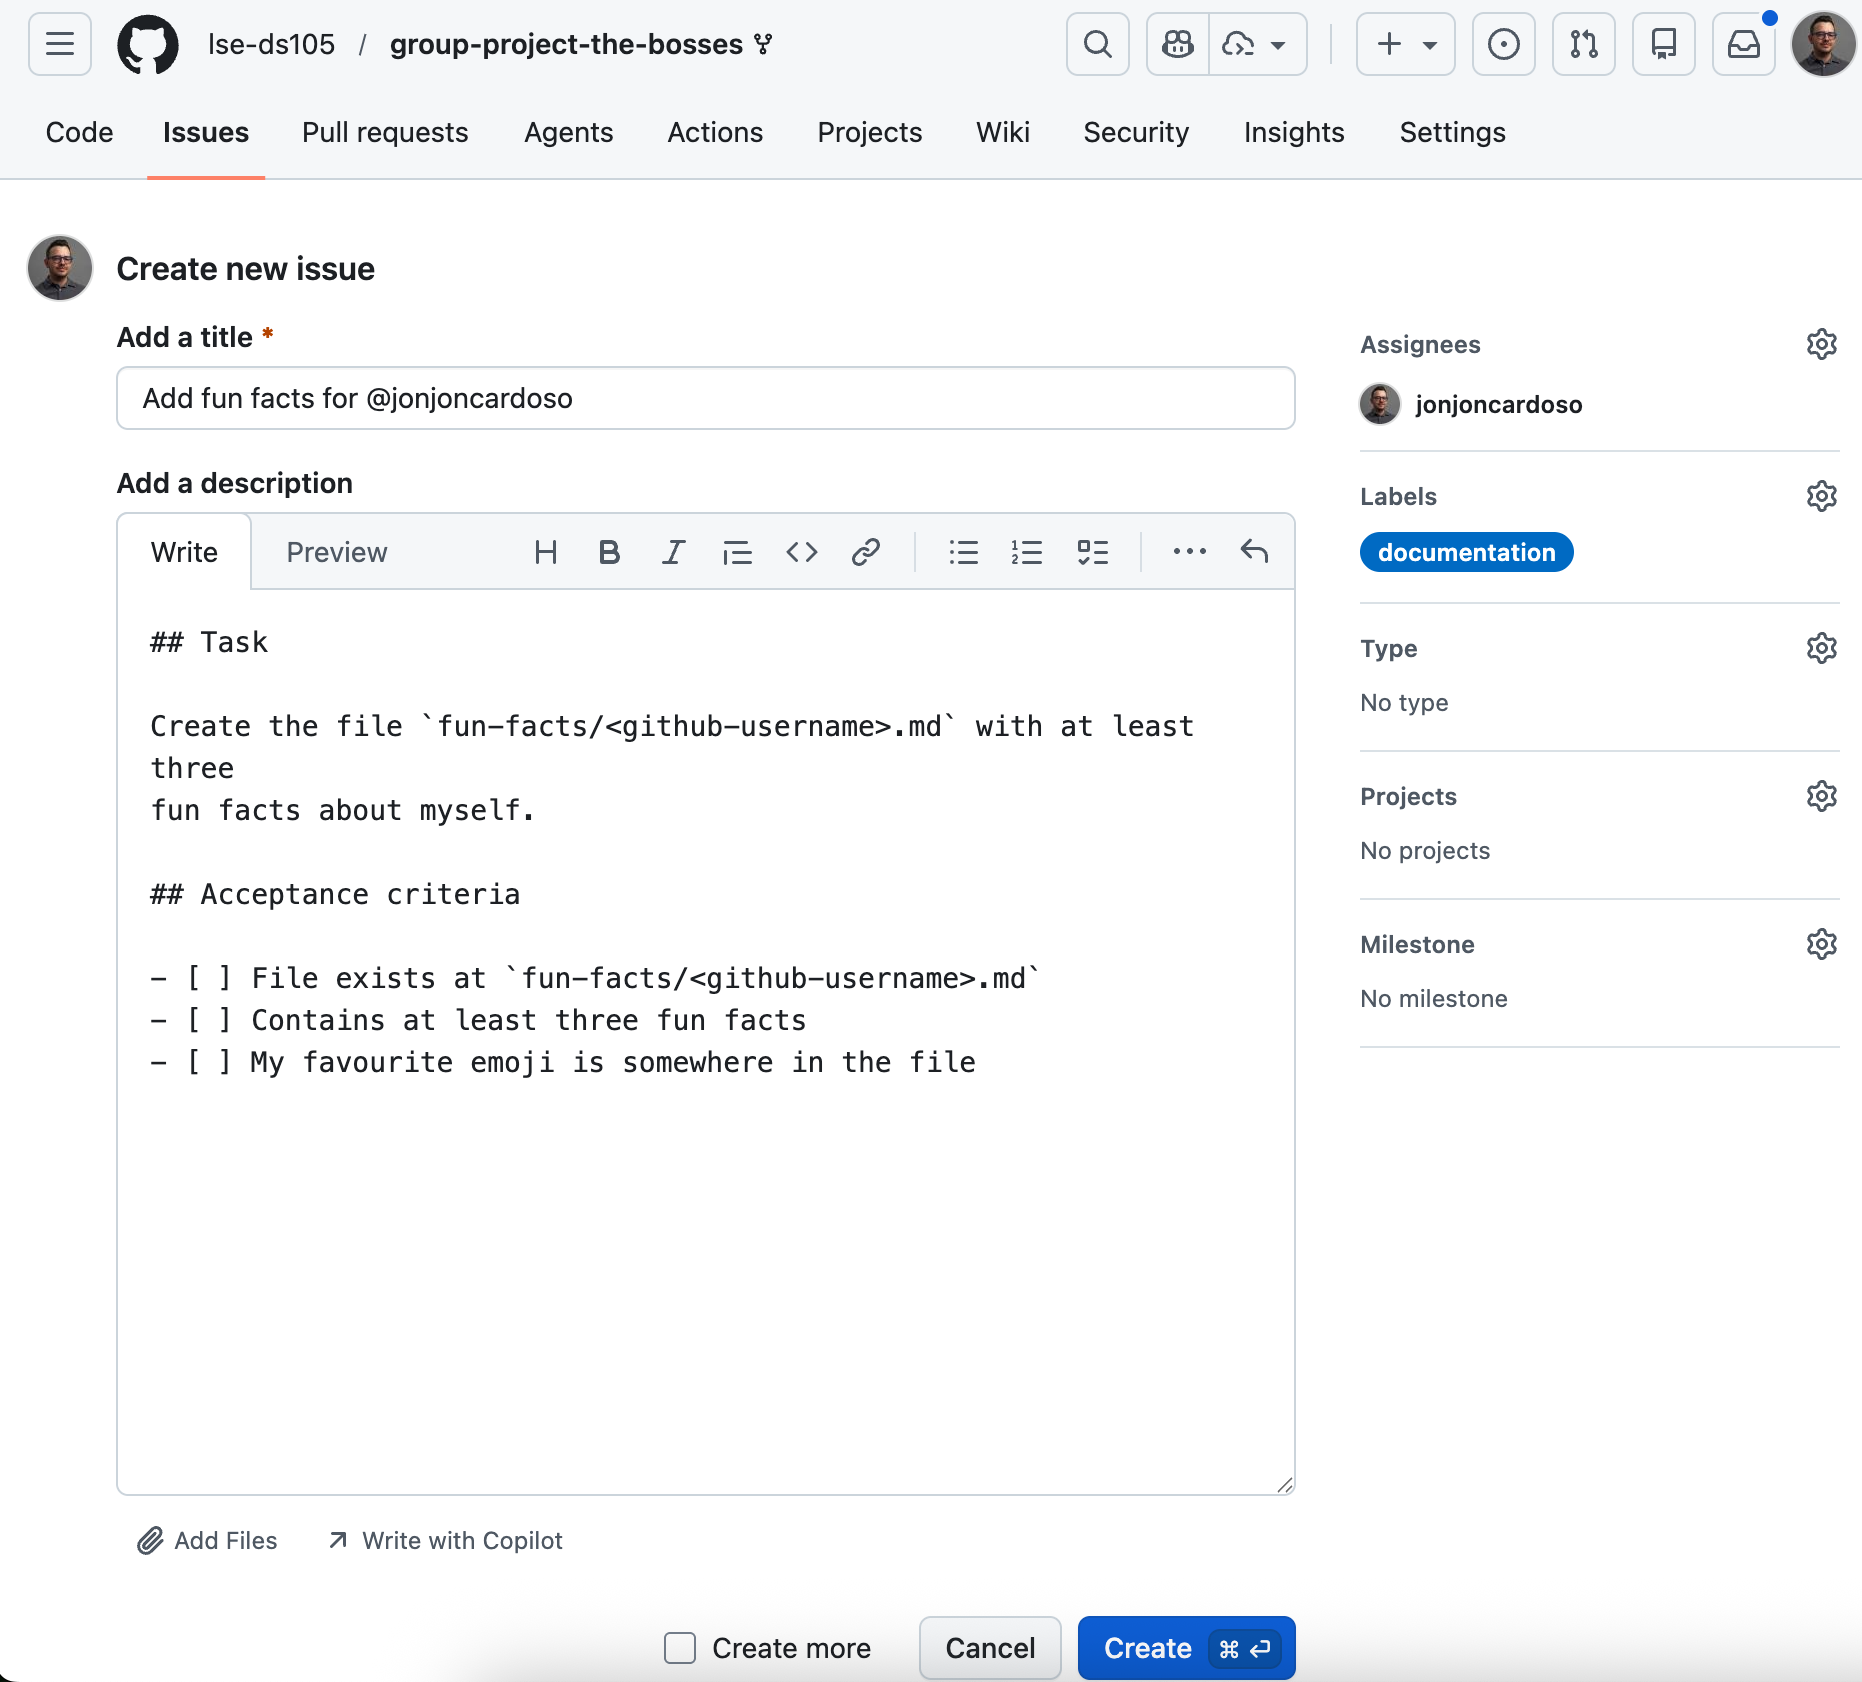
Issue template
Title: Add fun facts for <github-username>
Body:
## Task

Create the file `fun-facts/<github-username>.md` with at least three
fun facts about myself.

## Acceptance criteria

- [ ] File exists at `fun-facts/<github-username>.md`
- [ ] Contains at least three fun facts
- [ ] My favourite emoji is somewhere in the file
Step 2: Create a branch from the Issue
On GitHub, open your Issue and then create a branch directly from it:
On the right sidebar of the Issue, find the “Create a branch” link under Development.
Keep the suggested branch name (it will include the Issue number).
Click Create branch.
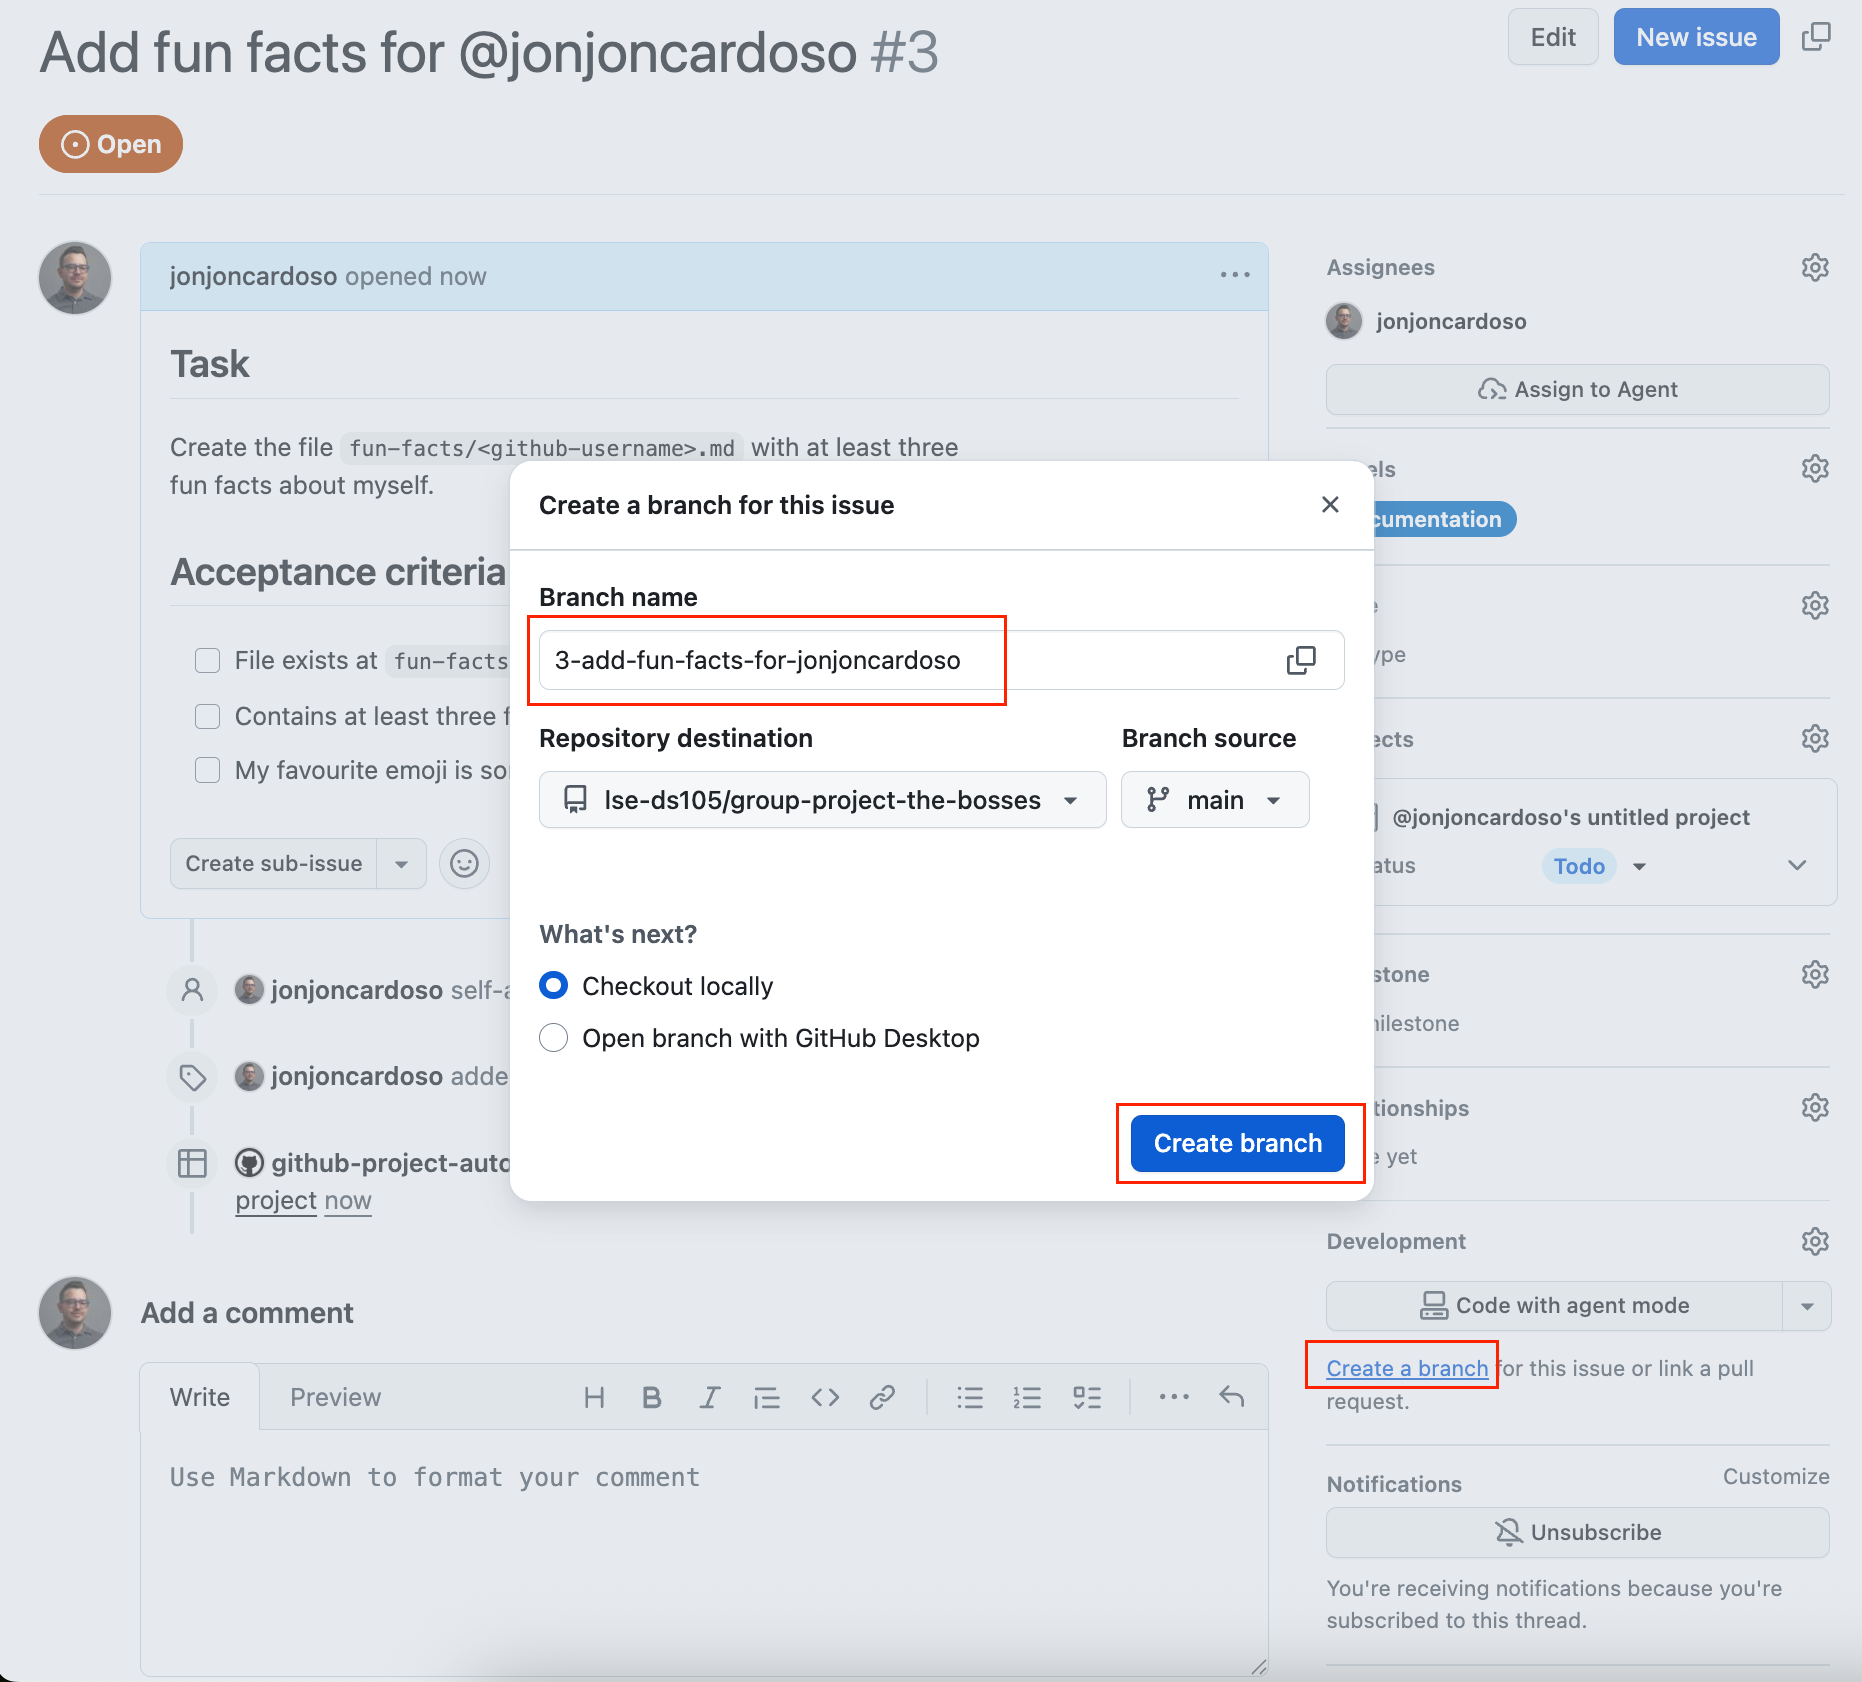
Creating a branch from an Issue. Click “Create a branch” on the right sidebar, keep the suggested name, and click Create branch.
GitHub will show you the commands to check out the branch locally.
Step 3: Check out the branch locally
In your terminal, fetch the new branch and switch to it:
git fetch origin
git checkout <branch-name>
Replace <branch-name> with the name GitHub created (something like 3-add-fun-facts-for-username).
Step 4: Do the work
Create your fun-facts file:
mkdir -p fun-factsThen create fun-facts/<your-github-username>.md. Be creative!
Step 5: Commit and push
git add fun-facts/<your-github-username>.md
git commit -m "Add fun facts for <your-github-username>"
git push origin <branch-name>
If git complains about “no upstream branch”
If you type git push without specifying the remote and branch name, git will refuse and show something like:
fatal: The current branch 1-add-fun-facts-for-jonjoncardoso has no upstream branch.
To push the current branch and set the remote as upstream, use

    git push --set-upstream origin 1-add-fun-facts-for-jonjoncardoso
This just means git does not know where to push by default. You have two options:
- Use the full command as written above:
git push origin <branch-name>. This always works. - Set the upstream once by running the command git suggests:
git push --set-upstream origin <branch-name>. After that, plaingit pushwill work for the rest of this branch’s life.
Either way is fine. The error is not a problem with your code or your branch — git is just asking you to be explicit.
Step 6: Open a Pull Request
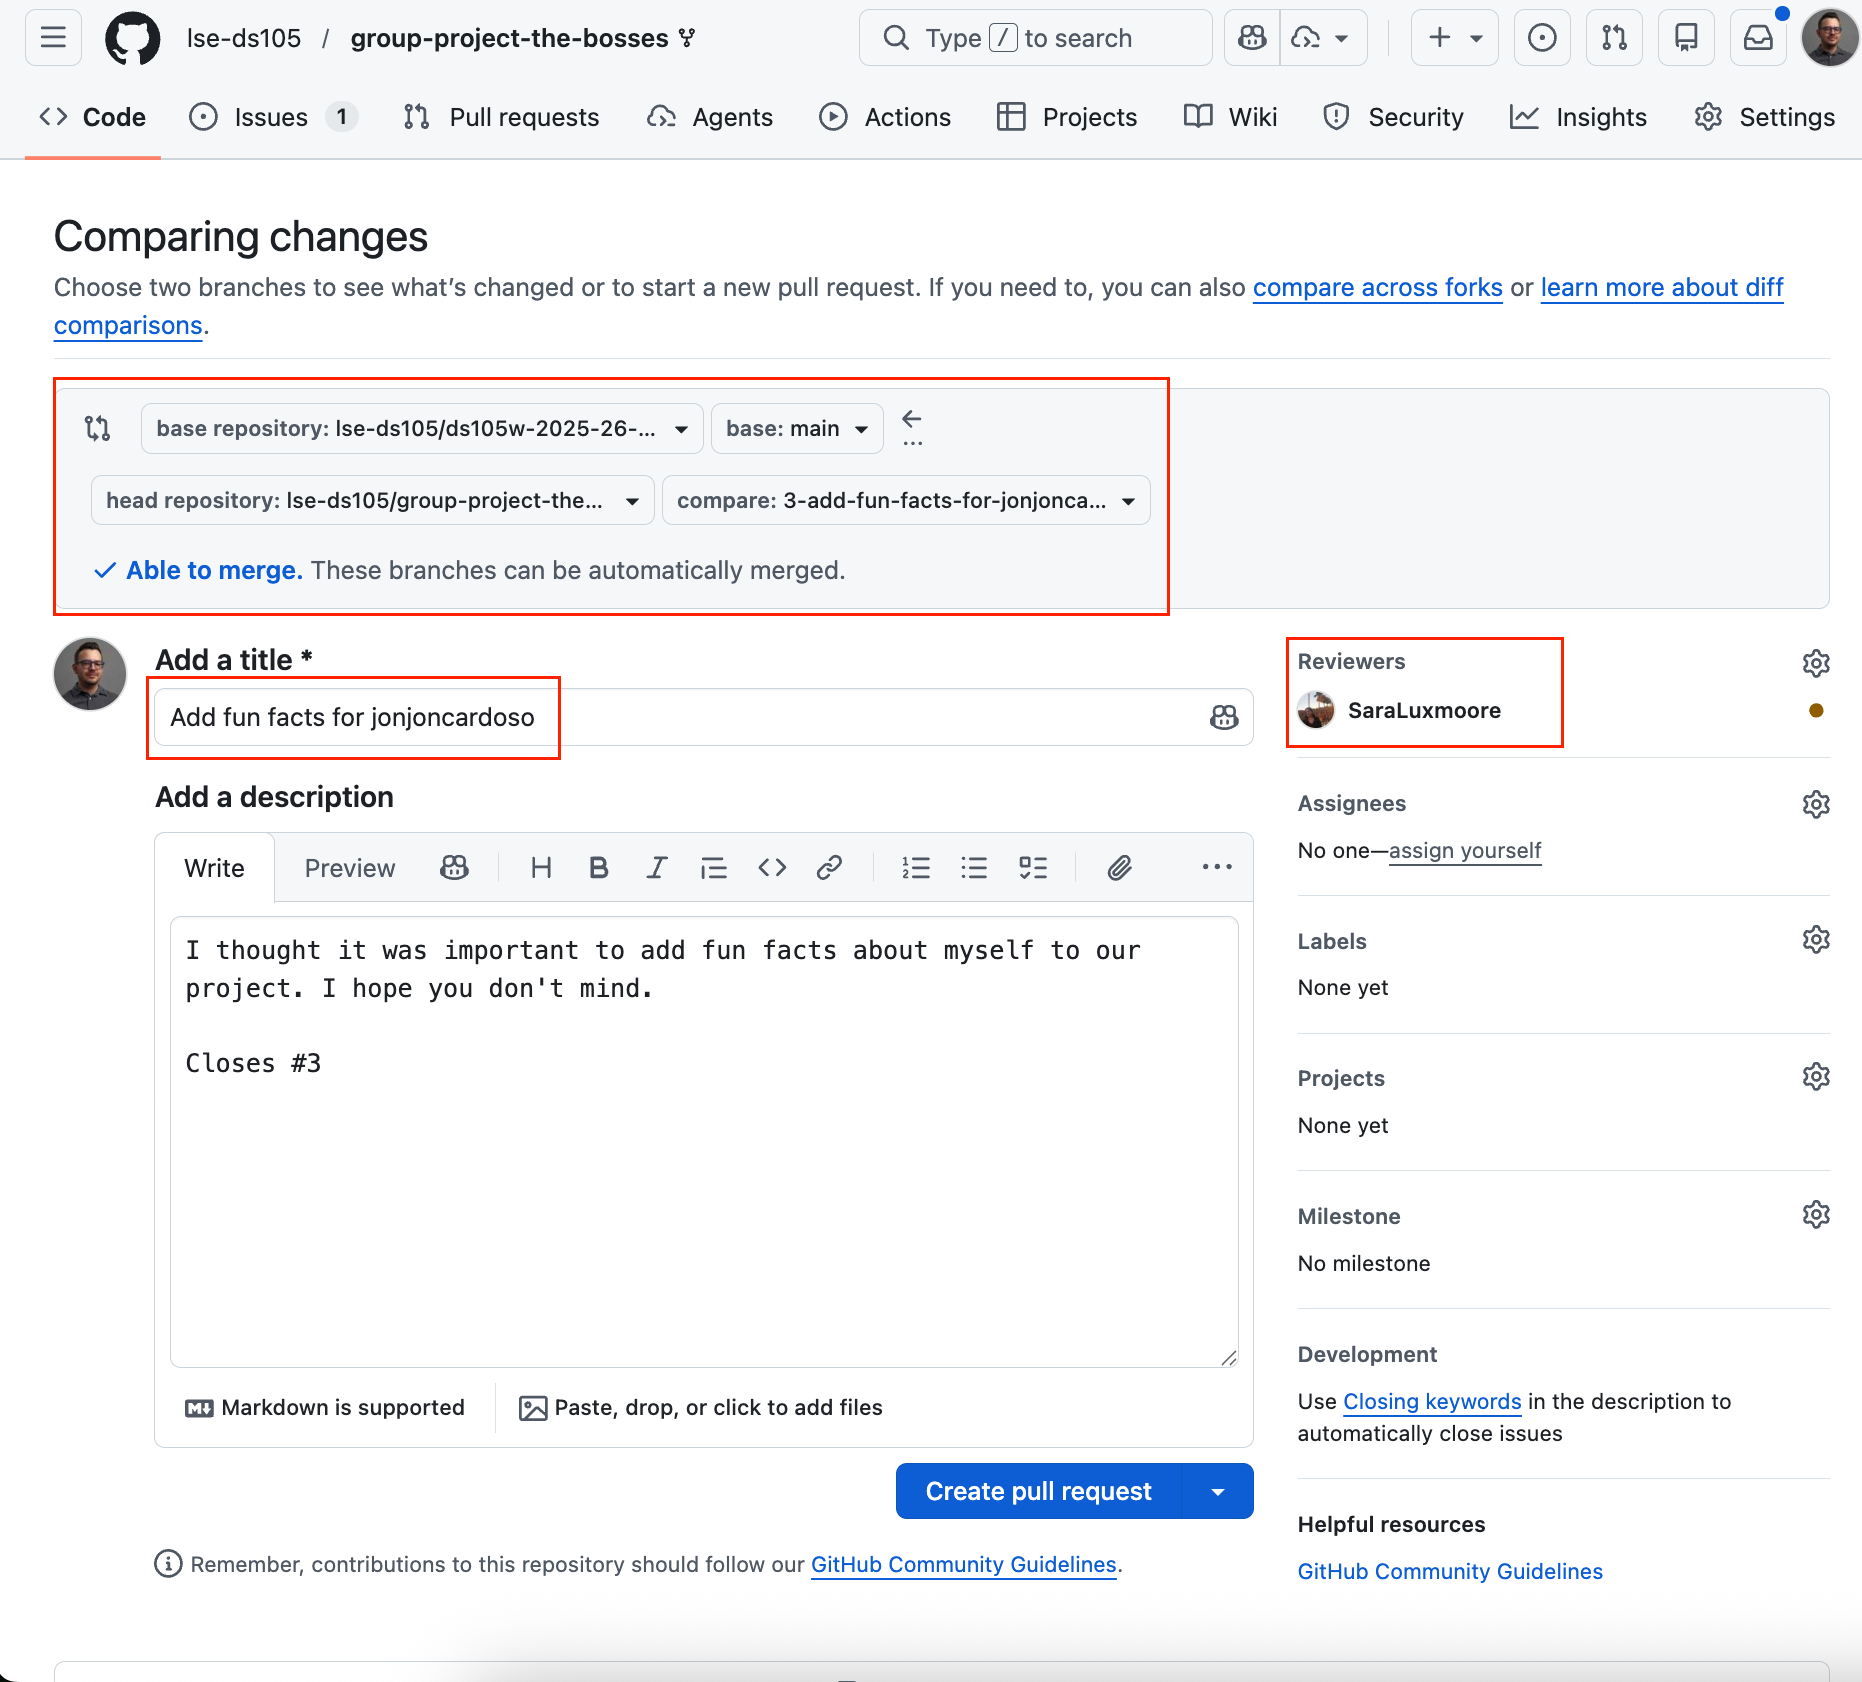
Go to your repository on GitHub. You should see a banner offering to open a Pull Request for your branch. Click it.
You will see two fields:
Title (the top line): give your PR a short descriptive name, like
Add fun facts for jonjoncardoso.Description (the larger text box below): this is where you explain what you did and link the Issue.
In the description box, write something like:
Added my fun-facts file with three facts and my favourite emoji.

Closes #2
Replace
2with the number of the Issue you created (you can see it in the Issues tab, or in the URL of your Issue page). TheCloses #2line is special: when the PR is merged, GitHub will automatically close Issue #2.
Ask a teammate to review your PR (they can leave a comment or just approve).
This will look like:
Step 7: Merge and pull
Once reviewed, merge the PR into main. Then everyone pulls:
git checkout main
git pull origin main
Tip: Do these one at a time within your group (Person A completes the full cycle first, then Person B, then Person C). This avoids conflicts in this exercise and lets everyone see the complete workflow.
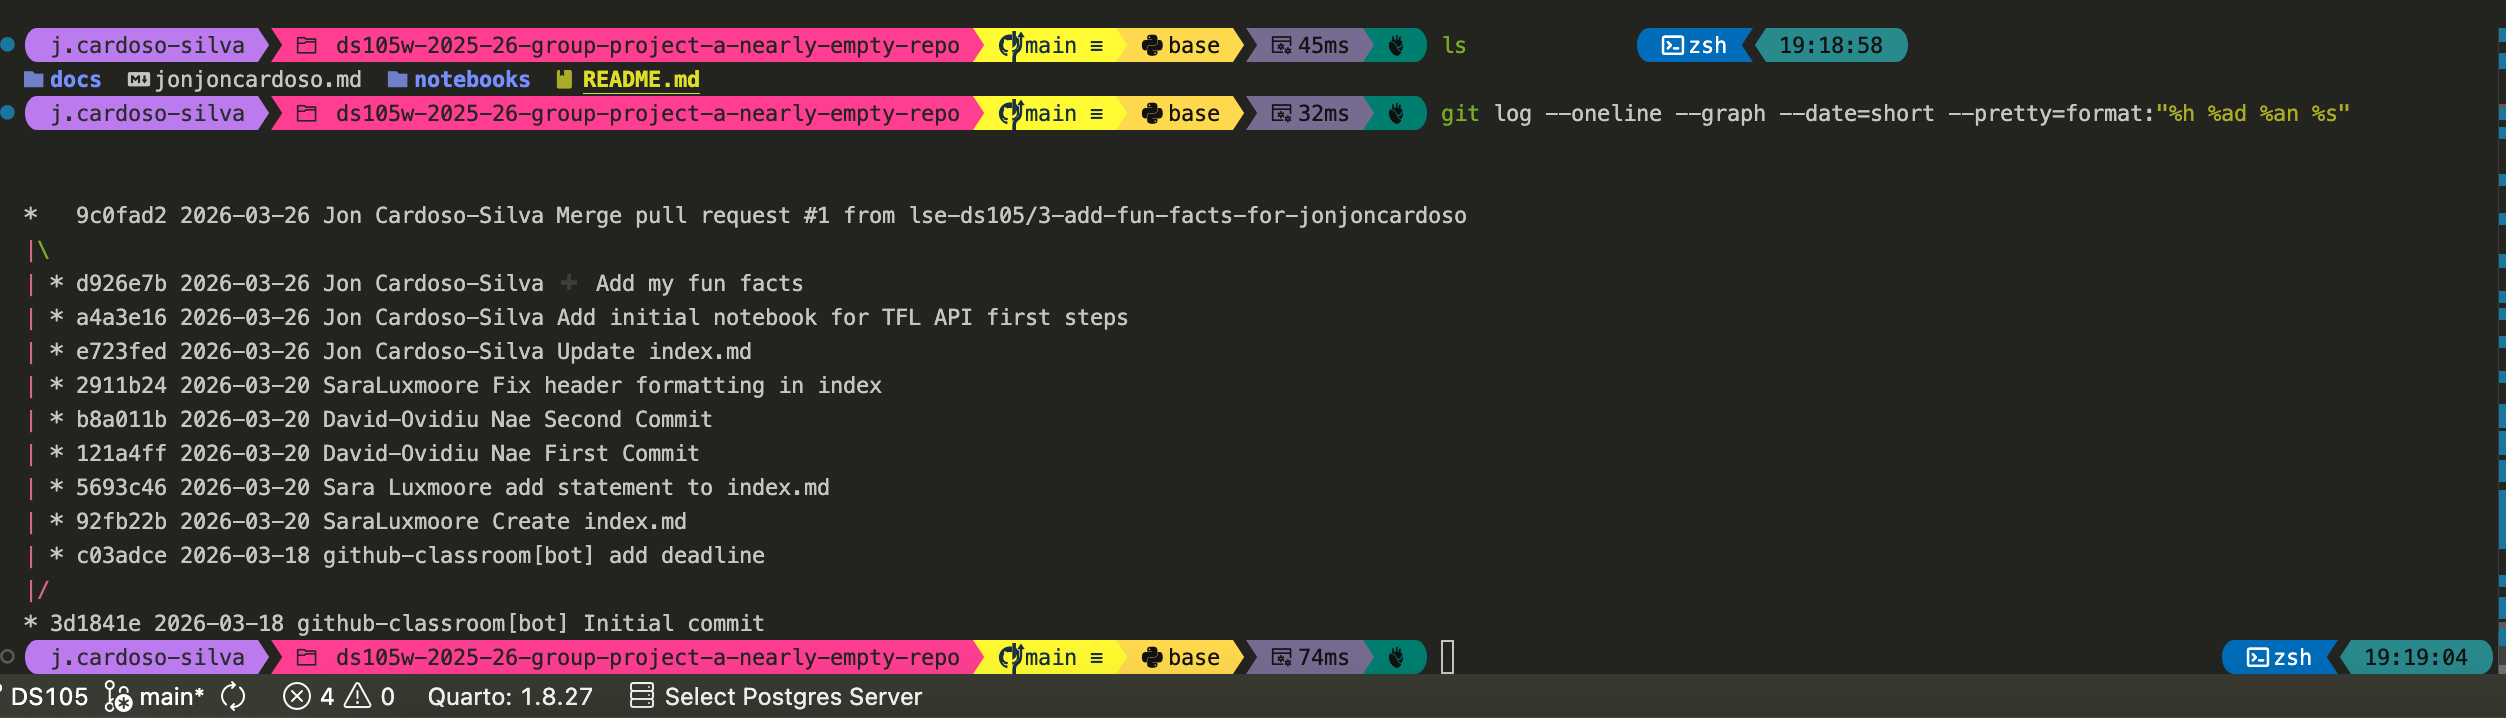
After everyone has merged, visualise the branch history:
git log --oneline --graph --date=short --pretty=format:"%h %ad %an %s"You should see each branch merging into main, with dates and author names:
No. Branches are most useful when you are working in parallel with others and the changes you make might interfere with their work. They are also helpful when you are making substantial changes and it is important for someone to review them before they land in main.
It is perfectly fine to push directly to main if your team prefers that workflow. Just be aware that you might hit conflicts if two people push changes to the same file around the same time. Having a conversation about this with your group is a good idea.
Part 2: Deliberate merge conflict (20 min)
Note to class teachers: This exercise works best in pairs within each group. Make sure both people edit the exact same line. Walk through the conflict markers on the projector after the first pair hits the conflict. Emphasise that conflicts are normal, not errors. VS Code highlights the conflict markers in colour.
Merge conflicts happen when two people edit the same line. They are a normal part of collaboration, not an error. This exercise creates one on purpose so you know what to expect.
The setup
Your repository should have a file called README.md. If it does not, one person should create it and push before continuing.
Both people start from a clean, up-to-date main:
git checkout main
git pull origin main
Now, both Person A and Person B will edit the same line of the README.md.
Person A opens README.md and replaces the first line with:
# 🍕 Pizza Appreciation SocietyCommits and pushes:
git add README.md
git commit -m "Rename project to Pizza Appreciation Society"
git push origin main
Person B (without pulling first!) opens the same README.md and replaces the same first line with:
# 🌮 Taco Fan ClubCommits and tries to push:
git add README.md
git commit -m "Rename project to Taco Fan Club"
git push origin main
The push will be rejected. That is expected.
Resolving the conflict
Person B pulls to see the conflict:
git pull origin mainOpen README.md. You will see something like:
<<<<<<< HEAD
# 🌮 Taco Fan Club
=======
# 🍕 Pizza Appreciation Society
>>>>>>> origin/main
VS Code highlights these markers in colour. Choose the version your team wants to keep (or combine both!), delete the <<<<<<<, =======, and >>>>>>> markers, and save.
Then complete the merge:
git add README.md
git commit -m "Resolve conflict: agreed on project name"
git push origin main
Everyone else pulls:
git pull origin mainChange the README.md back to something sensible for your project before moving on.
What if a conflict happens while merging a Pull Request?
The cleanest approach is to resolve the conflict before the merge, not during it. If GitHub shows “This branch has conflicts that must be resolved” on your PR page, do this locally:
# Switch to your feature branch
git checkout <your-branch>

# Pull the latest main into your branch
git pull origin main
Git will flag the conflicting files. Open them, resolve the markers (just like you did above), then:
git add <conflicting-files>
git commit -m "Resolve conflict with main"
git push origin <your-branch>
The PR on GitHub will update automatically and the conflict warning will disappear. You can then merge normally.
If you try to resolve the conflict through GitHub’s web editor instead, it works for simple cases but can get confusing for larger files. The local approach gives you more control.
Part 3: Plan your formative pitch (30 min)
Note to class teachers: This is free working time for teams. Circulate and check that each group has a sensible page taking shape and that they are creating Issues properly. If a group is stuck on what to write, point them to the checklist below.
Your formative pitch is on Monday 30 March (or Tuesday 31 March for some groups). You will present from whatever is on your GitHub repository. That means docs/index.md (your GitHub Pages site) and/or your Project Board.
Now that you know how to create Issues and work with branches, use this time to plan your pitch properly.
🎯 ACTION POINTS
- Create Issues for the tasks you need to complete before Monday. For example:
- “Draft project overview in docs/index.md”
- “List our data sources with API links”
- “Write one risk or open question for feedback”
- Update
docs/index.mdto include:- Your team name and members
- Your chosen track (WFP or self-chosen)
- Your research question (self-chosen) or the WFP problem as you understand it (WFP track)
- Data sources you plan to use (with links to APIs or documentation)
- A rough pipeline plan: what steps will your code follow, from raw data to final output?
- One risk or open question you want feedback on
- Commit and push. Confirm the page is live on your GitHub Pages site.
Reminder: The pitch does not need to be polished. We want to give you useful feedback, not watch a production. Show us your plan, show us your board, tell us what you are worried about.
Wrap-Up (5 min)
Note to class teachers: Quick check that every group has a Project Board with Issues and a
docs/index.mdready for Monday/Tuesday. Anyone without a group should be flagged immediately on Slack.
Before you leave, confirm that your team has:
- Each member has created a fun-facts file via a branch and merged a PR
- You have seen and resolved a merge conflict
- Your Project Board has Issues for the pitch tasks
- Your
docs/index.mdis updated and live on GitHub Pages
What’s coming:
- Monday 30 March / Tuesday 31 March: 🗣️ Formative Pitch presentations
- Wednesday 1 April, 8 pm: ✍️ Mini-Project 2 deadline
- W11 Lecture: Streamlit dashboards and website building for the group project
🔗 Useful Resources
Git Collaboration
Project Management
Course Links
- 🖥️ W10 Lecture
- 📦 Group Project
- 📔 Syllabus
- ✋ Contact Hours