📝 W02-W03 Formative Exercise
Enhancing Your ASCOR API with FastAPI and Pydantic Models
Last updated: 29 January 2025, 11:30
📣 A quick update from our teaching team:
We have discussed internally and decided to give everyone more time to practice with APIs and GitFlow. Here are some of our key decisions:
- 🗓️ We’re extending the formative deadline to Thursday, February 7th. (I, Jon, will still give you feedback this week if you manage to follow the Pull Request instructions)
- We’ll revisit the concepts of APIs in both the 🗣️ W03 Lecture and 💻 W03 Lab - you won’t want to miss these!
- 📓 I’ll update the syllabus to reflect these changes soon.
A small request: Try to work on this formative before our next lecture - it’ll help you get much more out of our discussions!
⏳ Duration
This exercise extends your W02 Lab work and should take about 2 hours to complete.
Deadline: Thursday, 6 February 2025, 20:00 GMT.
Objective
Building on the ASCOR API endpoint from the W02 Lab, you’ll implement data validation and structured responses using Pydantic models. The best solution to the challenge at the bottom will win a DSI water bottle 🎉
We’ll evaluate solutions based on:
- Clean, well-documented code
- Effective use of Pydantic models
- Proper handling of data hierarchy
- Clear Git commit history
These criteria mirror the upcoming summative assessment requirements.
📋 Preparation
Let’s make sure you’re ready:
Your W02 Lab endpoint should be working and returning data like this:
{
    "country": "United Kingdom",
    "assessment_year": 2024,
    "EP.1": "Partial",
    "EP.2": "Partial",
    "EP.3": "Partial",
    "CP.1": "Yes",
    "CP.2": "Partial",
    "CP.3": "No",
    "CP.4": "Partial",
    "CP.5": "Yes",
    "CP.6": "Partial",
    "CF.1": "No",
    "CF.2": "Exempt",
    "CF.3": "Yes",
    "CF.4": "",
}
If your endpoint isn’t quite working yet, use the model solution provided by your class teacher or ask a question on the
#helpchannel on Slack - we’ll help you get set up!
Task Structure
1️⃣ Your First Pydantic Model (30 min)
Let’s start simple! Just follow the steps below to learn how to convert our dictionary response into a structured Pydantic model.
💡 Why Pydantic? Pydantic ensures our API returns exactly what we promise. It validates data automatically and provides clear error messages when something’s wrong.
🎯 ACTION POINTS:
Keep your API running in one terminal window:
cd ascor-api
uvicorn main:app --reload
The
--reloadflag automatically restarts your server every time you make a change to your code.Create a new file at
v1/models.pyin your repository and add:from pydantic import BaseModel class CountryData(BaseModel): country: str assessment_year: int EP1: str EP_2: str EP_3: str CP_1: str CP_2: str CP_3: str CP_4: str CP_5: str CP_6: str CF_1: str CF_2: str CF_3: str CF_4: strThe above is a Python class that inherits from Pydantic’s
BaseModel. In itself it doesn’t do anything. Its purpose is to define a structure (or schema) for our data.Add an import to your endpoint in
v1/app.py:from .models import CountryDataThis will allow us to use the
CountryDatamodel in this other file.Now, change the response of the endpoint to use the new model and observe how the documentation changes:
@app.get("/v1/country-data/{country}/{assessment_year}", response_model=CountryData)
async def get_country_data(country: str, assessment_year: int ) -> CountryData:

    ... Keep your existing code here ...

    output = CountryData(country=output_dict['country'],
                         assessment_year=output_dict['assessment_year'],
                         EP_1=output_dict['EP.1'],
                         EP_2=output_dict['EP.2'],
                         EP_3=output_dict['EP.3'],
                         CP_1=output_dict['CP.1'],
                         CP_2=output_dict['CP.2'],
                         CP_3=output_dict['CP.3'],
                         CP_4=output_dict['CP.4'],
                         CP_5=output_dict['CP.5'],
                         CP_6=output_dict['CP.6'],
                         CF_1=output_dict['CF.1'],
                         CF_2=output_dict['CF.2'],
                         CF_3=output_dict['CF.3'],
                         CF_4=output_dict['CF.4'])
We will soon make this code look prettier but, for now, I want you to go save this and check the
/docspage of your API again.
What changes should you see?
The new model will be reflected in two places, as illustrated by the images below:
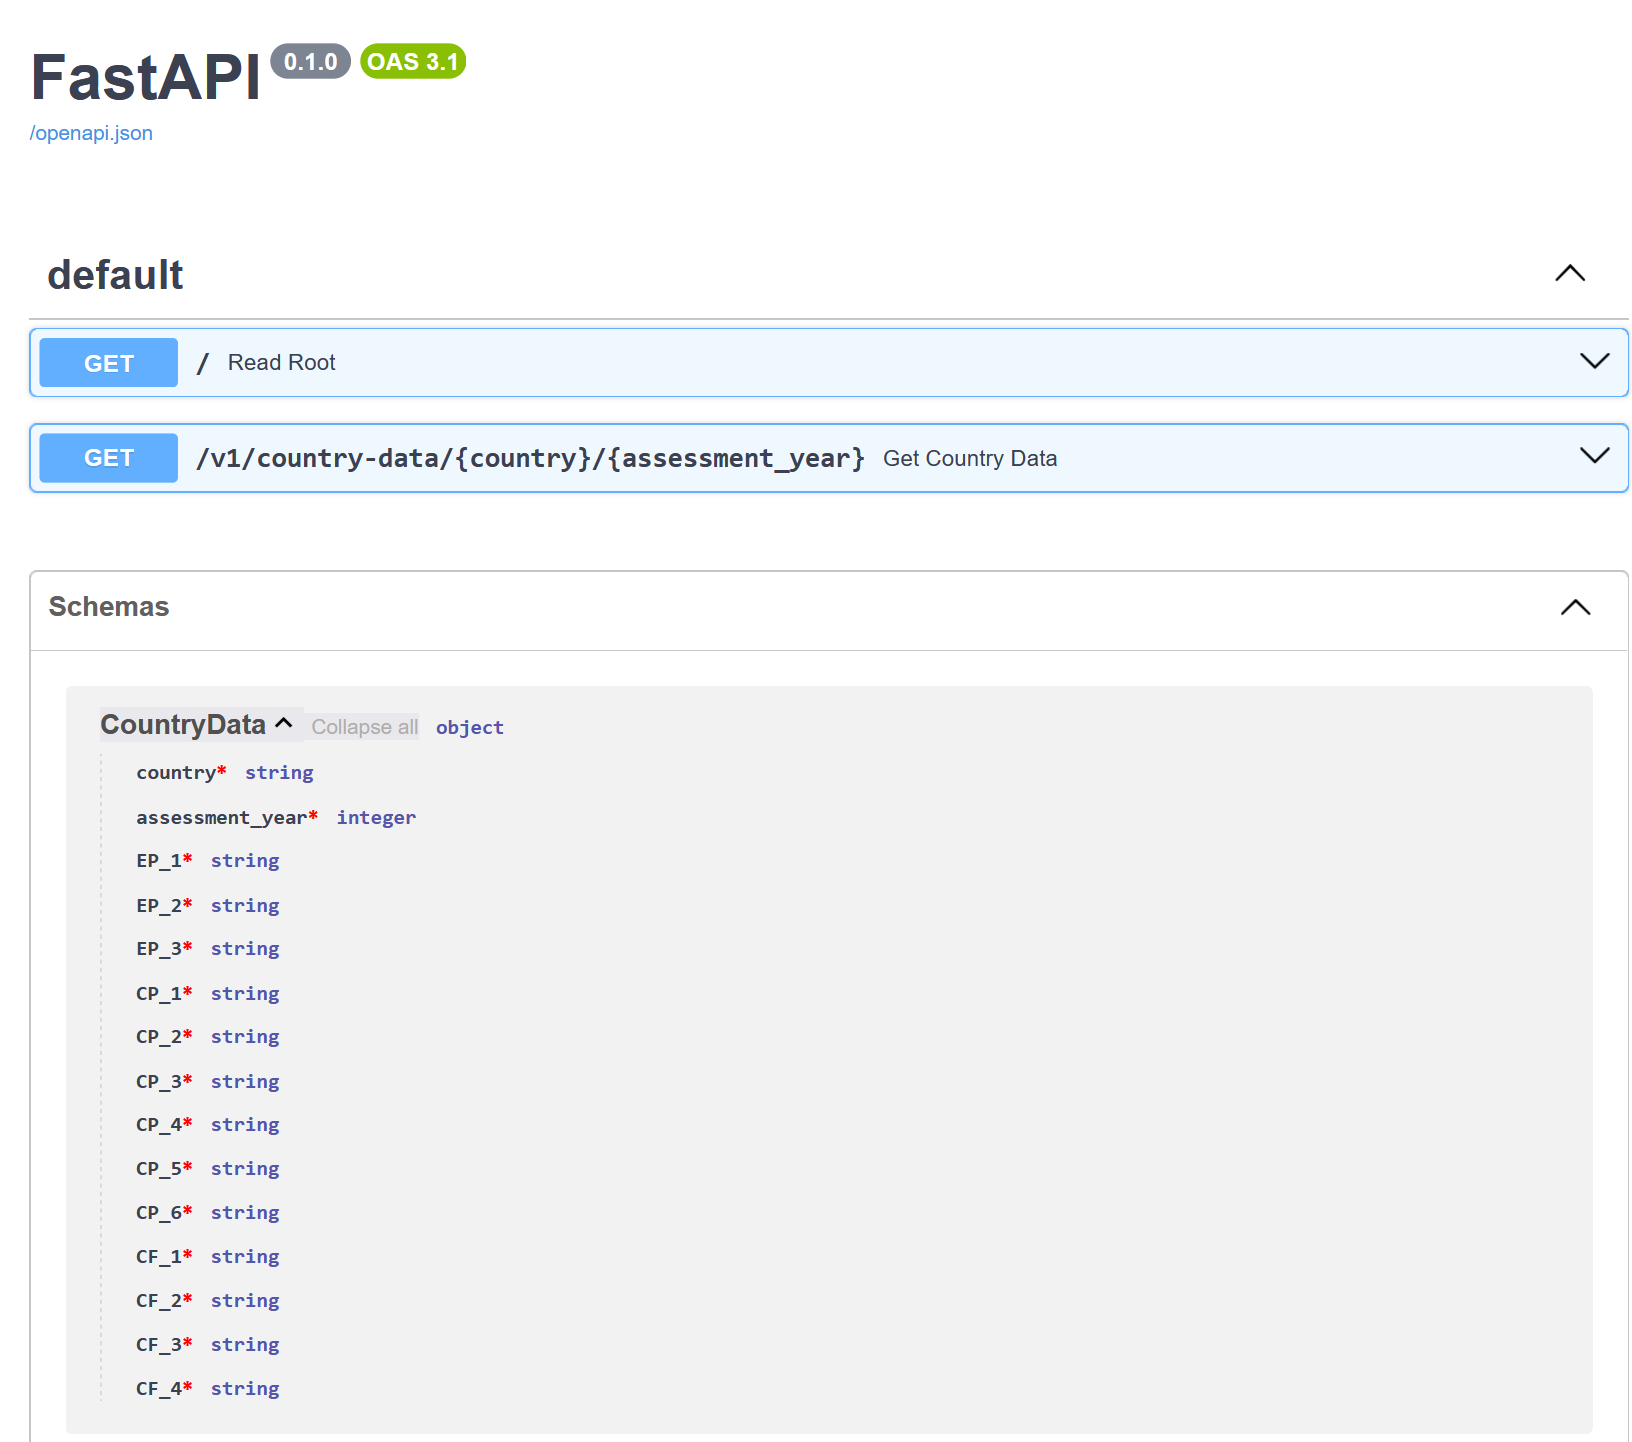
CountryData schema at the bottom
Let’s simplify our code!
One of the reasons we want to use a model is so that it is more transparent to a user what the API is returning, but it should also be easy enough to convert our dictionary into the model. We don’t want to be typing out every single key-value pair in the dictionary. We can do this by using the
**operator in Python.
Read more about the ** operator
The ** operator allows us to pass a dictionary as keyword arguments to a function.
In other words, if we have a function/class constructor that looks like this:
def my_function(a, b, c):
    return a + b + c
And we have a dictionary that looks like this:
my_dict = {'a': 1, 'b': 2, 'c': 3}We can pass it to the function like this:
my_function(**my_dict)This saves us the burden of having to type out every single key-value pair in the dictionary to match the function’s parameters.
As long as the names of the keys in the dictionary match the names of the parameters in the model, we can pass the dictionary to the model like this:
output = CountryData(**output_dict)To achieve that, you will have to replace the . symbol in the keys of the dictionary with an underscore _ so that they match the names of the parameters in the model.
I recommend that you edit your data pre-processing code to do this. If you are using the model solutions provided in the lab, you can replace the code that creates the remap_area_column_names dictionary with the following:
remap_area_column_names = {
    col: col.replace('area ', '').replace('.', '_')
    for col in area_columns
}
✅ Full Code Solution
Here’s how your endpoint function should look like at this stage:
@app.get("/v1/country-data/{country}/{assessment_year}", response_model=CountryData)
async def get_country_data(country: str, assessment_year: int) -> CountryData:

    selected_row = (
        (df_assessments["Country"] == country) &
        (df_assessments['Assessment date'].dt.year == assessment_year)
    )

    # Filter the data
    data = df_assessments[selected_row]

    # Selected and filter columns
    area_columns = [col for col in df_assessments.columns if col.startswith("area")]
    data = data[area_columns]

    # JSON does not allow for NaN or NULL.
    # The equivalent is just to leave an empty string instead
    data = data.fillna('')

    #Rename columns
    data['country'] = country
    data['assessment_year'] = assessment_year

    remap_area_column_names = {
        col: col.replace('area ', '').replace('.', '_')
        for col in area_columns
    }

    data = data.rename(columns=remap_area_column_names)

    # Grab just the first element (there should only be one anyway)
    # and return it as a dictionary
    output_dict = data.iloc[0].to_dict()

    output = CountryData(**output_dict)

    return output
Test your changes:
- Visit your API’s
/docspage - Try the endpoint with a country and year
- The response should look exactly the same as before!
- If something isn’t working as expected, post in the
#helpchannel on Slack
- Visit your API’s
Commit your progress. To signal that you’ve completed this part, keep updating your git branch. Here’s how:
First, make sure you’re in the right branch (the same one you created during the 💻 W02 Lab):
git checkout feature/country-endpoint-<your-github-username>Then, add and commit your changes:
git add models.py
git add v1/app.py
git commit -m "Add basic Pydantic model for API response"
git push
This stage of working Git is where I expect most of you to hit a roadblock. If you do, don’t worry! Just post in the
#helpchannel on Slack and we’ll help you out.
2️⃣ Ensuring Data Validation (40 min)
Models are also very useful for adding validation to our data. If we want to guarantee that the data we return always adheres to a certain structure, we can use Pydantic to enforce this.
🎯 ACTION POINTS:
Modify your
CountryDatamodel to include data validation:from pydantic import BaseModel, Field from typing import Literal # This helps us limit possible values class CountryData(BaseModel): country: str # Only allow years between 2023-2024 assessment_year: int = Field(ge=2023, le=2024) # Only allow specific values for assessment results EP_1: Literal["Yes", "No", "Partial", ""] EP_2: Literal["Yes", "No", "Partial", ""] EP_3: Literal["Yes", "No", "Partial", ""] # Keep the rest intact for nowTake a look at the documentation again. You should see the new validation rules displayed there:
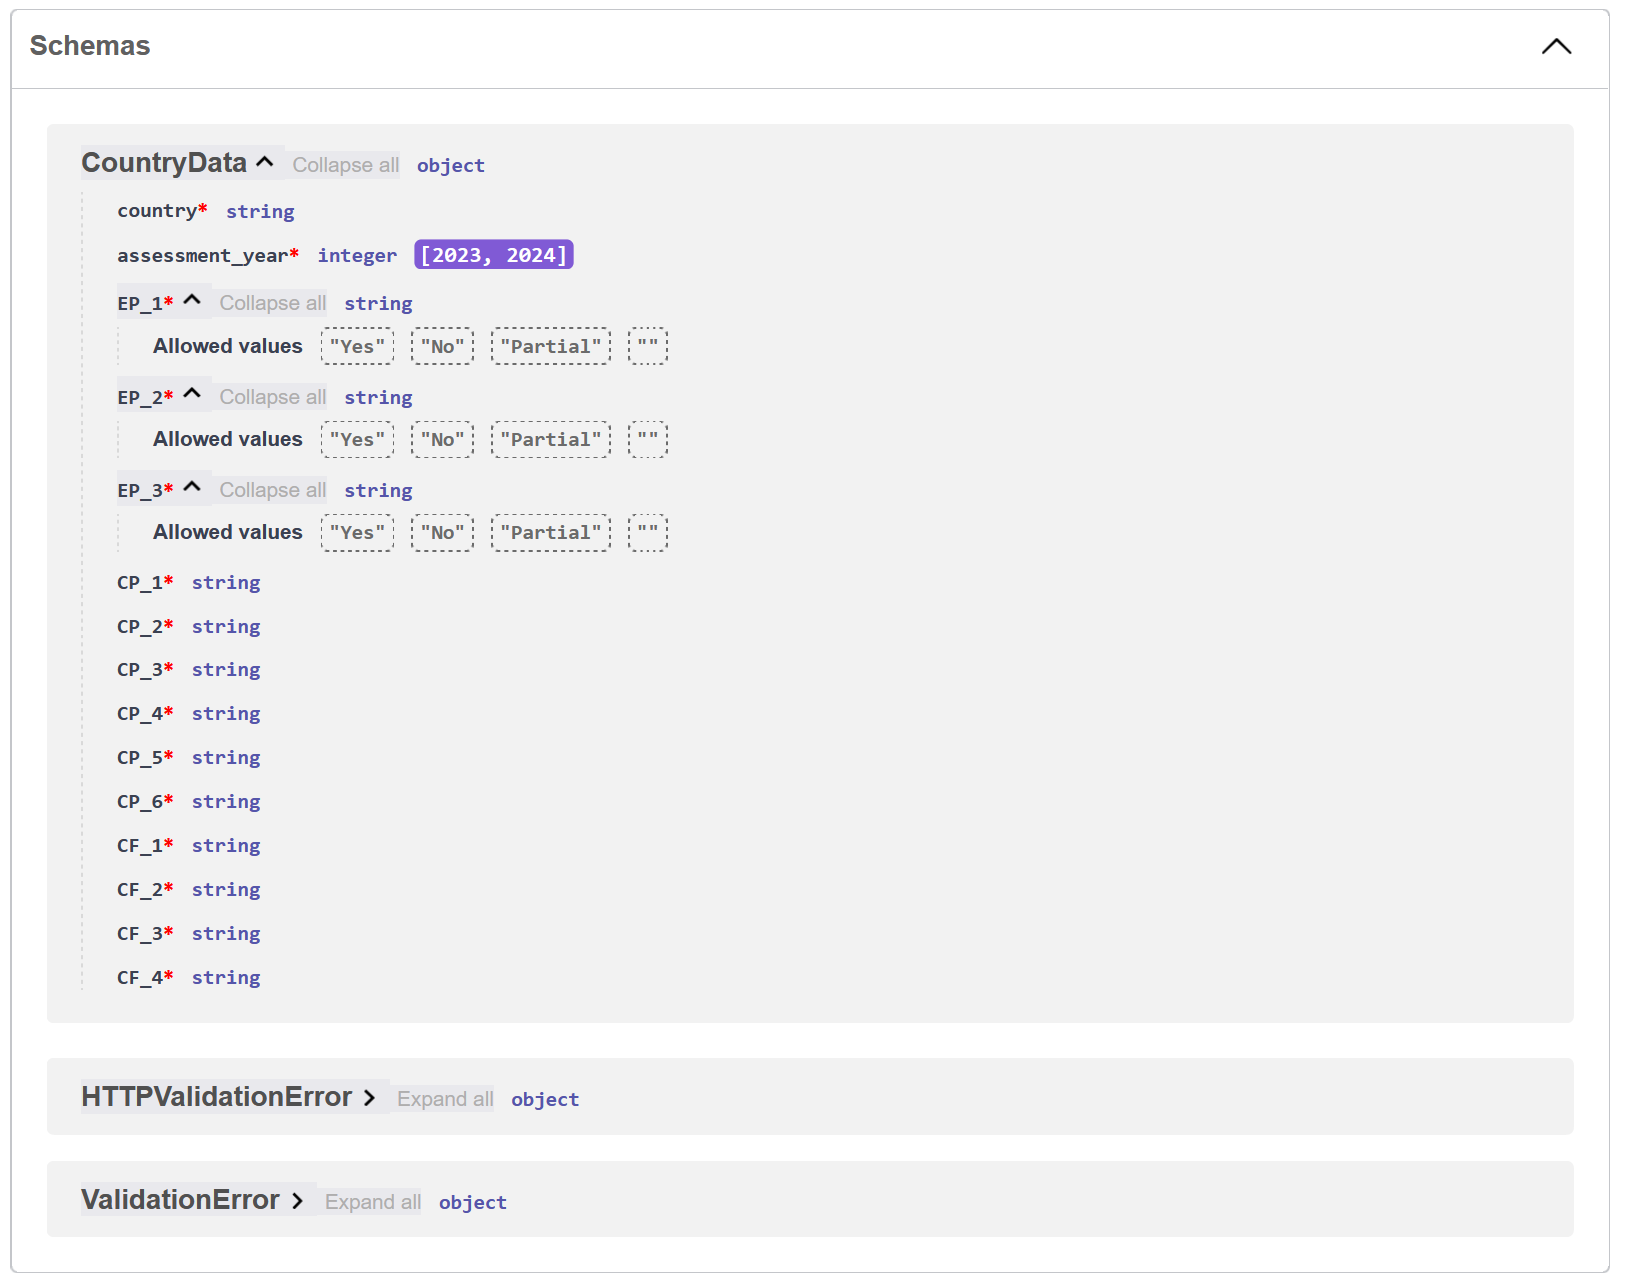
Figure 3. The documentation page of the API now shows the validation rules for the CountryDatamodelNow try to break the API on purpose! Query the API and use the year
2022. You should get a HTTP422response with a JSON output that represents an error with a message “Input should be greater than 2022”. This is Pydantic’s way of telling you that the year is out of range.
💡 Tip: Read more about the capabilities of Field.
To demarcate the end of this piece of work, commit these changes:
git commit -m "Add initial data validation to the Pydantic model"Now it’s your turn! Add validation rules for the remaining fields in the
CountryDatamodel. You can use theLiteraltype to restrict the possible values.- Do NOT assume that all other fields have the exact same literals (not all of them adhere to the list
["Yes", "No", "Partial", ""]) - Instead, use
df_assessments[area_column_name].unique()to get the unique values in each column - Always add the empty string
""as a possible value (in case the data is missing)
- Do NOT assume that all other fields have the exact same literals (not all of them adhere to the list
💡 Tip: In this section, we’re concerned with data validation on the Model layer. One could also apply validation on the Web Client side and prevent the user to send invalid queries in the first place. You can learn about string validations and numerical validations on the FastAPI documentation.
3️⃣ Hierarchy (20 min)
Finally, let’s structure our data to match the ASCOR hierarchy. This is the most challenging part and it’s OK if you can’t complete it all. Just give it a try!
🎯 ACTION POINTS:
Typically when working with API, we like to nest models to represent a hierarchy. For example, a CountryData model could contain an AreaData model, which in turn contains an Indicator model, and so on. This allows for more flexibility and better organisation of the data.
Let’s practice this by creating a model for each level of the hierarchy:
If we want to represent the hierarchy of the ASCOR data and we don’t want to fix the indicator names, we can replace our
CountryDatamodel with the following:class Area(BaseModel): indicators: dict[str, str] class CountryData(BaseModel): country: str assessment_year: int EP: Area CP: Area CF: AreaThis way, if ASCOR changes and adds new indicators, we don’t have to change our model. We can just add them to the dictionary.
Now notice what this change would mean to our Service layer (inside our endpoint function).
Right after the line where we create the
dataDataFrame, add:# Instead of a pandas DataFrame, # let's work with the pd.Series of the first row # The columns would then get moved to the index data = data.iloc[0]Then, create separate dictionaries for each area:
EP = {col: data[col] for col in data.index if col.startswith("EP")}
CP = {col: data[col] for col in data.index if col.startswith("CP")}
CF = {col: data[col] for col in data.index if col.startswith("CF")}
And our
output_dictwould also change:output_dict = { "country": country, "assessment_year": assessment_year, "EP": {"indicators": EP}, "CP": {"indicators": CP}, "CF": {"indicators": CF} }Finally, we would create the
CountryDatamodel just like before:output = CountryData(**output_dict)Test that it works and commit your progress. To signal that you’ve completed this part, keep updating your git branch. Here’s how:
🏆 Here comes a challenge (1 hour - ♾️)
If you’ve made it this far, you’re doing great!
Now can you come up with a neat way to specify the models.py and to reflect the changes in the app.py file so that the API returns a response that looks like this 1:
{
    "pillars": [
    {
        "name": "EP",
        "areas": [
            {
                "name": "EP.1",
                "assessment": "Partial",
                "indicators": [
                    {
                        "name": "EP.1.a",
                        "assessment": "Yes",
                        "metrics": ""
                    },
                    ...
                    {
                        "name": "EP.2.1",
                        "assessment": "Yes",
                        "metrics": {
                            "name": "EP.2.a.1",
                            "value": "-25%"
                        }
                    }
                ]
            }
        ]
    },
    {
        "name": "CP",
        "areas": [
            {
                "name": "CP.1",
                "assessment": "Partial",
                "indicators": [
                    ...
                ]
            },
            {
                ...
            }
        ]
    },
    {
        "name": "CF",
        "areas": [
            {
                "name": "CF.1",
                "assessment": "Partial",
                "indicators": [
                    ...
                ]
            },
            {
                ...
            }
        ]
    }
    ]
}
In other words, we want to nest the metrics (if they exist) inside the indicators, indicators inside the areas, and areas inside the pillars.
Whoever gets closer to solving this challenge or, if multiple solutions exist and one has particularly elegant and elements of intentional design, will be awarded the DSI water bottle! 🎉
Keep committing and pushing to avoid losing your work! In the spirit of mimicking a real-world scenario, I, Jon, will check the branches on Tuesday afternoon and give you feedback.
Footnotes
Thanks, Alex for proposing this data structure!↩︎