🔐 Week 02 | Day 03
API Authentication Patterns
ME204 – Data Engineering for the Social World
Dr Jon Cardoso-Silva
23 July 2025
API Authentication: Your Reference Guide
This deck contains copy-pasteable patterns for common API authentication methods.
💡 Purpose: Use these slides as a reference when working with APIs that require authentication. Each pattern can be adapted for different services.
First Things First: What is a REST API?
Think of APIs as Official Data Access
Think of APIs as developers of a company giving you explicit permission to access their data, provided you adhere to their rules.
Another Real-World Analogy (than the one about a restaurant)
Library System:
- You want a book → You ask the librarian
- Librarian checks: Are you allowed? Which book? How many?
- If approved → Librarian gets the book for you
- You follow the library’s rules (return on time, handle carefully)
API System:
- You want data → You make a request to the API
- API checks: Valid credentials? Correct format? Within limits?
- If approved → API returns the data you requested
- You follow the API’s rules (rate limits, authentication, data usage)
REST API Visual Flow
Why “REST” API?
REST = REpresentational State Transfer
What it means in practice:
- Uses standard HTTP methods
(GET,POST,PUT,DELETE) - URLs represent resources
(/users/123,/posts/456) - Responses typically in JSON format
- Stateless
(each request is independent of previous ones)
Example REST URL patterns:
GET /users/johndoe          → Get user info
GET /users/johndoe/posts    → Get user's posts
POST /posts                 → Create new post
PUT /posts/123              → Update post 123
DELETE /posts/123           → Delete post 123
HTTP Headers vs Parameters: The Fundamentals
Every HTTP Request Has Two Main Parts
🗂️ Headers (Metadata)
- What they are: Instructions about the request
- Where they go: Hidden from the URL
- Purpose: Authentication, content type, user agent
- Analogy: The envelope of a letter
Examples:
Authorization: Bearer abc123
Content-Type: application/json
User-Agent: MyApp/1.0
📋 Parameters (Query String)
- What they are: The actual data you’re requesting
- Where they go: Visible in the URL after
? - Purpose: Filtering, sorting, limiting results
- Analogy: The address on the envelope
Examples:
?limit=10&sort=date&category=newsVisual: Headers vs Parameters in Action
Code Example: Headers vs Parameters
❌ Wrong: Putting auth in parameters
Obviously: read the docs of the API you’re using to understand it!
Beyond Query Parameters: Other Types
So far we’ve only seen query parameters (in the URL). APIs use different parameter types:
1. Query Parameters (GET requests)
# Visible in URL after ?
params = {"limit": 10, "sort": "date"}
response = requests.get(url, params=params)
# Results in: https://api.example.com/data?limit=10&sort=date
2. Form Data (POST requests)
# Sent in request body, like a web form
data = {"username": "john", "message": "Hello world"}
response = requests.post(url, data=data)
3. JSON Data (POST/PUT requests)
What is a User-Agent Header?
User-Agent tells the API what application (WHO) is making the request.
Examples of User-Agent strings:
Chrome browser:
Mozilla/5.0 (Windows NT 10.0; Win64; x64)
AppleWebKit/537.36 Chrome/91.0.4472.124

Python requests:
python-requests/2.28.1

Your custom app:
MyWeatherApp/1.0 (contact@example.com)Some APIs require a User-Agent header
Some APIs may require you to identify yourself more explicitly in the user agent header.
From Wikimedia API (the organisation behind Wikipedia):
Requests (e.g. from browsers or scripts) that do not send a descriptive User-Agent header, may encounter an error message like this:
Scripts should use an informative User-Agent string with contact information, or they may be blocked without notice.
User-Agent required by Wikimedia
They ask people to use:
User-Agent: CoolBot/0.0 (https://example.org/coolbot/; coolbot@example.org) generic-library/0.0That is:
<client name>/<version> (<contact information>) <library/framework name>/<version> [<library name>/<version> ...]“Parts that are not applicable can be omitted.”
Inspecting HTTP Requests in Chrome
You can see the actual HTTP requests your browser makes:
Step 1: Open Chrome DevTools
- Right-click on any webpage → “Inspect”
- Or press F12 (Windows/Linux) or Cmd+Option+I (Mac)
Step 2: Go to Network Tab
- Click “Network” tab in DevTools
- Refresh the page (F5 or Cmd+R)
- Click on any request to see details
Inspecting HTTP Requests in Chrome (continued)
Step 3: Examine Request Details
You’ll see:
- Headers tab: All HTTP headers (Request & Response)
- Preview tab: Formatted response data
- Response tab: Raw response body
- Cookies tab: Session information
Try This Now!
- Open Chrome DevTools (F12)
- Go to Network tab
- Send a request to OpenMeteo API (or any other API or any other website)
- Click on the request to see headers
- Look for User-Agent in Request Headers!
Setting Headers in Python
Setting custom headers
headers = {
    "Authorization": "Bearer token123",
    "User-Agent": "ME204-Project/1.0",
    "Accept": "application/json"
}
response = requests.get(url, headers=headers)
Inspecting what was actually sent
It could look like this:
Understanding API “Apps”
What is an “App” in API Context?
Once we start connecting to new APIs, we will need to register our “app” with the API provider.
📱 “App” = Your Registered Application/Client
When you sign up for API access, you create an “app” which is just:
- A name for your project (e.g., “ME204 Weather Analysis”)
- A set of credentials (client ID, client secret, API key)
- Permission settings for what data you can access
Think of it as registering your code project with the API service, not building a mobile app!
API Registration Process
Hiding Secrets: Security Fundamentals
🕵️♂️ I will ask you to be good at hiding your API secrets!
(from unintended eyes)
Why We Hide API Credentials
What Happens If You Don’t Hide Secrets?
If you commit API keys to GitHub:
- Bots scan GitHub for exposed credentials within minutes
- Your API key gets stolen and used for malicious purposes
- You get charged for usage you didn’t make
- Your access gets revoked by the API provider
- Your project stops working
Real example: AWS bills for thousands of dollars from stolen keys!
Leaked API keys in the wild


The .env File Solution
Problem: You need credentials in your code, but can’t commit them to GitHub.
Solution: Store them in a .env file that stays on your computer only.
.env file (never commit this!)
Essential Security Setup
Step 1: Install python-dotenv
Step 2: Create .gitignore file
# Never commit these files
.env
*.env
.env.local
.env.production

# Also ignore common sensitive files
config.json
secrets.txt
credentials.csv
Step 3: Load in your Python code
Security Checklist
Before Every Commit
- Check your
.envfile exists and contains your secrets - Verify
.gitignoreincludes.env - Run
git status- make sure.envis NOT listed - Double-check your code uses
os.getenv(), not hardcoded keys - Test locally first before committing anything
Remember: Once something is on GitHub, it’s potentially public forever!
Let’s Put This Into Practice: Reddit Setup
Now that you understand the security principles, let’s set up Reddit API access together.
Reddit Account & App Creation
🎯 Follow along with these steps:
Create a Reddit account (if you don’t have one): reddit.com/register
Create a Reddit “app” for API access: reddit.com/prefs/apps
Follow these setup steps:
- Click “Create App” or “Create Another App”
- Name:
ME204_2025_YourName(e.g.,ME204_2025_JonCardoso) - App type: Script
- Description:
LSE ME204 Course - Reddit API Practice - About URL: Leave blank
- Redirect URI:
http://localhost:8000(required, but won’t be used)
Your Reddit App Credentials
After creating your app, you’ll see a screen like this:
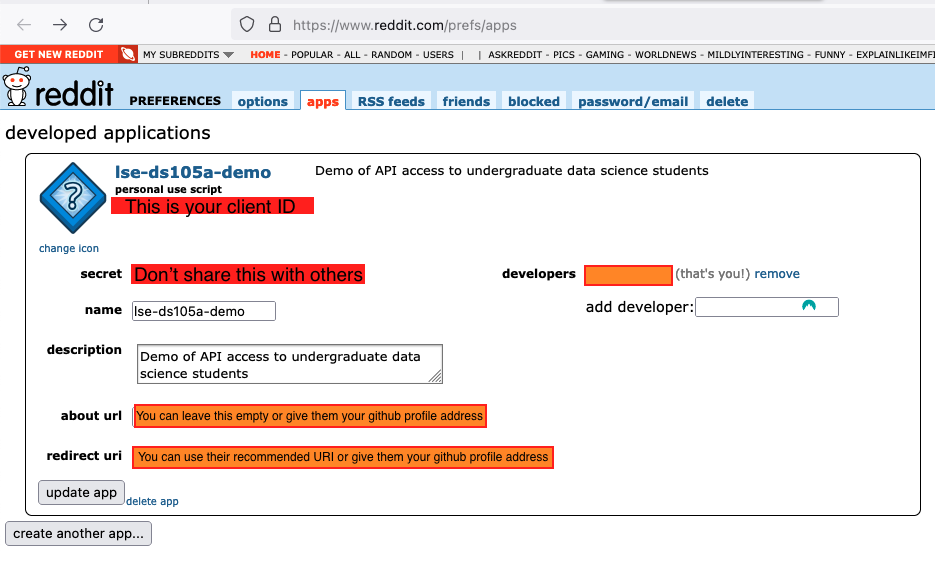
📝 Write down these 4 pieces of information:
- Reddit Username: Your Reddit username
- Reddit Password: Your Reddit password
- Client ID: The string under your app name (red box in image)
- Client Secret: The “secret” string (blue box in image)
Critical Security Reminder
NEVER put these credentials directly in your code or notebooks!
We’ll create a .env file in the next step to store them securely.
Moving to the Notebook
Now we’ll switch to hands-on coding!
What We’ll Do Next
- Open the lecture notebook:
ME204_W02D03_lecture.ipynb - Create a
.envfile with your Reddit credentials - Test the authentication step by step
- Move the notebook to your
me204-study-notesrepository - Verify your
.gitignoreprotects your.envfile
Let’s code together! 💻
🔚 Back to Theory: Authentication Mechanisms
[This section will be covered after the hands-on work]
The Authentication Spectrum
Increasing Security & Complexity →
Pattern 1: API Key Authentication
What You’ll Encounter
- Public APIs: OpenWeather, NewsAPI, many government APIs
- Simple services: When OAuth would be overkill
- Development/testing: Many APIs provide test keys
Real-World Examples
Google Maps Geocoding API: Part of Google Maps API that converts addresses to coordinates and vice versa.
Key looks like this:
AIzaSyDaGmWKa4JsXZ-HjGw7ISLn_3namBGewQe(see Geocoding API docs and their page about API keys).
OpenWeather API: Simple weather data access
Key looks like this:
1234567890abcdef(see OpenWeather API docs and their page about API keys).
Flow Diagram
Advantages
- Inherent simplicity - developers are familiar with API keys, making adoption quick
- Easy to implement and revoke
- Perfect for rate limiting and usage tracking
Limitations
- Less secure than authentication tokens - if stolen, can be used indefinitely until revoked
- Susceptible to interception if connection isn’t encrypted
- Lack fine-grained access controls found in more advanced methods like OAuth
Copy-Pasteable Code: API Key
If you need to work with an API that requires an API key, you will likely need code that looks like this:
Pattern 2: Basic Authentication
What You’ll Encounter
- Legacy systems: Older enterprise APIs
- Internal tools: Company-specific services with HTTPS
- Simple enterprise APIs: When OAuth would be overkill
Real-World Examples
- Greenhouse Harvest API: API to access data from hiring platform Greenhouse.

They also warn about API keys on their page!
Flow Diagram
Advantages
- Extremely simple - no cookies, session management, or login pages required
- Universal browser support
- Easy to implement and debug
Limitations
- Provides no confidentiality protection - credentials are merely Base64 encoded, not encrypted
- Not a secure method of user authentication and doesn’t protect transmitted entities
- Vulnerable to man-in-the-middle attacks if not used with HTTPS
- No built-in token expiration
Copy-Pasteable Code: Basic Auth
If you encounter an API that requires Basic Authentication, you will likely need code that looks like this:
Pattern 3: Bearer Token Authentication
What You’ll Encounter
- Modern REST APIs: Most current web services
- Cloud services: AWS, Azure, Google Cloud APIs
- Social media APIs: After OAuth flow completion
- Enterprise APIs: Microsoft Graph, Salesforce, etc.
Flow Diagram (Two steps)
Advantages
- Stateless authentication - no need to store user sessions on the server
- Compact and fast - efficiently transmitted in HTTP headers, ideal for APIs
- Can be used for both authentication and authorization with embedded claims
Limitations
- Once issued, JWTs cannot be revoked easily until they expire
- Token contents are readable by anyone - security through cryptographic signature, not secrecy
Copy-Pasteable Code: Bearer Token
If you encounter an API that requires Bearer Token authentication, you will likely need code that looks like this:
Pattern 4: OAuth 2.0 Authentication
What You’ll Encounter
- Major platforms: Google, GitHub, Reddit, Facebook APIs
- When user consent required: Accessing personal data
- Enterprise integrations: Connecting to company systems
- Most social media APIs: Twitter, LinkedIn, Instagram
Real-World Examples
- Google APIs: OAuth 2.0 for accessing user data like Google Drive
- Facebook/Meta Platform APIs: Social login and data access
- Reddit API: Comprehensive data gathering capabilities
- GitHub API: Repository and user management
OAuth 2.0 Flow Diagram
Advantages
- Enables limited access delegation without sharing passwords
- Users can revoke access to individual applications without changing passwords
- Fine-grained permission scopes
- Industry standard with broad ecosystem support
Limitations
- Steep learning curve for developers
- Complex implementation compared to simpler methods
- Requires careful handling of authorization codes and tokens
- Potential for security vulnerabilities if incorrectly implemented
The Four Grant Types
- Authorization Code: Most secure, for web applications
- Client Credentials: For server-to-server communication
- Device Code: For devices without browsers
- Refresh Token: For obtaining new access tokens
Secure Credential Management
The .env Pattern
.gitignore Template
Error Handling Essentials
Always Check Response Status
response = requests.get(url, headers=headers)

# This will raise an exception for 4xx and 5xx status codes
response.raise_for_status()

data = response.json()
Handle Common Errors
Common Header Patterns
API Documentation Quick Reference
| Service Type | Header Pattern | Example |
|---|---|---|
| API Key | X-API-Key |
{"X-API-Key": "abc123"} |
| Bearer Token | Authorization |
{"Authorization": "Bearer token123"} |
| Basic Auth | Authorization |
{"Authorization": "Basic dXNlcjpwYXNz"} |
| Custom | Service-specific | {"X-RapidAPI-Key": "key123"} |
User-Agent Requirements
Many APIs require a User-Agent header:
Remember These Key Points
Essential Patterns
- Store credentials in
.envfiles - Always check
response.raise_for_status() - Use
headersdictionary for tokens - Handle pagination for large datasets
- Test manually first, then automate
Resources & References
- Requests Documentation: requests.readthedocs.io
- OAuth 2.0 Guide: oauth.net
- HTTP Status Codes: httpstatuses.com
Remember: These slides are your reference toolkit. Bookmark them! 🔖

LSE Summer School 2025 | ME204 Week 02 Day 03