Week 03
Operating Systems, File Formats, and Introduction to Git/GitHub
DS105A – Data for Data Science
🗓️ 16 Oct 2025
1️⃣ Operating Systems
16:00 – 16:15
In your 📝 W03 Practice, you navigated through files and folders using the Terminal. This might have felt quite different from clicking around with your mouse!
Let’s understand what’s happening under the hood.
What an Operating System (OS) Does
A computer has four key components:
- Hardware provides the basic computing resources
- Operating System controls hardware and coordinates resource use
- Application Programs define how resources are used (Python, VS Code, web browsers)
- User requests actions from the computer
Examples of Operating Systems:
![]()
![]()
![]()
Ubuntu is a ![]() Linux distribution. Windows and macOS are proprietary operating systems.
Linux distribution. Windows and macOS are proprietary operating systems.
Why Different OSes Exist
Each operating system has its own history and philosophy:
UNIX & Linux
- UNIX: First major OS, developed at Bell Labs
- GNU/Linux: Free, open-source alternative
![]() Android phones use Linux
Android phones use Linux- macOS built on Darwin (a UNIX derivative)
Philosophy: Open, portable, simple
Windows
- Microsoft’s proprietary OS
- Evolved from MS-DOS → Windows 95 → Windows XP → Windows 10/11
- Dominant in desktop computing
- Office suite drove popularity
Philosophy: User-friendly, commercial
💡 Why this matters: Different OSes organise files differently and use different Terminal commands. Understanding this prevents frustration when tutorials use OS-specific syntax.
2️⃣ File Systems
16:15 – 16:30
Each OS organises files and directories differently. Every file has a path (its address in the system).
UNIX-like File Systems (Mac/Linux)
The directory structure starts from a single root directory called /:
💡 macOS uses /Users/ instead of /home/, but the structure is similar.
Windows File Systems
Windows uses drive letters (C:, D:, E:) where each drive is a separate filesystem:
⚠️ Windows uses \ (backslash) for paths, Mac/Linux use / (forward slash).
Absolute vs Relative Paths
We can specify file locations in two ways:
Absolute Path:
- Full location from the root directory
- Works from anywhere
- Examples:
- Mac/Linux:
/home/user/Documents/data.csv - Windows:
C:\Users\Username\Documents\data.csv
- Mac/Linux:
Relative Path:
- Location relative to where you are now
- More flexible for sharing code
- Examples:
./data.csv→ file in current directory../data.csv→ go up one level firstdata/weather.json→ file in data subfolder
💡 TIPs
- Use
pwdin Terminal to find where you are. - Always use relative paths in this course for reproducibility!
3️⃣ Environment Variables
16:30 – 16:35
Environment variables are system settings that programs use to find what they need.
What Are Environment Variables?
Special variables that store system-wide settings:
- Where programs are located (
PATH) - User’s home directory (
HOME) - Current directory (
PWD) - Temporary file locations (
TEMP)
🤔 Think about it: When you type python in Terminal, how does your computer know where the python program is?
Common Environment Variables
| Variable | Mac/Linux | Windows | Purpose |
|---|---|---|---|
$HOME |
/home/username/ |
%USERPROFILE% |
User’s home directory |
$PATH |
/usr/local/bin:/usr/bin/ |
C:\Windows\System32\;... |
Where OS looks for programs |
$PWD |
/home/username/Documents |
%CD% |
Current directory |
$TEMP |
/tmp/ |
%TEMP% |
Temporary files |
Try it now:
4️⃣ Terminal Commands & File Formats
16:35 – 16:50
Great notes from your 📝 W03 Practice! Let’s build on what you discovered.
Terminal Commands Quick Reference
UNIX/Mac/Linux (Nuvolos too!)
💡 Same goals, different commands. In this course, we use UNIX commands (Mac/Linux/Nuvolos).
Plain Text vs Binary Files
Not all files are the same! Understanding the difference helps you know which tools to use.
Plain Text Files:
- Human-readable when opened with text editors
- CSV, JSON, Python scripts (
.py), Markdown (.md) - Can view with
cat, edit withnanoor VS Code - Store data as characters using encoding like UTF-8
Binary Files:
- Not human-readable (gibberish if opened as text)
- Images (
.png,.jpg), PDFs, databases, executables - Need specific applications to open
- Store data as raw bytes
File Formats for Data Science
The two most common data formats you’ll work with:
CSV (Comma-Separated Values)
date,max_temp_c,conditions
2025-10-13,18,cloudy
2025-10-14,22,sunny
2025-10-15,19,rainy- Simple tabular data
- One row per line
- Columns separated by commas
- No nested structures
- Great for final results
Working with Files in Python
Let me show you how to save and read data files so you don’t need to re-download from APIs every time.
Demo Notebook: week03/W03-NB02-File-Formats.ipynb
We’ll cover:
- Collecting data from an API (recap)
- Writing/Reading JSON files
- Writing/Reading CSV files
- When to use each format
💡 This is critical for your 📝 W04 Practice: collect data once, save it, work from the saved file!
Writing JSON Files
Save API data so you don’t need to download it repeatedly:
What’s happening:
with open()creates a connection to the file'w'means write modejson.dump()writes the dictionary as JSONindent=2makes it human-readable- File closes automatically when done
Reading JSON Files
Read saved data without making another API call:
Benefits:
- ✅ Faster
(no network wait) - ✅ Works offline
- ✅ Respectful to API servers (no rate limits)
- ✅ Reproducible
(same data every time)
Writing CSV Files
Transform structured data into simple tabular format:
import csv

dates = loaded_data['daily']['time']
temps = loaded_data['daily']['temperature_2m_max']

# Write to CSV
with open('data/july_2024_temps.csv', 'w', newline='') as f:
    writer = csv.writer(f)

    # Header row
    writer.writerow(['date', 'max_temp_c'])

    # Data rows
    for i in range(len(dates)):
        writer.writerow([dates[i], temps[i]])

print("CSV created!")
💡 We use range(len(dates)) to iterate through indices, accessing both lists at the same position.
Reading CSV Files
Read CSV data back into Python:
This pattern matches what you learned in DataQuest this week!
When to Use JSON vs CSV
Use JSON when:
- Your data has nested structure
- You’re storing API responses
- You need to preserve exact data types
- Data has complex relationships
Example: Weather data with location info, multiple measurements, metadata
Use CSV when:
- Your data is simple rows and columns
- You want to open in Excel/Sheets
- You’re creating summary tables
- You need maximum compatibility
Example: Final heatwave counts per year (simple table)
💡 W04 Practice workflow: Collect from API → Save as JSON → Analyze → Export summary as CSV
💭 Quick Pair Discussion
Before our coffee break, let’s connect what you learned in 📝 W03 Practice to what we’ve covered today. Turn to someone near you (2-3 people).
Your task (3 minutes total):
Share one discovery (1.5 minutes): Each person briefly shares one thing that clicked from the Terminal work or file format exploration. Could be about
pwd/ls/cd, plain text vs binary files, or anything else.Share one challenge (1.5 minutes): What is something that you found difficult or confusing this week?
💡 Post in Slack: Drop your pair’s key insight in a thread on the #social channel. What was the most interesting connection you made?
☕ Coffee Break
16:50 – 17:00

After the break:
- Hands-on Git & GitHub setup
- Create your personal course repository
- Move your course files into version control
- Your first commit and push!
5️⃣ Git & GitHub Hands-On
17:00 – 18:00
This hour runs like a lab session. Follow along on your laptop!
What is Git? What is GitHub?
Git:
- Version control system (like “track changes” for code)
- Tracks every change to your files
- Lets you go back to previous versions
- Works on your computer (local)
GitHub:
- Website that stores Git repositories online
- Backup of your work in the cloud
- Makes collaboration possible
- Portfolio of your projects
💡 Think of it this way: Git is the engine, GitHub is the parking garage where you store your car.
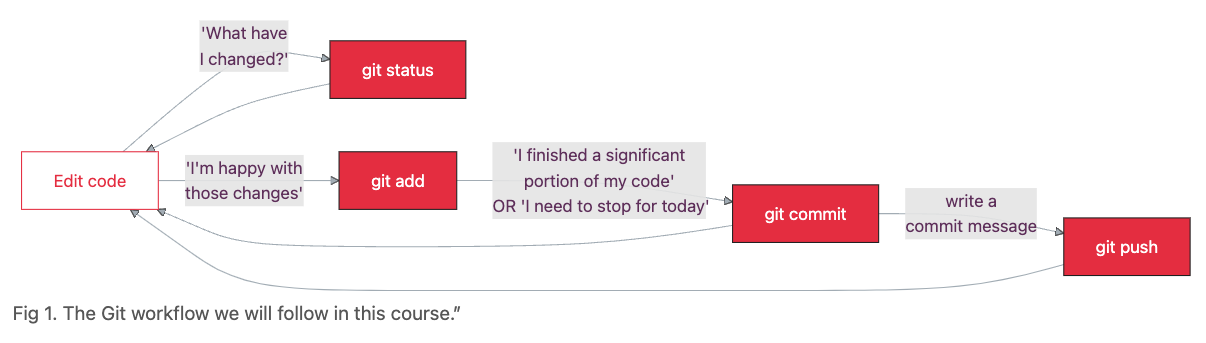
The Git Ceremony
Today’s Goal
By the end of this hour, you will have:
- ✅ Created a GitHub account
- ✅ Created a repository called
my-ds105a-notes - ✅ Cloned it to Nuvolos
- ✅ Moved your week01, week02, week03 folders into the repository
- ✅ Made your first commits
- ✅ Pushed your work to GitHub
Everything you need is in the guide on Moodle/website. We’ll work through it together!
The Git Ceremony
This workflow pattern will become muscle memory:
We’ll practice this ceremony multiple times today. By W04, it’ll feel natural!
Let’s Get Started!
Open the guide: Using GitHub & Git for Version Control
We’ll work through each step together.
💡 Don’t rush! Git feels overwhelming at first, but we’ll practice repeatedly over the coming weeks. Today is just exposure.
Thanks!
See you in Friday’s lab where you’ll practice Git workflows and start your 📝 W04 Practice!
💬 Questions? Post in the #help channel on Slack.
![]()
LSE DS105A (2025/26)